第一个spring小demo
工作中用spring有一年多了,基本弄懂了bean配置文件的配置,但是却没有对spring配置文件,加载有更多的认识,今天动手写了第一个spring的小demo。
这个demo之前是想做web版的,但是web的启动比较麻烦,不如直接使用main方法执行直观,所以,就使用main方法来读取配置文件,启动spring。
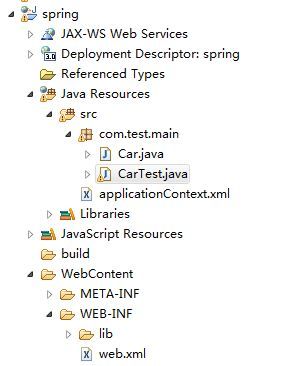
其中src部分是项目源码 和 配置文件applicationContext.xml
WebContent 目录下面的WEB-INF/lib 目录下面存放的是spring的jar包 和 项目用到的一些支撑jar包。
源码部分 Car 是实体类
CarTest 是main方法所在的程序入口
看一下Car 类内容
package com.test.main;

public class Car {

	private String brand;
	private String color;
	private int speed;

	public Car(){};

	public Car(String brand, String color, int speed) {
		this.brand = brand;
		this.color = color;
		this.speed = speed;
	}

	public String getBrand() {
		return brand;
	}

	public void setBrand(String brand) {
		this.brand = brand;
	}

	public String getColor() {
		return color;
	}

	public void setColor(String color) {
		this.color = color;
	}

	public int getSpeed() {
		return speed;
	}

	public void setSpeed(int speed) {
		this.speed = speed;
	}

	public String toString(){
		StringBuffer sb = new StringBuffer();
		sb.append("brand=" + brand)
		.append(";color=" + color)
		.append(";speed=" + speed);
		return sb.toString();
	}
}
为了更直观的看到car的内容,重写了toString方法,用来返回car的品牌、颜色等内容信息。
看一下CarTest的内容
package com.test.main;


import java.sql.SQLException;
import javax.sql.DataSource;

import org.springframework.beans.factory.BeanFactory;
import org.springframework.beans.factory.xml.XmlBeanFactory;
import org.springframework.context.ApplicationContext;
import org.springframework.context.support.ClassPathXmlApplicationContext;
import org.springframework.core.io.ClassPathResource;
import org.springframework.core.io.Resource;
import org.springframework.jdbc.core.JdbcTemplate;

public class CarTest {

	public static void main(String[] args) throws SQLException {

		// BeanFactory
		Resource cr = new ClassPathResource("applicationContext.xml");
		@SuppressWarnings("deprecation")
		BeanFactory bf = new XmlBeanFactory(cr);
		DataSource ds = bf.getBean("dataSource", DataSource.class);
		System.out.println(ds.getConnection().getMetaData().getDatabaseMinorVersion());

		// ApplicationContext
		@SuppressWarnings("resource")
		ApplicationContext context =
				new ClassPathXmlApplicationContext("classpath:applicationContext.xml");
		Car car = context.getBean("car" ,Car.class);
		System.out.println(car);

		JdbcTemplate jdbcTemplate = context.getBean("jdbcTemplate", JdbcTemplate.class);
		System.out.println(jdbcTemplate.getDataSource().toString());
	}
}
beanFactory部分,先利用ClassPathResource类来加载资源配置文件,然后通过XmlBeanFactory构造BeanFactory,再从beanFactory中获取bean。
applicationContext部分,直接通过ClassPathXMLApplicationContext来完成applicationContext的构造,然后从applicationContext中获取bean。
<?xml version="1.0" encoding="UTF-8" ?>
<beans xmlns="http://www.springframework.org/schema/beans"
	xmlns:xsi="http://www.w3.org/2001/XMLSchema-instance" xmlns:p="http://www.springframework.org/schema/p"
	xmlns:context="http://www.springframework.org/schema/context"
	xmlns:aop="http://www.springframework.org/schema/aop" xmlns:tx="http://www.springframework.org/schema/tx"
	xsi:schemaLocation="http://www.springframework.org/schema/beans
       http://www.springframework.org/schema/beans/spring-beans-3.0.xsd
       http://www.springframework.org/schema/context
       http://www.springframework.org/schema/context/spring-context-3.0.xsd
       http://www.springframework.org/schema/tx
       http://www.springframework.org/schema/tx/spring-tx-3.0.xsd
       http://www.springframework.org/schema/aop
       http://www.springframework.org/schema/aop/spring-aop-3.0.xsd">

    <bean id="car" class="com.test.main.Car">
		<property name="brand" value="Audi" />
		<property name="color" value="white" />
		<property name="speed" value="150" />
	</bean>

    <!-- 配置数据源 -->
	<bean id="dataSource" class="org.apache.commons.dbcp.BasicDataSource"
		destroy-method="close"
		p:driverClassName="com.mysql.jdbc.Driver"
		p:url="jdbc:mysql://localhost:3306/sampledb"
		p:username="root"
		p:password="root" />

	<!-- 配置Jdbc模板  -->
	<bean id="jdbcTemplate" class="org.springframework.jdbc.core.JdbcTemplate"
		p:dataSource-ref="dataSource" />

</beans>
文件中配置了三个bean,car,dataSource和jdbcTemplate。
car 的配置中,属性使用的是<property>标签,属性中包含name 和 value的形式。
dataSource和jdbcTemplate的配置中,属性部分采用的是p:命名空间,相当于单独的property属性配置。
其中 jdbcTemplate的属性配置中,通过ref 引用了dataSource属性,相当于
<property name="dataSource" ref="dataSource" />
接下来看一下运行效果。
四月 02, 2015 6:54:52 下午 org.springframework.beans.factory.xml.XmlBeanDefinitionReader loadBeanDefinitions
信息: Loading XML bean definitions from class path resource [applicationContext.xml]
6
四月 02, 2015 6:54:52 下午 org.springframework.context.support.ClassPathXmlApplicationContext prepareRefresh
信息: Refreshing org.springframework.context.support.ClassPathXmlApplicationContext@22e2d428: startup date [Thu Apr 02 18:54:52 CST 2015]; root of context hierarchy
四月 02, 2015 6:54:52 下午 org.springframework.beans.factory.xml.XmlBeanDefinitionReader loadBeanDefinitions
信息: Loading XML bean definitions from class path resource [applicationContext.xml]
四月 02, 2015 6:54:52 下午 org.springframework.beans.factory.support.DefaultListableBeanFactory preInstantiateSingletons
信息: Pre-instantiating singletons in org.springframework.beans.factory.support.DefaultListableBeanFactory@70317b12: defining beans [car,dataSource,jdbcTemplate]; root of factory hierarchy
brand=Audi;color=white;speed=150
org.apache.commons.dbcp.BasicDataSource@376f24cf
其中
6
brand=Audi;color=white;speed=150
org.apache.commons.dbcp.BasicDataSource@376f24cf
为我们打印的输出结果
这个就算是spring的helloworld示例了,希望赶紧进入到spring的世界中去。
