Android 屏幕适配(Supporting Different Screen Sizes)
<?xml version="1.0" encoding="utf-8"?>
<RelativeLayoutxmlns:android="http://schemas.android.com/apk/res/android"
    android:layout_width="match_parent"
    android:layout_height="match_parent">
    <TextView
        android:id="@+id/label"
        android:layout_width="match_parent"
        android:layout_height="wrap_content"
        android:text="Type here:"/>
    <EditText
        android:id="@+id/entry"
        android:layout_width="match_parent"
        android:layout_height="wrap_content"
        android:layout_below="@id/label"/>
    <Button
        android:id="@+id/ok"
        android:layout_width="wrap_content"
        android:layout_height="wrap_content"
        android:layout_below="@id/entry"
        android:layout_alignParentRight="true"
        android:layout_marginLeft="10dp"
        android:text="OK"/>
    <Button
        android:layout_width="wrap_content"
        android:layout_height="wrap_content"
        android:layout_toLeftOf="@id/ok"
        android:layout_alignTop="@id/ok"
        android:text="Cancel"/>
</RelativeLayout>

res/layout/main.xml, single-pane (default) layout:<LinearLayout xmlns:android="http://schemas.android.com/apk/res/android"
android:orientation="vertical"
android:layout_width="match_parent"
android:layout_height="match_parent">
<fragment android:id="@+id/headlines"
android:layout_height="fill_parent"
android:name="com.example.android.newsreader.HeadlinesFragment"
android:layout_width="match_parent"/>
</LinearLayout>res/layout-large/main.xml, two-pane layout:<LinearLayout xmlns:android="http://schemas.android.com/apk/res/android"
android:layout_width="fill_parent"
android:layout_height="fill_parent"
android:orientation="horizontal">
<fragment android:id="@+id/headlines"
android:layout_height="fill_parent"
android:name="com.example.android.newsreader.HeadlinesFragment"
android:layout_width="400dp"
android:layout_marginRight="10dp"/>
<fragment android:id="@+id/article"
android:layout_height="fill_parent"
android:name="com.example.android.newsreader.ArticleFragment"
android:layout_width="fill_parent"/>
</LinearLayout>
res/layout/main.xml, single-pane (default) layout:<LinearLayout xmlns:android="http://schemas.android.com/apk/res/android"
android:orientation="vertical"
android:layout_width="match_parent"
android:layout_height="match_parent">
<fragment android:id="@+id/headlines"
android:layout_height="fill_parent"
android:name="com.example.android.newsreader.HeadlinesFragment"
android:layout_width="match_parent"/>
</LinearLayout>res/layout-sw600dp/main.xml, two-pane layout:<LinearLayout xmlns:android="http://schemas.android.com/apk/res/android"
android:layout_width="fill_parent"
android:layout_height="fill_parent"
android:orientation="horizontal">
<fragment android:id="@+id/headlines"
android:layout_height="fill_parent"
android:name="com.example.android.newsreader.HeadlinesFragment"
android:layout_width="400dp"
android:layout_marginRight="10dp"/>
<fragment android:id="@+id/article"
android:layout_height="fill_parent"
android:name="com.example.android.newsreader.ArticleFragment"
android:layout_width="fill_parent"/>
</LinearLayout>
res/layout/main.xml:single-pane layoutres/layout-large:multi-pane layoutres/layout-sw600dp:multi-pane layout
res/layout/main.xml, single-pane layoutres/layout/main_twopanes.xml, two-pane layout
res/values-large/layout.xml:<resources>
<item name="main"type="layout">@layout/main_twopanes</item>
</resources>res/values-sw600dp/layout.xml:<resources>
<item name="main"type="layout">@layout/main_twopanes</item>
</resources>
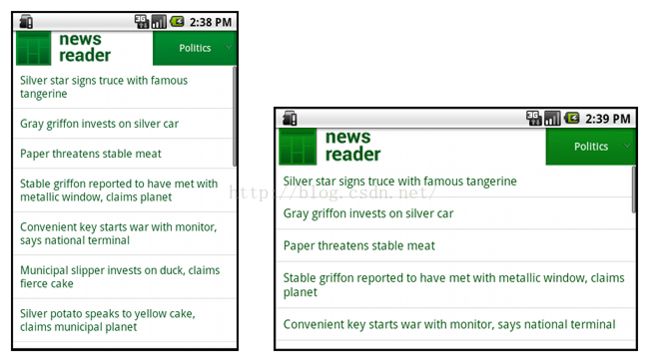
- small screen, portrait: single pane, with logo
- small screen, landscape: single pane, with logo
- 7" tablet, portrait: single pane, with action bar
- 7" tablet, landscape: dual pane, wide, with action bar
- 10" tablet, portrait: dual pane, narrow, with action bar
- 10" tablet, landscape: dual pane, wide, with action bar
- TV, landscape: dual pane, wide, with action bar
res/layout/onepane.xml:
<LinearLayout xmlns:android="http://schemas.android.com/apk/res/android"
    android:orientation="vertical"
    android:layout_width="match_parent"
    android:layout_height="match_parent">

    <fragment android:id="@+id/headlines"
              android:layout_height="fill_parent"
              android:name="com.example.android.newsreader.HeadlinesFragment"
              android:layout_width="match_parent"/>
</LinearLayout>
res/layout/onepane_with_bar.xml:
<LinearLayout xmlns:android="http://schemas.android.com/apk/res/android"
android:orientation="vertical"
android:layout_width="match_parent"
android:layout_height="match_parent">
<LinearLayout android:layout_width="match_parent"
android:id="@+id/linearLayout1"
android:gravity="center"
android:layout_height="50dp">
<ImageView android:id="@+id/imageView1"
android:layout_height="wrap_content"
android:layout_width="wrap_content"
android:src="@drawable/logo"
android:paddingRight="30dp"
android:layout_gravity="left"
android:layout_weight="0"/>
<View android:layout_height="wrap_content"
android:id="@+id/view1"
android:layout_width="wrap_content"
android:layout_weight="1"/>
<Button android:id="@+id/categorybutton"
android:background="@drawable/button_bg"
android:layout_height="match_parent"
android:layout_weight="0"
android:layout_width="120dp"
style="@style/CategoryButtonStyle"/>
</LinearLayout>
<fragment android:id="@+id/headlines"
android:layout_height="fill_parent"
android:name="com.example.android.newsreader.HeadlinesFragment"
android:layout_width="match_parent"/>
</LinearLayout>
res/layout/twopanes.xml:
<LinearLayout xmlns:android="http://schemas.android.com/apk/res/android"
    android:layout_width="fill_parent"
    android:layout_height="fill_parent"
    android:orientation="horizontal">
    <fragment android:id="@+id/headlines"
              android:layout_height="fill_parent"
              android:name="com.example.android.newsreader.HeadlinesFragment"
              android:layout_width="400dp"
              android:layout_marginRight="10dp"/>
    <fragment android:id="@+id/article"
              android:layout_height="fill_parent"
              android:name="com.example.android.newsreader.ArticleFragment"
              android:layout_width="fill_parent"/>
</LinearLayout>
res/layout/twopanes_narrow.xml:
<LinearLayoutxmlns:android="http://schemas.android.com/apk/res/android"
    android:layout_width="fill_parent"
    android:layout_height="fill_parent"
    android:orientation="horizontal">
    <fragmentandroid:id="@+id/headlines"
              android:layout_height="fill_parent"
              android:name="com.example.android.newsreader.HeadlinesFragment"
              android:layout_width="200dp"
              android:layout_marginRight="10dp"/>
    <fragmentandroid:id="@+id/article"
              android:layout_height="fill_parent"
              android:name="com.example.android.newsreader.ArticleFragment"
              android:layout_width="fill_parent"/>
</LinearLayout>
res/values/layouts.xml:
<resources>
    <item name="main_layout"type="layout">@layout/onepane_with_bar</item>
    <bool name="has_two_panes">false</bool>
</resources>
res/values-sw600dp-land/layouts.xml:
<resources>
    <item name="main_layout"type="layout">@layout/twopanes</item>
    <bool name="has_two_panes">true</bool>
</resources>
res/values-sw600dp-port/layouts.xml:
<resources>
    <item name="main_layout"type="layout">@layout/onepane</item>
    <bool name="has_two_panes">false</bool>
</resources>
res/values-large-land/layouts.xml:
<resources>
    <item name="main_layout"type="layout">@layout/twopanes</item>
    <bool name="has_two_panes">true</bool>
</resources>
res/values-large-port/layouts.xml:
<resources>
    <item name="main_layout"type="layout">@layout/twopanes_narrow</item>
    <bool name="has_two_panes">true</bool>
</resources>
7. 使用 9-patch bitmaps
Supporting different screen sizes usually means that your image resources must also be capable of adapting to different sizes. For example, a button background must fit whichever button shape it is applied to.
If you use simple images on components that can change size, you will quickly notice that the results are somewhat less than impressive, since the runtime will stretch or shrink your images uniformly. The solution is using nine-patch bitmaps, which are specially formatted PNG files that indicate which areas can and cannot be stretched.
Therefore, when designing bitmaps that will be used on components with variable size, always use nine-patches. To convert a bitmap into a nine-patch, you can start with a regular image (figure 4, shown with in 4x zoom for clarity).

Figure 4. button.png
And then run it through the draw9patch utility of the SDK (which is located in the tools/ directory), in which you can mark the areas that should be stretched by drawing pixels along the left and top borders. You can also mark the area that should hold the content by drawing pixels along the right and bottom borders, resulting in figure 5.

Figure 5. button.9.png
Notice the black pixels along the borders. The ones on the top and left borders indicate the places where the image can be stretched, and the ones on the right and bottom borders indicate where the content should be placed.
Also, notice the .9.png extension. You must use this extension, since this is how the framework detects that this is a nine-patch image, as opposed to a regular PNG image.
When you apply this background to a component (by setting android:background="@drawable/button"), the framework stretches the image correctly to accommodate the size of the button, as shown in various sizes in figure 6.

button.9.png
nine-patch in various sizes.

