QtQuick基础教程(三)---界面元素布局
本文详细介绍在QtQuick 基础教程(一)提到的界面元素布局设计。
QML中4种元素布局方式:绝对坐标(包括关联坐标)、锚(Anchors)、定位器(Poisitioners)、布局(Layout)。
这几个不能混用,否则会出现不可意料的错误。
绝对坐标
绝对坐标
这种方式直接给出元素的(x,y)坐标,简单明了。缺点是屏幕调整时(比如换个手机),很可能出现位置问题。示例代码及结果如下:
Rectangle {
    width: 200
    height: 200
    color: "red"

    Rectangle {
        x: 100
        y: 100
        width: 100
        height: 100
        color: "blue"

        Rectangle {
            width: 50
            height: 50
            color: "green"
        }
    }
}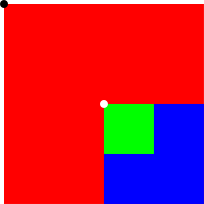
这个例子中,红包矩形是根元素,默认坐标是黑点(0,0),蓝色矩形是红色矩形子元素,其坐标(白点)相对于父元素平移(100,100),而绿色矩形是蓝色矩形的子元素,其默认坐标(白点)是其父元素的坐标(100,100)。
坐标绑定
与绝对坐标相似,不过引用了父元素。代码如下所示,结果与上一代码相同。
Rectangle {
    width: 200
    height: 200
    color: "red"

    Rectangle {
        x: parent.x + 100 // parent.x=0
        y: parent.y + 100 // parent.y=0
        width: 100
        height: 100
        color: "blue"

        Rectangle {
            width: 50
            height: 50
            color: "green"
        }
    }
}
锚(Anchors)
锚定位
锚是QtQuick中为方便布局提供了一种方式,提供了6种关系模式:左(left), 右(right), 垂直中心(vertical center), 顶(top), 底(bottom) and 水平中心(horizontal center)。具体如下图。
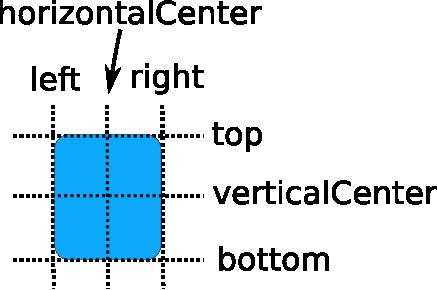
注:锚只作用于直接父元素,不要用于其他元素。
再上几个代码和示例。
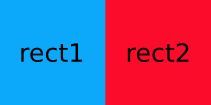
例1:
Rectangle { id: rect1; color: "blue"}
Rectangle { id: rect2; anchors.left: rect1.right; color: "red"}
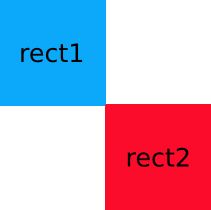
例2:
Rectangle { id: rect1; color: "blue"}
Rectangle { id: rect2; anchors.left: rect1.right; anchors.top: rect1.bottom; color: "red"}Rectangle { id: rect1; x: 0; color: "blue"}
Rectangle { id: rect2; anchors.left: rect1.right; anchors.right: rect3.left; color: "red"}
Rectangle { id: rect3; x: 150; color: "blue"}空隙和偏移
锚的空隙通过 anchors.margins 设定,共有4种:leftMargin, rightMargin, topMargin 和 bottomMargin。平移共有3种:horizontalCenterOffset, verticalCenterOffset 和 baselineOffset.。如图所示。
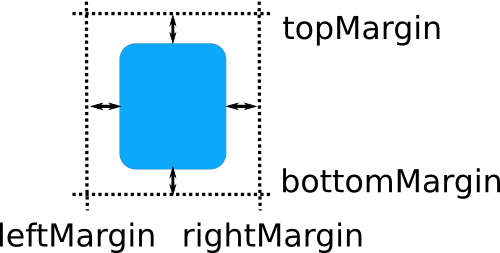
再来个示例代码:
Rectangle { id: rect1; color: "blue"}
Rectangle { id: rect2; anchors.left: rect1.right; anchors.leftMargin: 5; color: "red"}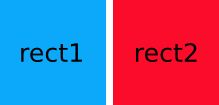
注:锚的margins**只在**设定锚关系后才生效。上段代码如果只是设定margins,但没有anchors.left: rect1.right这句,那么margin是不生效的。
定位器(Positioners)
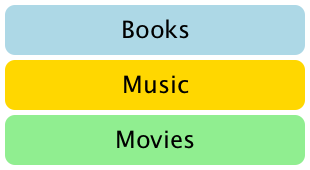
定位器有4种:Column、Row、Grid、Flow。定位器不改变其管理元素位置外的其他属性。下面给出其示例代码及效果。
定位器的处理定位的方式有些奇葩:前一个加到定位器中的元素是下一个元素的parent!!!
所以,在设定当前元素大小时,要用id属性访问其父元素来操作。千万不要直接用parent,这个bug调了我好久。。。
Column
import QtQuick 2.0
Item { width: 310; height: 170 Column { anchors.horizontalCenter: parent.horizontalCenter anchors.verticalCenter: parent.verticalCenter spacing: 5 Rectangle { color: "lightblue"; radius: 10.0; width: 300; height: 50 Text { anchors.centerIn: parent font.pointSize: 24; text: "Books" } }
        Rectangle { color: "gold"; radius: 10.0 ;width: 300; height: 50 Text { anchors.centerIn: parent font.pointSize: 24; text: "Music" } }
        Rectangle { color: "lightgreen"; radius: 10.0; width: 300; height: 50 Text { anchors.centerIn: parent font.pointSize: 24; text: "Movies" } }
    }
}
Row
import QtQuick 2.0
Rectangle { width: 320; height: 110 color: "#c0c0c0" Row { anchors.horizontalCenter: parent.horizontalCenter anchors.verticalCenter: parent.verticalCenter spacing: 5 Rectangle { width: 100; height: 100; radius: 20.0; color: "#024c1c" }
        Rectangle { width: 100; height: 100; radius: 20.0; color: "#42a51c" }
        Rectangle { width: 100; height: 100; radius: 20.0; color: "white" }
    }
}
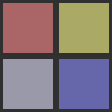
Grid
import QtQuick 2.0
Rectangle { width: 112; height: 112 color: "#303030" Grid { anchors.horizontalCenter: parent.horizontalCenter anchors.verticalCenter: parent.verticalCenter columns: 2; spacing: 6 Rectangle { color: "#aa6666"; width: 50; height: 50 }
        Rectangle { color: "#aaaa66"; width: 50; height: 50 }
        Rectangle { color: "#9999aa"; width: 50; height: 50 }
        Rectangle { color: "#6666aa"; width: 50; height: 50 }
    }
}
Flow
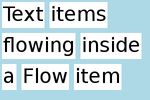
Flow类似于Grid,但不同在于它使用二级顺序,先排序第一级再排第二级。以下面代码为例,先排X向,再向Y向延伸。
import QtQuick 2.0
Rectangle { color: "lightblue" width: 300; height: 200 Flow { anchors.fill: parent anchors.margins: 4 spacing: 10 Text { text: "Text"; font.pixelSize: 40 }
        Text { text: "items"; font.pixelSize: 40 }
        Text { text: "flowing"; font.pixelSize: 40 }
        Text { text: "inside"; font.pixelSize: 40 }
        Text { text: "a"; font.pixelSize: 40 }
        Text { text: "Flow"; font.pixelSize: 40 }
        Text { text: "item"; font.pixelSize: 40 }
    }
}
布局
布局是Qt开发者最熟悉的了,这是Qt的一大特色,与QtWidgets中的Layouts功能相同。它比定位器功能要强,主要有以下几个功能:
- 设置对齐方式
- 调整自身大小及调整子对象大小(Layout不是子对象的父对象)
- 设置限制(比如最大宽度)
- 设置间距
效果与定位器相同,不再演示。
布局功能在qml中不大好用,google很久都没找到stretch属性怎么设置。
参考
coordinate system
positioning with anchors
item positioners types
QtQuick Layout
