Android学习总结
在Android 编程五要诀:Activity、Service、BroadcastReceiver、ContentProvider、Intent中我们大概了解了这五种要素,今天就这五要素谈谈我的心得吧。
一、Activity
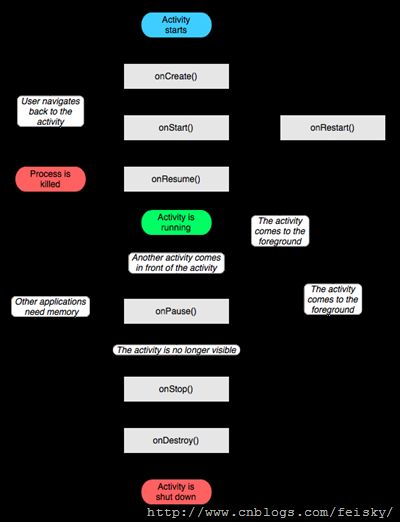
首先是生命周期,Activity的生命周期可以分为三组:
- The entire lifetime of an activity happens between the first call to
onCreate()onDestroy() -
The visible lifetime of an activity happens between a call to
onStart()onStop() -
The foreground lifetime of an activity happens between a call to
onResume()onPause()
Activity有三种基本状态:
- Active:处于屏幕前景(当前task的栈顶Activity处于Active状态),同一时刻只能有一个Activity处于Active状态;
- Paused状态:处于背景画面画面状态,失去了焦点,但依然是活动状态;
- stopped:不可见,但依然保持所有的状态和内存信息。
可以调用finish()结束处理Paused或者stopped状态的Activity。
各种状态之间通过下列的函数调用转换:
void onCreate(Bundle savedInstanceState)
void onStart()
void onRestart()
void onResume()
void onPause()
void onStop()
void onDestroy()
保存Activity状态
To capture that state before the activity is killed, you can implement an onSaveInstanceState()onPause() is called. It passes the method a Bundle object where you can record the dynamic state of the activity as name-value pairs. When the activity is again started, the Bundle is passed both to onCreate() and to a method that's called afteronStart(),onRestoreInstanceState()
Unlike onPause() and the other methods discussed earlier, onSaveInstanceState() andonRestoreInstanceState()are not lifecycle methods. They are not always called. BecauseonSaveInstanceState() is not always called, you should use it only to record the transient state of the activity, not to store persistent data. Use onPause() for that purpose instead.
要保存activity被杀死前的状态,你可以执行onSaveInstanceState()方法。Android调用这个方法应该在这个activity变得比较容易被销毁之前-也就是在调用onPause()之前。它传递一个Bundle对象给这个方法,该对象使用名称-值对记录activity的动态状态。当activity再次被启动时,这个Bundle被传递给onCreate() 和一个在onStart()之后被调用的方法,onRestoreInstanceState()
不同于onPause() 和之前讨论过的方法,onSaveInstanceState() 和onRestoreInstanceState()是没有生命周期的方法。他们不是每次都被调用。因为onSaveInstanceState() 没有每次被调用,你应该只使用它来记录activity的暂时状态,而不是存储永久数据。不过可以使用onPause() 代替。
启动另一个Activity的过程
onPause() method is called.onCreate(), onStart(), and onResume() methods are called in sequence.onStop() method is called.
onStart(), and onResume()然后,如果启动的activity不再被显示,它的 onStop() 被调用
Activity中常用的函数有SetContentView() findViewById() finish() startActivity(),其生命周期涉及的函数有:
void onCreate(Bundle savedInstanceState)
void onStart()
void onRestart()
void onResume()
void onPause()
void onStop()
void onDestroy()
注意的是,Activity的使用需要在Manifest文件中添加相应的<Activity>,并设置其属性和intent-filter。
借用代码为例:
AndroidManifest.xml程序清单
- <?xml version="1.0" encoding="utf-8"?>
- <manifest xmlns:android="http://schemas.android.com/apk/res/android"
- package="com.oristand" android:versionCode="1" android:versionName="1.0.0">
- <application android:icon="@drawable/icon" android:label="@string/app_name">
- <activity android:name=".LoginDemoActivity" android:label="@string/app_name">
- <intent-filter>
- <action android:name="android.intent.action.MAIN" />
- <category android:name="android.intent.category.LAUNCHER" />
- </intent-filter>
- </activity>
- <!-- login activity -->
- <activity android:name=".LoginActivity" android:label="@string/app_login"></activity>
- </application>
- </manifest>
如何改变Theme呢?在manifest里面将<application android:icon="@drawable/icon" android:label="@string/app_name">修改成:<application android:icon="@drawable/icon" android:label="@string/app_name" android:theme="@style/AppTheme">
在前篇文章中提到的permissions又是什么呢?
在<application。。。>之前添加如下permission,就有了执行一些功能的许可。在百度地图应用中,我们就需要添加如下的permissions。
<uses-permission android:name="android.permission.ACCESS_NETWORK_STATE" >
    </uses-permission>
    <uses-permission android:name="android.permission.ACCESS_FINE_LOCATION" >
    </uses-permission>
    <uses-permission android:name="android.permission.INTERNET" >
    </uses-permission>
    <uses-permission android:name="android.permission.WRITE_EXTERNAL_STORAGE" >
    </uses-permission>
    <uses-permission android:name="android.permission.ACCESS_WIFI_STATE" >
    </uses-permission>
    <uses-permission android:name="android.permission.CHANGE_WIFI_STATE" >
    </uses-permission>
    <uses-permission android:name="android.permission.READ_PHONE_STATE" >
    </uses-permission>

    <supports-screens
        android:anyDensity="true"
        android:largeScreens="true"
        android:normalScreens="true"
        android:resizeable="true"
        android:smallScreens="true" />
每个activity在manifest中都必须申明,如上面所写LoginDemoActivity和LoginActivity。
string.xml程序清单
- <?xml version="1.0" encoding="utf-8"?>
- <resources>
- <string name="app_name">LoginDemo</string>
- <string name="txt_btn_go">Go...</string>
- <string name="app_login">登录</string>
- <string name="txt_username">用户名:</string>
- <string name="txt_passwd">密 码:</string>
- <string name="txt_btn_login">登 录</string>
- <string name="txt_btn_reset">取 消</string>
- </resources>
LoginDemoActivity程序清单
- package com.oristand;
- import android.app.Activity;
- import android.content.Intent;
- import android.os.Bundle;
- import android.view.View;
- import android.widget.Button;
- public class LoginDemoActivity extends Activity {
- // 点击go按钮,进入登录活动(LoginActivity)
- private Button btn_go;
- // 按钮添加监听事件
- private BtnListener btnListener = new BtnListener();
- /** Called when the activity is first created. */
- @Override
- public void onCreate(Bundle savedInstanceState) {
- super.onCreate(savedInstanceState);
- setContentView(R.layout.main);
- // 丛当前试图中找到按钮,初始化
- btn_go = (Button) findViewById(R.id.btn_go);
- // 绑定点击事件
- btn_go.setOnClickListener(btnListener);
- }
- // 监听事件
- private class BtnListener implements View.OnClickListener {
- @Override
- public void onClick(View v) {
- // TODO Auto-generated method stub
- if (v.getId() == R.id.btn_go) {
- login();
- }
- }
- }
- // 通过Intent实现跳转
- public void login() {
- Intent intent_login = new Intent();
- intent_login.setClass(this, LoginActivity.class);
- startActivity(intent_login);
- }
- }
LoginActivity.java程序清单
- package com.oristand;
- import android.app.Activity;
- import android.os.Bundle;
- import android.view.View;
- import android.widget.Button;
- import android.widget.EditText;
- public class LoginActivity extends Activity {
- // 用户名输入框
- private EditText et_username;
- // 密码输入框
- private EditText et_passwd;
- // 登录按钮
- private Button btn_login;
- // 取消按钮
- Button btn_reset;
- // 按钮添加点击事件
- BtnListener btnListener = new BtnListener();
- @Override
- protected void onCreate(Bundle savedInstanceState) {
- // TODO Auto-generated method stub
- super.onCreate(savedInstanceState);
- // 设置当前视图
- setContentView(R.layout.login);
- // 从当前事件中找到输入框,初始化
- et_username = (EditText) findViewById(R.id.et_username);
- et_passwd = (EditText) findViewById(R.id.et_passwd);
- // 从当前事件中找到登录按钮,初始化
- btn_login = (Button) findViewById(R.id.btn_login);
- btn_login.setOnClickListener(btnListener);
- // ...
- btn_reset = (Button) findViewById(R.id.btn_reset);
- btn_reset.setOnClickListener(btnListener);
- }
- // 点击事件
- private class BtnListener implements View.OnClickListener {
- @Override
- public void onClick(View v) {
- // TODO Auto-generated method stub
- if (v.getId() == R.id.btn_login) {
- // do login...
- } else if (v.getId() == R.id.btn_reset) {
- finish();
- }
- }
- }
- }
main.xml程序清单
- <?xml version="1.0" encoding="utf-8"?>
- <LinearLayout xmlns:android="http://schemas.android.com/apk/res/android"
- android:orientation="vertical" android:layout_width="fill_parent"
- android:layout_height="fill_parent" android:gravity="center_vertical|center_horizontal">
- <Button android:id="@+id/btn_go" android:layout_width="wrap_content"
- android:layout_height="wrap_content" android:text="@string/txt_btn_go" />
- </LinearLayout>
login.xml程序清单
- <?xml version="1.0" encoding="utf-8"?>
- <TableLayout xmlns:android="http://schemas.android.com/apk/res/android"
- android:orientation="vertical" android:layout_width="fill_parent"
- android:layout_height="fill_parent">
- <TableRow android:orientation="horizontal"
- android:layout_width="fill_parent" android:layout_height="wrap_content">
- <TextView android:layout_width="fill_parent"
- android:layout_height="wrap_content" android:text="@string/txt_username" />
- <EditText android:id="@+id/et_username" android:maxLength="8"
- android:maxLines="1" android:layout_weight="1.0"
- android:layout_width="fill_parent" android:layout_height="wrap_content"
- android:text="" />
- </TableRow>
- <TableRow android:orientation="horizontal"
- android:layout_width="fill_parent" android:layout_height="wrap_content">
- <TextView android:layout_width="fill_parent"
- android:layout_height="wrap_content" android:text="@string/txt_passwd" />
- <EditText android:id="@+id/et_passwd" android:password="true"
- android:maxLength="10" android:maxLines="1" android:layout_weight="1.0"
- android:layout_width="fill_parent" android:layout_height="wrap_content"
- android:text="" />
- </TableRow>
- <LinearLayout android:orientation="horizontal"
- android:layout_width="fill_parent" android:layout_height="wrap_content">
- <Button android:id="@+id/btn_login" android:layout_width="fill_parent"
- android:layout_height="wrap_content" android:layout_weight="1.0"
- android:text="@string/txt_btn_login" />
- <Button android:id="@+id/btn_reset" android:layout_width="fill_parent"
- android:layout_height="wrap_content" android:layout_weight="1.0"
- android:text="@string/txt_btn_reset" />
- </LinearLayout>
- </TableLayout>
好了今天暂时写到这里,明天继续service。
参考资料:
http://www.cnblogs.com/feisky/archive/2010/01/16/1649081.html
http://www.cnblogs.com/feisky/archive/2010/01/01/1637427.html
http://bbs.iandroid.cn/android-9510-1-1.html
