Windows系统下Theano库的安装过程
系统:Windows 8.1
Python环境:Anaconda2
一、下载并安装Anaconda2
安装时注意:
1、选择为当前用户安装还是所有用户安装时使用默认选项;
2、勾选加入环境变量。
二、安装mingw和libpython
1、执行完第一步后,打开windows命令行,输入命令:
>conda list
可以看到Anaconda包含的库,里面没有mingw、libpython、theano(linux版本的Anaconda是包含theano库的)
2、安装mingw和libpython
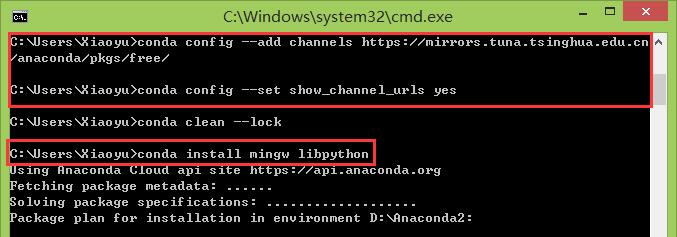
由于从国外的网站上下载包可能会很慢,这里提供一个方法,输入命令:
>conda config --add channels https://mirrors.tuna.tsinghua.edu.cn/anaconda/pkgs/free/
>conda config --set show_channel_urls yes
然后开始安装:
>conda install mingw libpython
可以看到网速很快,因为用的是清华的软件仓库源
当下载并安装完成后,验证是否成功,输入命令:
>gcc -v
会显示GCC版本等信息
三、安装theano
>pip install theano
四、最后的配置
在home文件夹(C:/user/{your name})下新建一个文本文档,取名为.theanorc.txt,并在里面输入如图所示内容
上图红框里的就是下图中的MinGW的路径,要根据实际情况自己修改
五、验证Theano
这时所有工作已经完成了,验证一下Theano是否能正常工作和编译C程序;新建一个python文件,输入以下代码:
import numpy as np
import time
import theano
A = np.random.rand(1000,10000).astype(theano.config.floatX)
B = np.random.rand(10000,1000).astype(theano.config.floatX)
np_start = time.time()
AB = A.dot(B)
np_end = time.time()
X,Y = theano.tensor.matrices('XY')
mf = theano.function([X,Y],X.dot(Y))
t_start = time.time()
tAB = mf(A,B)
t_end = time.time()
print("NP time: %f[s], theano time: %f[s] (times should be close when run on CPU!)" %(
                                           np_end-np_start, t_end-t_start))
print("Result difference: %f" % (np.abs(AB-tAB).max(), ))
正常情况,输出结果如下(Numpy和Theano运行时间差不多,都是调用相同模块来做矩阵乘法):
参考资料:
1、http://www.cnblogs.com/thkinglee/p/4966176.html
2、http://www.unjeep.com/q/441116062.htm
3、http://deeplearning.net/software/theano/install_windows.html#install-windows
4、https://mirrors.tuna.tsinghua.edu.cn/help/anaconda/


