android Tabhost控件的使用
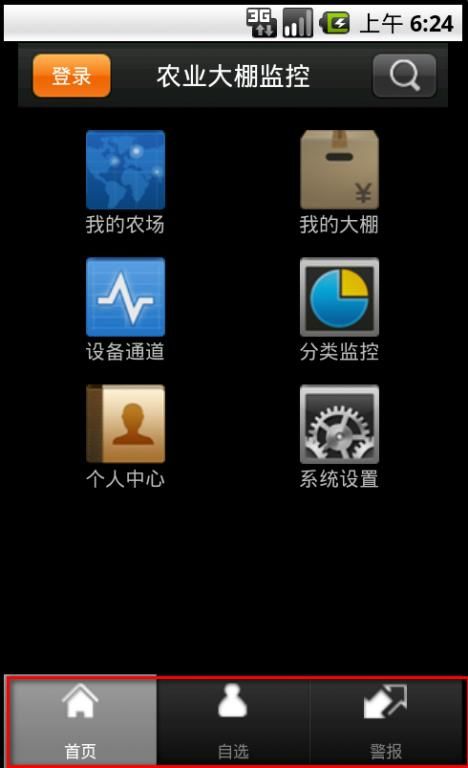
Tabhost用来实现如图的效果:
上图的首页、自选、警报是由Tabhost控件来实现的,Tabhost控件中的每个tab其实都是一个Activity,也就是说我创建一个Tabhost,在tabhost中添加tab页就可以实现。
实现方式:1、创建布局文件
<?xml version="1.0" encoding="UTF-8"?>
<LinearLayout xmlns:android="http://schemas.android.com/apk/res/android"
	android:layout_width="fill_parent" android:layout_height="fill_parent"
	android:orientation="vertical">
	<TabHost android:id="@android:id/tabhost" android:layout_width="fill_parent"
		android:layout_height="fill_parent">
		<FrameLayout android:id="@android:id/tabcontent"
			android:layout_width="fill_parent" android:layout_height="fill_parent"
			android:paddingBottom="50dp">
		</FrameLayout>
		<RelativeLayout android:layout_width="fill_parent"
			android:layout_height="fill_parent">
			<TabWidget android:id="@android:id/tabs"
				android:layout_width="fill_parent" android:layout_height="wrap_content"

				android:layout_alignParentBottom="true" />
		</RelativeLayout>
	</TabHost>
</LinearLayout>
最外层的LinerLayout的作用是为了解决布局出现的问题,因为在调试的时候时候出现分页所显示activity,但是不显示tab的标签也就是说红色的部分。有的时候显示标签但是不显示分页的activity,因此添加了LinearLayout进行区别。在中间Relativelayout的作用是实现了TabHost的底部显示,如果想实现顶部显示,去掉这个标签,且将FrameLayout放在TabWidget下面即可。代码如下:
<?xml version="1.0" encoding="UTF-8"?>
<LinearLayout xmlns:android="http://schemas.android.com/apk/res/android"
	android:layout_width="fill_parent" android:layout_height="fill_parent"
	android:orientation="vertical">
	<TabHost android:id="@android:id/tabhost" android:layout_width="fill_parent"
		android:layout_height="fill_parent">

		<TabWidget android:id="@android:id/tabs"
				android:layout_width="fill_parent" android:layout_height="wrap_content"
		/>
		<FrameLayout android:id="@android:id/tabcontent"
			android:layout_width="fill_parent" android:layout_height="fill_parent"
			android:paddingBottom="50dp">
		</FrameLayout>
	</TabHost>
</LinearLayout>
2、创建继承自TabActivity的Activity类TabsActivity
package cn.firefly.Activity;

import android.content.Intent;
import android.content.res.Resources;
import android.os.Bundle;
import android.view.View;
import android.widget.ImageView;
import android.widget.TabHost;
import android.widget.TabHost.TabSpec;
import android.widget.TextView;

public class TabsActivity extends TabActivity {
	private String[] tabName = new String[] { "首页", "自选", "警报" };//tab页的名称
	private int[] tabImg = new int[] { R.drawable.tab_home_page,//tab页显示的图片
			R.drawable.tab_select_ico, R.drawable.tab_warning };
	private Class[] classes = new Class[] { HomePageActivity.class,//每个tab页对应的Activity
			SelfSelectedActivity.class, WarningMsgActivity.class };

	@Override
	protected void onCreate(Bundle savedInstanceState) {
		// TODO Auto-generated method stub
		super.onCreate(savedInstanceState);
		setContentView(R.layout.tab);
		createTable();
	}

	private void createTable() {
		TabHost tabHost = getTabHost();
		Resources res = getResources();//动态生成Tab页
		for (int i = 0; i < tabName.length; i++) {
			TabSpec spec = tabHost.newTabSpec("tab" + i)
					.setIndicator(tabName[i], res.getDrawable(tabImg[i]))
					.setContent(new Intent(this, classes[i]));
			tabHost.addTab(spec);
			View view = tabHost.getTabWidget().getChildAt(i);
			view.getLayoutParams().height = 100;//设置tab页的高度
			((TextView) view.findViewById(android.R.id.title)).setTextSize(12);//显示文字的大小
			((ImageView) view.findViewById(android.R.id.icon)).setPadding(0,
					-5, 0, 0);//调整图片位置以避免图片和文字重叠
		}
		tabHost.setCurrentTab(0);
	}

}
3、在AndroidManifest.xml中设置tabsActivity
 <activity
            android:name=".TabActivity"
            android:theme="@style/fireFlyTheme" />
这里使用了自定义主题,请不懂的朋友查看我另外一篇博文《android 自定义样式》
转载请注明出处,谢谢。
