让linux下无线网卡变身随身wifi----hostapd移植
git clone git://w1.fi/srv/git/hostap.git
得到hostap目录,但是里面wpa_supplicant and hostapd的结合在一起,我们这里只需要hostapd
所以进入hostap/hostapd目录下编译
发现它依赖另外两个库,一个是前面移植过的libnl,还有一个是openssl
libnl移植过了就不需要移植了,这里移植一下openssl
移植文档:http://blog.csdn.net/x_nazgul/article/details/20149595
2、移植hostapd
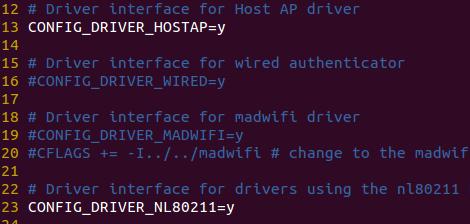
cp defconfig .config
vi .config
修改如下:

修改Makefile 指定编译器为arm-linux-gcc 指定ssl和libnl头文件的路径
修改CC=arm-linux-gcc 并且添加四句话

注意,这里的路径一点是要你移植的ssl库和libnl库对应的路径
如此,编译make
便可以得到hostapd
拷贝至开发板,运行hostapd –v
如果提示找不到库,记得把libnl生成的库拷贝到开发板中/lib中来 记得加上cp -a参数
# ./hostapd -v
    hostapd v2.2-devel
    User space daemon for IEEE 802.11 AP management,
    IEEE 802.1X/WPA/WPA2/EAP/RADIUS Authenticator
    Copyright (c) 2002-2014, Jouni Malinen <[email protected]> and contributors
a、Can't open RFKILL control device: No such file or directory
呵呵,得配置内核了,要是没有内核源码那就麻烦了,嘿嘿
b、ioctl(SIOCGIFBR) failed: Package not installed配置内核
--- Networking support │ │
│ │ Networking options ---> │ │
│ │ [ ] Amateur Radio support ---> │ │
│ │ < > CAN bus subsystem support ---> │ │
│ │ < > IrDA (infrared) subsystem support ---> │ │
│ │ < > Bluetooth subsystem support ---> │ │
│ │ -*- Wireless ---> │ │
│ │ < > WiMAX Wireless Broadband support ---> │ │
│ │ <*> RF switch subsystem support --->!!这需要选择!!!
3、配置文档
其实hostapd最关键的就是配置文档了,所以得东西都在里面
文档位置,在我们/hostap/hostapd目录下,也就是编译好的hostapd目录,有一个文件hostapd.conf
没错,就是他,那么我们得修改一些东西
这里有个介绍,我就不多说了:http://blog.chinaunix.net/uid-22028680-id-3574921.html
不过你不要自己去弄了,我弄一个配好的,你只需要修改
interface=wlan0//你无线网卡的设备名
wpa_passphrase=123456789 //密码
资源:http://blog.csdn.net/x_nazgul/article/details/20207989
把命令和配置文档放一起,然后
#./hostapd hostapd.conf
搞定,这个时候你应该可以搜索到test热点了 这个热点的名字你也可以再配置文档中修改的
你用手机连接了,可以输入密码132456789进行连接,连接上了,但是提示获取IP失败
喝喝,你懂得,DHCP开始上场了