This article shows how to build ArduPilot for Qualcomm® Snapdragon Flight™ Kit (Developer’s Edition) with Make on Linux.
Contents [hide]
- 1 Overview
- 2 Preconditions
- 2.1 Flashing the OS with QFIL on Windows
- 2.2 Get the source code
- 2.3 Get additional tools/libraries
- 3 Building for QURT
- 4 Building for QFLIGHT
- 5 Starting ArduPilot on boot
Overview
There are two ports of ArduPilot to this board:
- QFLIGHT runs mostly on the ARM cores, with just sensor and UARTs on the DSPs. This port is much easier to debug and you can use all of the normal Linux development tools.
- HAL_QURT runs primarily on the DSPs, with just a small shim on the ARM cores. This port has better performance due to its extremely accurate realtime scheduling, and is also more robust as it can keep flying if Linux crashes for some reason (the QFLIGHT port relies on both Linux and QURT working to keep flying). However it is harder to debug!
The build instructions for the two ArduPilot ports are almost exactly the same (both are covered here).
The instructions in this article demonstrate building for Copter (from the ArduCopter directory). Plane and Rover are build in the same way, from their respective vehicle source directories.
Preconditions
Flashing the OS with QFIL on Windows
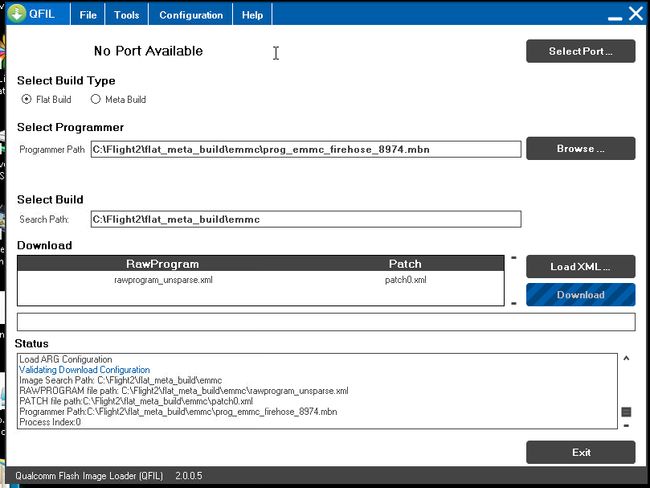
Boards purchased from Intrinsyc come pre-loaded with an operating system (i.e. Debian) but it may not if you receive a board from a different source. Use the instructions below to flash the OS onto the board from a Windows PC.
- Download and install QFIL (here – search for the green download button with “QPST 2.7.422” written below it).
- Put the board into bootloader mode by first powering the board using the power brick and then connect with a USB cable to your PC (note the board has a USB3.0 port but a normal micro USB cable will work)
- Start QFIL and the COM port the board is connected to should automatically appear to the left of the Select Port button. Normally it appears with the name “QDLoader 9008”.
- Under “Select Programmer” click the Browse button and find prog_emmc_firehose_8974.mbn (To-Do: which of the packages was this from?)
- Under “Download” the rawprogram_unsprse.xml” should be found automatically (?)
- Click the Download button and if all goes well the OS will be flashed to the board
Get the source code
First clone the source:
git clone https://github.com/diydrones/ardupilot.git
Get additional tools/libraries
To build ArduPilot for either port you will also need 3 library packages from Intrinsyc (download links are supplied when you buy the board):
- HEXAGON_Tools package, tested with version 7.2.11
- Hexagon_SDK packet, version 2.0
- HexagonFCAddon package, tested with Flight_BSP_1.1_ES3_003.2
These packages should all be unpacked in a $HOME/Qualcomm directory.
Building for QURT
To build Copter you do:
cd ArduCopter
make qurt -j4
Upload the firmware to the board by joining to the WiFi network of the board and entering the following command (where myboard is the hostname or IP address of your board):
make qurt_send FLIGHT_BOARD=myboard
This will install two files:
/root/ArduCopter.elf
/usr/share/data/adsp/libardupilot_skel.so
To start ArduPilot just run the .elf file as root on the flight board.
/root/ArduCopter.elf
By default ArduPilot will send telemetry on UDP 14550 to the local WiFi network. Just open your favourite MAVLink compatible GCS and connect with UDP.
Building for QFLIGHT
To build Copter for QFLIGHT do:
cd ArduCopter
make qflight -j4
Upload the firmware to the board by joining to the WiFi network of the board and entering the following command (where myboard is the hostname or IP address of your board):
make qflight_send FLIGHT_BOARD=myboard
This will install two files:
/root/ArduCopter.elf
/usr/share/data/adsp/libqflight_skel.so
To start ArduPilot just run the .elf file as root on the flight board. You can control UART output with command line options. A typical startup command would be:
/root/ArduCopter.elf -A udp:192.168.1.255:14550:bcast -e /dev/tty-3 -B qflight:/dev/tty-2 --dsm /dev/tty-4
That will start ArduPilot with telemetry over UDP on port 14550, GPS on tty-2 on the DSPs, Skektrum satellite RC input on tty-4 and ESC output on tty-3.
By default ArduPilot will send telemetry on UDP 14550 to the local WiFi network. Just open your favourite MAVLink compatible GCS and connect with UDP.
Starting ArduPilot on boot
You can also set up ArduPilot to start on boot by adding the startup command to /etc/rc.local. For example, on QURT build you’d add the line:
/root/ArduCopter.elf &
