直线拟合,图像组件轮廓的检测和计算机描述
四、直线拟合
在一些应用,不仅要求检测出图像中的直线,还要求对图像中的直线精准的估计出位置和方向。下面我们将介绍opencv中如何通过一些点拟合出最适合的直线。
直线拟合的主要原理是,最小二乘法,即计算各点与直线的最小距离,求出最小距离之和的直线就是最合适的直线。
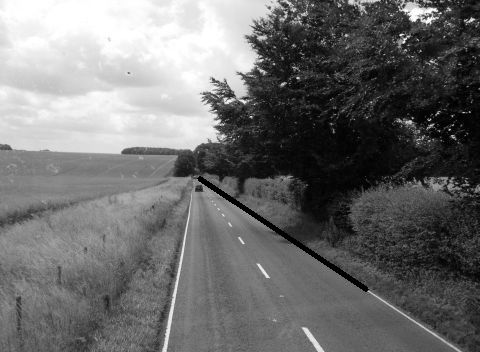
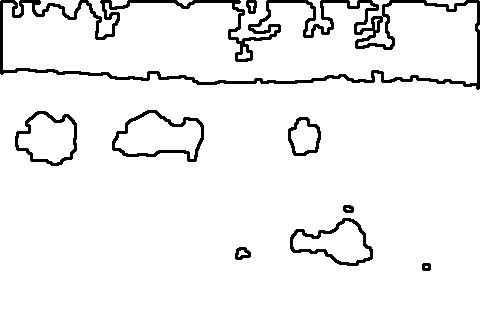
我们选择前面通过概率霍夫变换(cv::HoughLinesP)求出的第一个线段为实例,与Canny算子实现出的边缘按位与,得到一系列边缘点,程序和结果如下:
        // Display one line
	image= cv::imread("road.jpg",0);
	int n=0;
	cv::line(image, cv::Point(li[n][0],li[n][1]),cv::Point(li[n][2],li[n][3]),cv::Scalar(255),5);
	cv::namedWindow("One line of the Image");
	cv::imshow("One line of the Image",image);
	cv::imwrite("One line of the Image.jpg",image);

	// Extract the contour pixels of the first detected line
	cv::Mat oneline(image.size(),CV_8U,cv::Scalar(0));
	cv::line(oneline, cv::Point(li[n][0],li[n][1]),cv::Point(li[n][2],li[n][3]),cv::Scalar(255),5);
	cv::bitwise_and(contours,oneline,oneline);
	cv::Mat onelineInv;
	cv::threshold(oneline,onelineInv,128,255,cv::THRESH_BINARY_INV);
	cv::namedWindow("One line");
	cv::imshow("One line",onelineInv);
	cv::imwrite("One line.jpg",onelineInv);
One line of the Image.jpg
One line.jpg
然后将这条直线存入Point中
	std::vector<cv::Point> points;

	// Iterate over the pixels to obtain all point positions
	for( int y = 0; y < oneline.rows; y++ ) {

		uchar* rowPtr = oneline.ptr<uchar>(y);

		for( int x = 0; x < oneline.cols; x++ ) {

		    // if on a contour
			if (rowPtr[x]) {

				points.push_back(cv::Point(x,y));
			}
		}
    }
最后通过opencv提供的cv::fitLine函数,进行直线拟合,
        cv::Vec4f line;
	cv::fitLine(cv::Mat(points),line,CV_DIST_L2,0,0.01,0.01);

	std::cout << "line: (" << line[0] << "," << line[1] << ")(" << line[2] << "," << line[3] << ")\n";

	int x0= line[2];
	int y0= line[3];
	int x1= x0-200*line[0];
	int y1= y0-200*line[1];
	image= cv::imread("road.jpg",0);
	cv::line(image,cv::Point(x0,y0),cv::Point(x1,y1),cv::Scalar(0),3);
	cv::namedWindow("Estimated line");
	cv::imshow("Estimated line",image);
五、检测组件的轮廓
图像是由组件组成,图像分析的一个目标就是检测和提取这些目标物体。在目标检测、识别中,第一步就是禅城一个二值图像,使我们能够粗略的估计感兴趣区域的大概位置,无论二值图像是怎么获得的(例如直方图映射,运动分析等等中获得),第二步就是从这些0,1集合中检测出目标。
5.1 检测组件轮廓的实现
我们以下面图形为例子(打开和关闭的形态学滤波操作后加上简单的门限处理形成的图形),介绍怎么检测目标组件。
opencv提供简单的函数cv::findContours:
函数定义:
//! retrieves contours and the hierarchical information from black-n-white image.
CV_EXPORTS_W void findContours( InputOutputArray image, OutputArrayOfArrays contours,
                              OutputArray hierarchy, int mode,
                              int method, Point offset=Point());

//! retrieves contours from black-n-white image.
CV_EXPORTS void findContours( InputOutputArray image, OutputArrayOfArrays contours,
                              int mode, int method, Point offset=Point());
函数使用实例:
// Get the contours of the connected components
	std::vector<std::vector<cv::Point>> contours;
	cv::findContours(image,
		contours, // a vector of contours
		CV_RETR_EXTERNAL, // retrieve the external contours
		CV_CHAIN_APPROX_NONE); // retrieve all pixels of each contours
int mode:
CV_RETR_EXTERNAL: 只对轮廓外面检索,内部洞的检索忽略(上面的图)
CV_RETR_LIST, // retrieve all contours :对所有轮廓检索(下面的图)
int method:
CV_CHAIN_APPROX_NONE:检测所有的边界
OutputArray hierarchy: 当轮廓检测选择CV_RETR_LIST,时,轮廓中有小洞,这是就可以建立等级,大轮廓包含小轮廓的等级。
轮廓显示程序:
// draw black contours on white image
	cv::Mat result(image.size(),CV_8U,cv::Scalar(255));
	cv::drawContours(result,contours,
		-1, // draw all contours
		cv::Scalar(0), // in black
		2); // with a thickness of 2
两种模式检索出的结果如下:
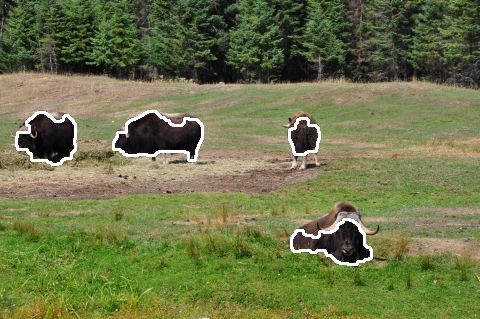
     // Eliminate too short or too long contours 删除太长和太短的轮廓
	int cmin= 100;  // minimum contour length
	int cmax= 1000; // maximum contour length
	std::vector<std::vector<cv::Point>>::const_iterator itc= contours.begin();
	while (itc!=contours.end()) {

		if (itc->size() < cmin || itc->size() > cmax)
			itc= contours.erase(itc);
		else
			++itc;
	}

	// draw contours on the original image
	cv::Mat original= cv::imread("group.jpg");
	cv::drawContours(original,contours,
		-1, // draw all contours
		cv::Scalar(255,255,255), // in white
		2); // with a thickness of 2

	cv::namedWindow("Contours on Animals");
	cv::imshow("Contours on Animals",original);
	cv::imwrite("Contours on Animals.jpg",original);
程序结果:
六、组件轮廓的描述
一个组件经常对应一个图形中具体的一个物体,检测这个物体,或者同其他物体进行比较,或者根据组件的轮廓特征进行提取,都是组件描述的应用。这节中我们将介绍opencv中几种常见的组件描述。
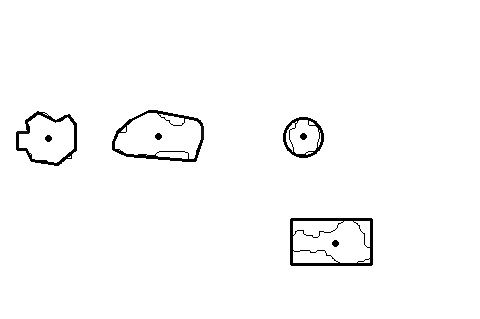
bounding box:边界矩形,
enclosing circle:封闭圆
approximate polygon:近似多边形
convex hull:凸包 即形状最小的凸多边形
opencv中还提供一些组件轮廓形状的描述和其他功能函数
如:cv::minAreaRect 最小面积矩形,可以倾斜的在组件轮廓上选择矩阵面积最小的长和宽
cv::contourArea 估计组件的面积,即像素点的多少
cv::pointPolygonTest 判断一个点在轮廓里面还是外面
cv::matchShapes 测量两个组件轮廓的相似性
组件轮廓形状的程序实例:
	image= cv::imread("binaryGroup.bmp",0);

	// testing the bounding box
	cv::Rect r0= cv::boundingRect(cv::Mat(contours[0]));
	cv::rectangle(result,r0,cv::Scalar(0),2);

	// testing the enclosing circle
	float radius;
	cv::Point2f center;
	cv::minEnclosingCircle(cv::Mat(contours[1]),center,radius);
	cv::circle(result,cv::Point(center),static_cast<int>(radius),cv::Scalar(0),2);

//	cv::RotatedRect rrect= cv::fitEllipse(cv::Mat(contours[1]));
//	cv::ellipse(result,rrect,cv::Scalar(0),2);

	// testing the approximate polygon
	std::vector<cv::Point> poly;
	cv::approxPolyDP(cv::Mat(contours[2]),poly,5,true);

	std::cout << "Polygon size: " << poly.size() << std::endl;

	// Iterate over each segment and draw it
	std::vector<cv::Point>::const_iterator itp= poly.begin();
	while (itp!=(poly.end()-1)) {
		cv::line(result,*itp,*(itp+1),cv::Scalar(0),2);
		++itp;
	}
	// last point linked to first point
	cv::line(result,*(poly.begin()),*(poly.end()-1),cv::Scalar(20),2);

	// testing the convex hull
	std::vector<cv::Point> hull;
	cv::convexHull(cv::Mat(contours[3]),hull);

	// Iterate over each segment and draw it
	std::vector<cv::Point>::const_iterator it= hull.begin();
	while (it!=(hull.end()-1)) {
		cv::line(result,*it,*(it+1),cv::Scalar(0),2);
		++it;
	}
	// last point linked to first point
	cv::line(result,*(hull.begin()),*(hull.end()-1),cv::Scalar(20),2);

	// testing the moments

	// iterate over all contours
	itc= contours.begin();
	while (itc!=contours.end()) {

		// compute all moments
		cv::Moments mom= cv::moments(cv::Mat(*itc++));

		// draw mass center
		cv::circle(result,
			// position of mass center converted to integer
			cv::Point(mom.m10/mom.m00,mom.m01/mom.m00),
			2,cv::Scalar(0),2); // draw black dot
	}

	cv::namedWindow("Some Shape descriptors");
	cv::imshow("Some Shape descriptors",result);
	cv::imwrite("Some Shape descriptors.jpg",result);

	// New call to findContours but with CV_RETR_LIST flag
	image= cv::imread("binaryGroup.bmp",0);

	// Get the contours of the connected components
	cv::findContours(image,
		contours, // a vector of contours
		CV_RETR_LIST, // retrieve the external and internal contours
		CV_CHAIN_APPROX_NONE); // retrieve all pixels of each contours

	// draw black contours on white image
	result.setTo(cv::Scalar(255));
	cv::drawContours(result,contours,
		-1, // draw all contours
		cv::Scalar(0), // in black
		2); // with a thickness of 2
	cv::namedWindow("All Contours");
	cv::imshow("All Contours",result);
	cv::imwrite("All Contours.jpg",result);
程序结果:


