移动web开发调试工具AlloyLever介绍
简介
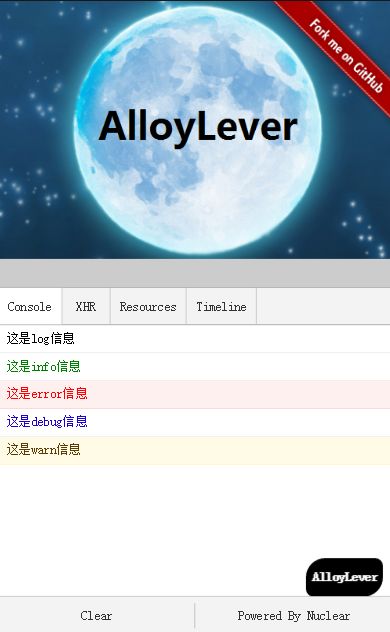
web调试有几个非常频繁的刚需:看log、看error、看AJAX发包与回包。其他的如timeline和cookie以及localstorage就不是那么频繁,但是AlloyLever都支持。如你所见:
特征
- 点击alloylever按钮之间切换显示或隐藏工具面板
- Console会输出所有用户打印的日志如console.[log/error/info/debug/debug]
- Console会输出所有的错误信息(脚本错误和网络请求错误)
- XHR面板会输出所有(XMLHttpRequest)AJAX请求和服务器端返回的数据
- Resouces面板会输出所有的Cookie信息和LocalStorage
- TimeLime面板会输出页面相关的生命周期里的时间段耗时情况
演示
http://alloyteam.github.io/AlloyLever/
Install
可以通过npm安装:
npm install alloylever使用
你的页面只需要引用一个js即可!
<script src="alloylever.js"></script>但是需要注意的是,该js必须引用在其他脚本之前。至于为什么,看下面的原理。
Console截获
window.console = {
    wc: window.console
};
var self = this;
['log', 'error', 'warn', 'debug', 'info'].forEach(function (item) {
    console[item] = function (msg) {
        this.wc[item](msg);
        self.log(msg, item);
    }
});
重写了console方法,并且保存下window下真正的方法进行执行,并且注入自己的事件。
AJAX截获
var XHR = window.XMLHttpRequest;

window.XMLHttpRequest=function(){
    var xhr = new XHR();
    checkSuccess(xhr);
    return xhr;
};

window.XMLHttpRequest.realXHR = XHR;

var self=this;

function checkSuccess(xhr) {
    if ((xhr.status >= 200 && xhr.status < 300) || xhr.status == 304) {
        self.option.xhrs.push({url:xhr.responseURL, json:JSON.stringify(JSON.parse( xhr.responseText), null, "\t")})
    }else if(xhr.status>=400) {
        console.error(xhr.responseURL +' '+xhr.status+' ('+xhr.statusText+')')
    }
    else{
        window.setTimeout(function () {
            checkSuccess(xhr);
        }, 0);
    }
}
如上面所示,重写了XMLHttpRequest对象。用户new的对象全部为重写后的,返回的是真正的。这样就可以拿到所有用户创建的XMLHttpRequest对象的实例进行监听。
Error截获
其中error包含两部分,第一部分是js报的错误,通过下面的方式截获:
window.onerror = function (errorMsg, url, lineNumber, column, errorObj) {
    console.error('Error: ' + errorMsg + ' Script: ' + url + ' Line: ' + lineNumber
        + ' Column: ' + column + ' StackTrace: ' + errorObj);
}
这里执行的时候console已经被重写了。所以自己的console面板也能看到错误。
第二部分是资源加载失败报的错,通过遍历HTML dom节点拿到所有的 js/css/img,然后再次发送请求。js和css通过XMLHttpRequest发请求,监听状态。,img通过new Image(),监听onerror。具体代码参见: https://github.com/AlloyTeam/AlloyLever/blob/master/src/component/alloy_lever/index.js
其他
Timeline通过timing.js获得所有信息,timing.js基于window.performance封装的类库。Cookie和localStorage通过js遍历得到。
相关
Github: https://github.com/AlloyTeam/AlloyLever
Issues: https://github.com/AlloyTeam/AlloyLever/issues
欢迎试用反馈。

