linux下安装 nexus
nexus安装包下载:http://www.sonatype.org/nexus/archived
先是下载目前最新的版本
有提供zip和tar.gz格式,随便下哪种都可以。解压后安装到/opt/nexus目录。
二、解压之后会有两个文件夹,nexus-2.6.0-05和sonatype-work,我们进入第一个文件夹的bin目录来启动nexus 。
1、进入启动目录,启动
cd nexus-2.6.0-05/bin/
./nexus start
2、这时候提示:
****************************************
WARNING – NOT RECOMMENDED TO RUN AS ROOT
****************************************
If you insist running as root, then set the environment variable RUN_AS_USER=root before running this script.
大概意思就是要在环境配置export RUN_AS_USER=root,临时配置
在命令行下输入:
export RUN_AS_USER=root
然后执行,就不会再提示了
./nexus start
3、也可以在系统里面永久配置
vi /etc/profile 加入export RUN_AS_USER=root
三、启动之后查看日志(日志路径:nexus/logs)
报:
wrapper | Reloading Wrapper configuration...
wrapper | Launching a JVM...
wrapper | JVM exited while loading the application.
jvm 5 | Exception in thread "main" java.lang.UnsupportedClassVersionError: org/sonatype/nexus/bootstrap/jsw/JswLauncher : Unsupported major.minor version 51.0
jvm 5 | at java.lang.ClassLoader.defineClass1(Native Method)
jvm 5 | at java.lang.ClassLoader.defineClassCond(ClassLoader.java:631)
jvm 5 | at java.lang.ClassLoader.defineClass(ClassLoader.java:615)
jvm 5 | at java.security.SecureClassLoader.defineClass(SecureClassLoader.java:141)
jvm 5 | at java.net.URLClassLoader.defineClass(URLClassLoader.java:283)
jvm 5 | at java.net.URLClassLoader.access$000(URLClassLoader.java:58)
jvm 5 | at java.net.URLClassLoader$1.run(URLClassLoader.java:197)
jvm 5 | at java.security.AccessController.doPrivileged(Native Method)
jvm 5 | at java.net.URLClassLoader.findClass(URLClassLoader.java:190)
jvm 5 | at java.lang.ClassLoader.loadClass(ClassLoader.java:306)
jvm 5 | at sun.misc.Launcher$AppClassLoader.loadClass(Launcher.java:301)
jvm 5 | at java.lang.ClassLoader.loadClass(ClassLoader.java:247)
jvm 5 | Could not find the main class: org.sonatype.nexus.bootstrap.jsw.JswLauncher. Program will exit.
wrapper | There were 5 failed launches in a row, each lasting less than 300 seconds. Giving up.
wrapper | There may be a configuration problem: please check the logs.
wrapper | <-- Wrapper Stopped
网上解释是要JAVA7才行。唉只能下个低版本了。
四、重新下了个nexus-oss-webapp-1.9.2.4-bundle.zip 版本。
解压/opt/nexus1924/bin/jsw/linux-x86-64 目录下启动就可以访问了。
http://192.168.13.31:8081/nexus
默认管理员用户名/密码: admin/admin123
登录系统后点击左侧菜单栏Views/Repositories下的Repositories选择Central仓库点击下边的Configuration把Download Remote Indexes属性设为True保存即可。
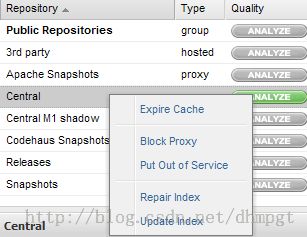
然后在Central仓库上右键然后点击Repair Index 即可下载中心仓库的索引文件,稍等几分钟点击下边的Browse Index即可看见下载的索引文件。
往Public Repositories中添加Central仓库,点击Public Repositories在Configuration选项卡中把Central移到左侧即可。
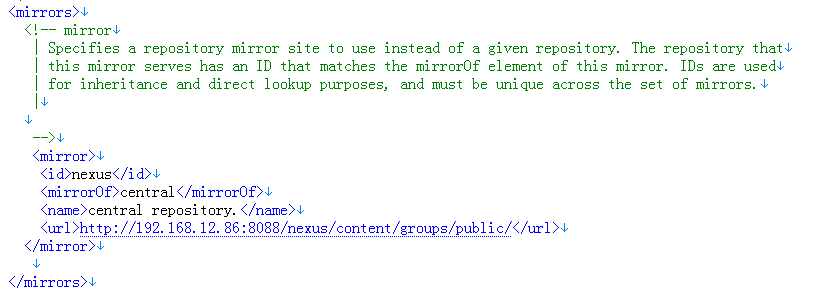
最后在自己的应用中把中心仓库配置成建立的私有仓库地址即可,修改本地的maven配置文件,C:\Documents and Settings\用户名\.m2\setting.xml
在mirrors添加mirror节点地址指向建立的私有仓库地址,mirrorOf属性值设为central为了覆盖超级pom中指定的central地址,如下
我们知道nexus有默认的用户,其中一个就是admin,密码是admin123。在实际应用中,我们很多会有如下需求
一 修改admin 的密码
点击左侧菜单栏的Security——>Users,你可以看到系统默认的用户。可以reset pwd,set pwd,这样就可以设置新密码了。
二 添加新用户
点击上方的add按钮,在弹出的界面中
设置必填项,设置状态为激活和角色信息。


