优秀开源代码解读:RESTKit的使用教程
这篇教程由一个独立的iOS开发者及4 Arrows Media的创始人 Scott McAlister写的。
网上有很多可用于连接和获取有趣、有用数据的web服务器。例如,Twitter有一个web服务,您可以查看列表和发推,Foursquare有一个web服务,您可以建立连接,并让服务器允许您检索你当前位置附近的餐馆的列表。如果你想要使用这些api,您可以使用NSURLRequest或封装好的框架像ASIHTTPRequest或AFNetworking立即连接到他们的服务器。正如教程 other tutorials中提到的那样。
然而,有一个更简单的方法实现这些api——使用RESTKit !RESTKit是一个易于使用的流行框架,使您不必编写很多无聊的代码,通常情况下你要当处理web服务api,比如解析JSON或映射响应对象等。在这教程中,我们会去试试做一简单的应用程序,使用FourSquare API列出附近的咖啡店——因为我喜欢咖啡!
本教程是为任何水平的iOS开发者,从初学者到高级。请鼓起勇气读下去。
开始
首先,我们将在Xcode创建一个 Master-View应用程序。如果您已经熟悉如何做到这一点,它是如何工作的,可以快速移动到下一个部分——但是我不得不为了那些初学者包括更多的细节。
启动Xcode并选择Master-Detail程序模板创建一个新项目。输入CoffeeShop做为项目的名字,device family选择为iPhone,勾上Use Storyboards and Use Automatic Reference Counting复选框(其他复选框不必选)
单击Next,并选择一个位置来保存你的项目。
选择Master-Disciple的,呃,等等…Master-Detail 是一个功能完备的应用程序模板,所以单击Run来构建和运行。您应该看到一个空白的屏幕,导航条上面有编辑和添加(+)按钮。单击“+”按钮以添加一些表条目到主屏幕。点击其中的一项将显示详细信息屏幕:
你可以看到这种格式非常适合数据列表,包含不同级别的信息。打开 MasterViewController.h:
- #import <UIKit/UIKit.h>
- @interface MasterViewController : UITableViewController
- @end
MasterViewController继承自UITableViewController类,管理UITableView并遵循2个协议:UITableViewDelegate 和 UITableViewDataSource.
UITableViewDataSource是用来控制UITableView显示的数据,UITableViewDelegate是用来操作UITableView的事件(如数据选择;置顶信息;删除和重新排序数据)
注意这些在MasterViewController.m里面的关键方法:
- - (NSInteger)numberOfSectionsInTableView:(UITableView *)tableView
- {
- return 1;
- }
- - (NSInteger)tableView:(UITableView *)tableView numberOfRowsInSection:(NSInteger)section
- {
- return _objects.count;
- }
- - (UITableViewCell *)tableView:(UITableView *)tableView cellForRowAtIndexPath:(NSIndexPath*)indexPath
- {
- UITableViewCell *cell = [tableView dequeueReusableCellWithIdentifier:@"Cell"];
- NSDate *object = [_objects objectAtIndex:indexPath.row]; cell.textLabel.text = [object description];
- return cell;
- }
- - (void)prepareForSegue:(UIStoryboardSegue *)segue sender:(id)sender
- {
- if ([[segue identifier] isEqualToString:@"showDetail"]) {
- NSIndexPath *indexPath = [self.tableView indexPathForSelectedRow];
- NSDate *object = [_objects objectAtIndex:indexPath.row];
- [[segue destinationViewController] setDetailItem:object];
- }
- }
前两个方法,numberOfSectionsInTableView:和tableView:numberOfRowsInSection:从他们的命名可以看出来,这2个方法是告诉有表有多少分段,每个分段有多少行。
在tableView:cellForRowAtIndexPath:方法里你可以指定每个cell数据的显示。
prepareForSegue:seder:方法预备在主视图(Master view)显示详情视图(Detail view)的内容。 进而用来控制视图之间的切换 。这是storyboard的一个特性,更多关于细节在Beginning Storyboards in iOS 5 里可以看到。
对于本教程,您将只使用主视图控制器来显示一个列表附近的咖啡店。为简单起见,详细信息视图控制器将不被使用。所以去除如下内容:
1.MasterViewController.m类里的prepareForSegue:sender: 方法
2.在MasterViewController.m顶部导入 #import for DetailViewController.h
3.DetailViewController.h 和 DetailViewController.m文件
4.删除MainStoryboard 里面的Detail View Controller – Detail,你可以在这里找到:
现在用到有趣的东西——RESTKit !RESTKit 主页RestKit.org (RESTKit的主页)描述如下:
“RestKit是一个基于objective – c的iOS框架,其目的是为了使RESTful web服务更简单、快速和有趣。它基于强大的对象映射系统并且使用了一个干净、简单的HTTP请求/响应API,减少完成任务所需的代码量。
RestKit有三个主要组件:
1.Network – 在NSURLConnection的基础上提供了request/response 抽象方法
2.Object Mapping – 提供了一个简单的API使本地对象响应远程JSON / XML。
3.Core Data – 在对象映射(Object Map)里支持扩展。用来扩展远程资源映射到本地的对象。
简而言之,你不必编写大量的代码!
最困难的事是安装RestKit。当然这也不难,只是有很多的步骤而已。
首先你要做的就是安装这个RestKit。我推荐使用Git来管理你的RestKit安装。
打开终端,输入以下命令:
- $ cd /path/to/MyApplication # initialize git if needed
- $ git init
- $ git submodule add git://github.com/RestKit/RestKit.git RestKit
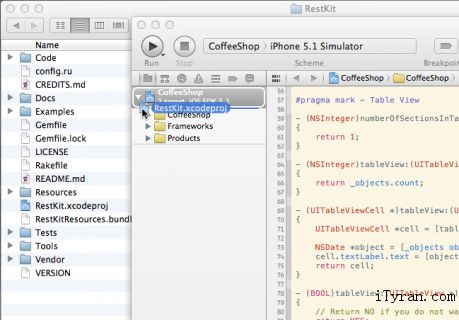
1.点击顶部的项目在项目导航器面板中,选择的项目的target。
2.单击Build Settings 在搜索框搜索Other Linker Flags。点击Other Linker Flags,在右边值里添加”-ObjC”。
3.配置完之后,在搜索框里输入 Header Search Path 点击右边值里添加“$(BUILT_PRODUCTS_DIR)/../../Headers”。
4.现在点击Build Phases,在Target Dependencies 点击下拉三角形。点击添加按钮,选择REstKit。
5.点击连接器,然后在这里选择(+)按钮添加libRestKit.a 静态链接库。
6.你还要添加一些苹果自带的框架,如下:(点击cmd可以多选)
CFNetwork.framework
CoreData.framework
libxml2.dylib
MobileCoreServices.framework
QuartzCore.framework
Security.framework
SystemConfiguration.framework
7.还点击上次那个‘+’
设置的最后一步, 验证您的RestKit安装和配置。打开AppDelegate.m,并添加以下:
- #import <RestKit/RestKit.h>
单击运行。如果程序无错误, 那么RestKit就设置正确了。
连接 Foursquare
现在你可以使用RestKit工作,你可以使用RestKit连接Foursquare的web服务器,为你的app获得“地点数据(venue data-让服务器知道你所在地点-译者注)”。
你将使用Foursquare的 Search Venues API 来搜索你所在地点附近的咖啡店。
别急着立刻阅读整个文档,我们只需要使用一个基本的查询而已(单击下面的连接来试一试):https://api.Foursquare.com/v2/venues/search?ll=37.33,-122.03&categoryId=4bf58dd8d48988d1e0931735,它将返回苹果总部(Apple Headquarters) 附近的咖啡店场所的位置的JSON格式的数据(纬度:37.33 和 经度:-122.03)。
Foursquare标识场所的分类是“Coffee Shop”,“categoryId=4bf58dd8d48988d1e0931735.”
对于普通查询的典型的JSON响应,和下面的代码相似:
- {
- "meta": {
- "code": 200
- },
- "notifications": [
- {
- "item": {
- "unreadCount": 0
- },
- "type": "notificationTray"
- }
- ],
- "response": {
- "venues": [
- {
- "beenHere": {
- "count": 0
- },
- "categories": [
- {
- "icon": {
- "name": ".png",
- "prefix": "https://Foursquare.com/img/categories/food/coffeeshop_",
- "sizes": [
- 32,
- 44,
- 64,
- 88,
- 256
- ]
- },
- "id": "4bf58dd8d48988d1e0931735",
- "name": "Coffee Shop",
- "pluralName": "Coffee Shops",
- "primary": true,
- "shortName": "Coffee Shop"
- }
- ],
- "contact": {
- "formattedPhone": "(650) 967-4473",
- "phone": "6509674473",
- "twitter": "redrockcoffee"
- },
- "hereNow": {
- "count": 1,
- "groups": [
- {
- "count": 1,
- "items": [],
- "name": "Other people here",
- "type": "others"
- }
- ]
- },
- "id": "450af4f4f964a5204c391fe3",
- "location": {
- "address": "201 Castro St.",
- "city": "Mountain View",
- "country": "United States",
- "crossStreet": "at Villa St.",
- "distance": 8315,
- "lat": 37.393803003654625,
- "lng": -122.07888155105633,
- "postalCode": "94041",
- "state": "CA"
- },
- "menu": {
- "mobileUrl": "https://Foursquare.com/v/450af4f4f964a5204c391fe3/device_menu",
- "type": "foodAndBeverage",
- "url": "https://Foursquare.com/v/red-rock-coffee/450af4f4f964a5204c391fe3/menu"
- },
- "name": "Red Rock Coffee",
- "specials": {
- "count": 0,
- "items": []
- },
- "stats": {
- "checkinsCount": 10817,
- "tipCount": 91,
- "usersCount": 3281
- },
- "url": "http://redrockcoffee.org/",
- "verified": true
- }
- ]
- }
- }
Foursquare 提供免费的web服务访问,只要你在“OAuth Consumer Registration”页面注册你的App。所以在继续之前,确保你完成了注册。
应用程序的Web站点和回调URL可以是您的网站上虚拟页面,因为你的应用程序将是一个移动连接和不依赖于服务器的代码。点击Foursquare’s User Authentication连接获取更多信息。
当你创建你的Foursquare应用程序注册时,你会得到一个客户机ID和一个客户的密码,你可以调用Foursquare API。
你需要将这些添加打你的源代码中,这样的话当调用Foursquare API时,RestKit可以验证你的应用程序。将下面的代码添
在MasterViewController.m 中的#import下:
- #define kCLIENTID "Your Foursquare Client ID"
- #define kCLIENTSECRET "Your Foursquare Client Secret"
记住你必须用从Foursquare中收到的真实的Client ID和密码取代虚拟值。
是时候写代码了
你拥有足够的代码片段可以完成你的应用程序,所以您需要做的就是添加代码!
你将使用到RestKit的两个组件:Network和Object Mapping。Network:为Foursquare的API定义基本的URL, “https://api.Foursquare.com/v2?″并发送接受你的信息。Object Mapping,你创建一个数据模型,将映射返回的JSON数值。
上面举出了2个创景的数据。这样开始创为基于JSON结构的场所数据建立数据模型类。
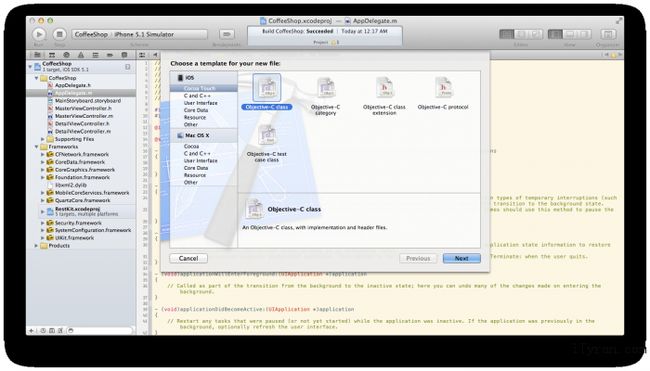
1.选择 File->New->File(原来是右击Project Navigator->New Fil,或者command-N)
2.选择iOS\Cocoa Touch\Objective-C类型,并点击Next。
3.输入类名例如”Venue”,选择继承于NSObject,并点击Next。
4.选择文件的保存位置,并点击创建。
现在你所添加的JSON数据只有“场所的名字venue name”。所以在Venue.h添加name属性:
- @interface Venue : NSObject
- @property (strong, nonatomic) NSString *name;
- @end
Venue.m中的synthesize 属性:
- @implementation Venue
- @synthesize name;
- @end
当需要的时候,你需要继续添加。
接下来,为了RestKit使用修改 MasterViewController.m添加下面的头文件:
- #import <RestKit/RestKit.h>
- #import "Venue.h"
并修改ViewDidLoad方法:
- - (void)viewDidLoad
- {
- [super viewDidLoad];
- RKURL *baseURL = [RKURL URLWithBaseURLString:@"https://api.Foursquare.com/v2"];
- RKObjectManager *objectManager = [RKObjectManager objectManagerWithBaseURL:baseURL];
- objectManager.client.baseURL = baseURL;
- RKObjectMapping *venueMapping = [RKObjectMapping mappingForClass:[Venue class]];
- [venueMapping mapKeyPathsToAttributes:@"name", @"name", nil];
- [objectManager.mappingProvider setMapping:venueMapping forKeyPath:@"response.venues"];
- [self sendRequest];
- }
这里你定义了调用 Foursquare API基本的URL。所有发送的请求将会添加这个基本的URL。如果你需要再两个不同的服务器和环境 (development/staging/production)之间转换的时候,这样作很好。使用基本的URL,你创建一个RKObjectManager对象,RKObjectManager是通过HTTP与RESTful服务的交互的主要接口。
RKObjectMapping类是用来映射JSON数据和你的数据的模型(model)类。mapKeyPathsToAttributes将JSON字段映射到您的
数据模型的属性。例如,它将JSON中的“id”数据 映射到Venue类中的venueID属性。
接下来,创建一个请求信息检索你的表数据,仍然在MasterViewController.m中,添加新的方法sendRequest:
- - (void)sendRequest
- {
- NSString *latLon = @"37.33,-122.03";
- NSString *clientID = [NSString stringWithUTF8String:kCLIENTID];
- NSString *clientSecret = [NSString stringWithUTF8String:kCLIENTSECRET];
- NSDictionary *queryParams;
- queryParams = [NSDictionary dictionaryWithObjectsAndKeys:latLon, @"ll", clientID, @"client_id", clientSecret, @"client_secret", @"coffee", @"query", @"20120602", @"v", nil];
- RKObjectManager *objectManager = [RKObjectManager sharedManager];
- RKURL *URL = [RKURL URLWithBaseURL:[objectManager baseURL] resourcePath:@"/venues/search" queryParameters:queryParams];
- [objectManager loadObjectsAtResourcePath:[NSString stringWithFormat:@"%@?%@", [URL resourcePath], [URL query]] delegate:self];
- }
RestKit将会通过delegate methods返回响应。为了接受这样响应,你需要实现RKObjectLoaderDelegate协议。
这样的话,在MasterViewController.h中声明:
- @interface MasterViewController : UITableViewController <RKObjectLoaderDelegate>
然后在MasterViewController.m文件中,添加RKObjectLoaderDelegate的方法:
- - (void)objectLoader:(RKObjectLoader *)objectLoader didFailWithError:(NSError *)error
- {
- NSLog(@"Error: %@", [error localizedDescription]);
- }
- - (void)request:(RKRequest*)request didLoadResponse:(RKResponse*)response {
- NSLog(@"response code: %d", [response statusCode]);
- }
- - (void)objectLoader:(RKObjectLoader *)objectLoader didLoadObjects:(NSArray *)objects
- {
- NSLog(@"objects[%d]", [objects count]);
- data = objects;
- [self.tableView reloadData];
- }
唯一一个必须实现的方法是objectLoader:didFailWithError,但是你也需要实现objectLoader:didLoadObjects检索你的请求数据。他返回基于在viewDidLoad注册的对象映射Venue对象数组。
如果你现在试图编译, 你将得到一个报错,因为在objectLoader:didLoadObjects的data没有定义。
在MasterViewController.m中的修改如下:
- @interface MasterViewController () {
- NSMutableArray *_objects;
- }
- @end
- @implementation MasterViewController
to:
- @interface MasterViewController ()
- @property (strong, nonatomic) NSArray *data;
- @end
- @implementation MasterViewController
- @synthesize data;
并修改:
- - (UITableViewCell *)tableView:(UITableView *)tableView cellForRowAtIndexPath:(NSIndexPath *)indexPath
- {
- UITableViewCell *cell = [tableView dequeueReusableCellWithIdentifier:@"Cell"];
- NSDate *object = [_objects objectAtIndex:indexPath.row];
- cell.textLabel.text = [object description];
- return cell;
- }
为:
- - (UITableViewCell *)tableView:(UITableView *)tableView cellForRowAtIndexPath:(NSIndexPath *)indexPath
- {
- UITableViewCell *cell = [tableView dequeueReusableCellWithIdentifier:@"Cell"];
- Venue *venue = [data objectAtIndex:indexPath.row];
- cell.textLabel.text = [venue name];
- return cell;
- }
同时,在 MasterViewController.m, 将 tableView:numberOfRowsInSection:中的返回语句改为:
- return data.count;
最后,确保在MasterViewController.m删除了tableView:commitEditingStyle和insertNewObject方法,因为数据不能再改变(另外,Xcode扔几个编译错误,如果您不删除/改正这些方法)。
点击运行。你将看到和下图相似的情况:
你会注意到这个列表上的一些地方实际上不是咖啡馆,例如Kaiser Permanente和 Nokia。因为Foursquare数据也有坑爹的时候嘛。:P
TableViews保留许多 TableViewCells的集合。但由于性能的原因,它只会为可见的单元格创建足够的TableViewCell。而不是删除和创建更多的表单元格,所以它可以循环利用那些滚动到屏幕外的表单元格。
在tableView:cellForRowAtIndexPath方法中,[tableView dequeueReusableCellWithIdentifier:@"Cell"]将会循环使用那些没有使用的单元格(这些表单元格的identifier必须和“Cell”吻合)。在MainStoryboard.storyboard的Table View Cell window中设置identifier,如下图所示:
Stylin’ the TableViewCells
在上面的storyboard图像中另一个选项是TableViewCell的风格。默认是Basic,即在cell中提供了一个左对齐的文本标签。其他可提供的选项是:
这些选项使你有可能在主视图中呈现你所选择的细节。比如,如果你使用一个app来寻找附近的咖啡店,如果我们可以看到看到每一个商店离我现在的距离,这将多么的美好。没有人会想要去很远的地方只为了一杯咖啡。
现在,使用Right Detail style来显示名字和距离。在下拉菜单中把原来的“Basic”风格改成“Right Detail style”
在下面的JSON数据中,“location”字段中就是距离
- "location": {
- "address": "201 Castro St.",
- "city": "Mountain View",
- "country": "United States",
- "crossStreet": "at Villa St.",
- "distance": 8315,
- "lat": 37.393803003654625,
- "lng": -122.07888155105633,
- "postalCode": "94041",
- "state": "CA"
- },
为了使这些数据可以被RestKit取出,创建一个位置数据模型并提供映射。以下是步骤:
1.新建一个文件命名为“Location”,并把它设为NSObject的子类。
2.在 Location.h,增加:
- @property (nonatomic, strong) NSString *address;
- @property (nonatomic, strong) NSString *city;
- @property (nonatomic, strong) NSString *country;
- @property (nonatomic, strong) NSString *crossStreet;
- @property (nonatomic, strong) NSString *postalCode;
- @property (nonatomic, strong) NSString *state;
- @property (nonatomic, strong) NSNumber *distance;
- @property (nonatomic, strong) NSNumber *lat;
- @property (nonatomic, strong) NSNumber *lng;
请确保这些属性有在 Location.m中被synthesize化!
3.现在在Venue.h中增加::
- #import "Location.h"
- @property (strong, nonatomic) Location *location;
在Venue.m中synthesize属性location。
4.在 MasterViewController.m,增加viewDidLoad中增加位置映射(在调用sendRequest之前)
- RKObjectMapping *locationMapping = [RKObjectMapping mappingForClass:[Location class]];
- [locationMapping mapKeyPathsToAttributes:@"address", @"address", @"city", @"city", @"country", @"country", @"crossStreet", @"crossStreet", @"postalCode", @"postalCode", @"state", @"state", @"distance", @"distance", @"lat", @"lat", @"lng", @"lng", nil];
- [venueMapping mapRelationship:@"location" withMapping:locationMapping];
- [objectManager.mappingProvider setMapping:locationMapping forKeyPath:@"location"];
这和你先前做的Venue映射是十分相似,除了:
mapRelationship:withMapping:. 他通知你的地点映射实例来使用他的位置属性。
setMapping:forKeyPath: 则是告诉objectManager根据JSON数据中的位置键去使用位置映射。
5.修改 tableView:cellForRowAtIndexPath: 为:
- UITableViewCell *cell = [tableView dequeueReusableCellWithIdentifier:@"Cell"];
- Venue *venue = [data objectAtIndex:indexPath.row];
- cell.textLabel.text = [venue.name length] > 24 ? [venue.name substringToIndex:24] : venue.name;
- cell.detailTextLabel.text = [NSString stringWithFormat:@"%.0fm", [venue.location.distance floatValue]];
- return cell;
编译运行。现在你会看见一些东西像如下图:
字母m代表的的是米,不是英里。请记得我们还在使用苹果的经纬度(译者注:模拟器默认位置是在苹果公司总部)—-如果你想你可以换成你自己的经纬度。想要获得更多怎么做的教程
点击这里.
自定义TableViewCells
让我们也把FourSquare的checkins也在我们的表视图中显示出来。要做到这一点,我们需要创建一个自定义的表视图元件。
在MainStoryboard中,把TableViewCell的style属性改成Custom。默认的文本标签会消失。在Size Inspector中改变列高度为Custom 并从44改成64。请确保你也为Tableview的rowHeight设置成了64。
请注意你可以使用自定义样式去纳入更多的详细信息到主屏幕。不要太多,足够就行。
因为tableViewCell现在被设置成了Custom,你不能使用UITableViewCell的textLabel 、detailTextLabel属性去增加文字。这意味着为了个别标签,你需要创建一个UITableViewCell的子类,里面有着被outlets 声明的venue name, distance, and check-ins。
用Objective-C类模版创建一个新文件。命名为VenueCell并设置为UITableViewCell的子类。
按下面修改 VenueCell.h :
- #import <UIKit/UIKit.h>
- @interface VenueCell : UITableViewCell
- @property (strong, nonatomic) IBOutlet UILabel *nameLabel;
- @property (strong, nonatomic) IBOutlet UILabel *distanceLabel;
- @property (strong, nonatomic) IBOutlet UILabel *checkinsLabel;
- @end
修改 VenueCell.m为:
- #import "VenueCell.h"
- @implementation VenueCell
- @synthesize nameLabel, distanceLabel, checkinsLabel;
- @end
正如你所见,这个类并没有做什么:它只是增加了nameLabel, distanceLabel、 checkinsLabel.的属性。
回到MainStoryboard.storyboard,选择prototype cell,设置他的类为VenueCell。并且,在Attributes Inspector中,改变识别码为“VenueCell”
这些项不需要去匹配,但是最好匹配下他们为了清晰和一致性。
现在连接那些VenueCell 中的outlets到文本标签。在Connections Inspector中,连接Outlets:nameLabel, distanceLabel 、heckinsLabel到他们各自的UILabels。
在MasterViewController.m: 的顶部增加VenueCell 的引用
- #import "VenueCell.h"
并改变MasterViewController中的 tableView:cellForRowAtIndex:
- UITableViewCell *cell = [tableView dequeueReusableCellWithIdentifier:@"Cell"];
- Venue *venue = [data objectAtIndex:indexPath.row];
- cell.textLabel.text = [venue.name length] > 25 ? [venue.name substringToIndex:25] : venue.name;
- cell.detailTextLabel.text = [NSString stringWithFormat:@"%.0fm", [venue.location.distance floatValue]];
- return cell;
为:
- VenueCell *cell = [tableView dequeueReusableCellWithIdentifier:@"VenueCell"];
- Venue *venue = [data objectAtIndex:indexPath.row];
- cell.nameLabel.text = [venue.name length] > 25 ? [venue.name substringToIndex:25] : venue.name;
- cell.distanceLabel.text = [NSString stringWithFormat:@"%.0fm", [venue.location.distance floatValue]];
- cell.checkinsLabel.text = [NSString stringWithFormat:@"%d checkins", [venue.stats.checkins intValue]];
- return cell;
如果你尝试编译和运行这将不起作用,因为Venue并没有一个统计属性。正如位置数据一样,Foursquare网站也在JSON数据中提供了统计数据
- "stats": {
- "checkinsCount": 3552,
- "tipCount": 42,
- "usersCount": 1089
- },
如同位置数据一样,你需要创建一个统计数据的模型并提供映射给RestKit
1.创建一个新文件并命名为“Stats,”,并设置为NSOjbect的子类。
2.在Stats.h中增加:
- @property (nonatomic, strong) NSNumber *checkins;
- @property (nonatomic, strong) NSNumber *tips;
- @property (nonatomic, strong) NSNumber *users;
在m文件中synthesize化。
3.在Venue.h中增加
- #import "Stats.h"
- @property (strong, nonatomic) Stats *stats;
Venue.m 中的synthesize 状态 .
4.在MasterViewController.m的viewDidLoad中增加位置的映射(在sendRequest之前):
- RKObjectMapping *statsMapping = [RKObjectMapping mappingForClass:[Stats class]];
- [statsMapping mapKeyPathsToAttributes:@"checkinsCount", @"checkins", @"tipCount", @"tips", @"usersCount", @"users", nil];
- [venueMapping mapRelationship:@"stats" withMapping:statsMapping];
- [objectManager.mappingProvider setMapping:statsMapping forKeyPath:@"stats"];
编译运行,你可以看见像这样的东西:
谁会想到,Kaiser Permanente竟然会被星巴克更流行!
注意: 如果在这个地方你会崩,复查来确保你在MainStoryboard.storyboard中设置识别码为“VenueCell”
何去何从?
这里给出以上教程所有的代码 。
下面给出你刚才所做的事情:
1.用Master-Detail Application template.来使用UITableView
2.RestKit的安装和配置。
3.为你的app配置Foursquare并介绍了他们的街道api
4.为你的app创建数据模型
5.建立RestKit的映射让其可以请求,接受,解析数据进你的数据模型
6.创建一个自定义的表视图元件来显示Foursquare的数据
你没有做的是:
1.安装并使用NSURLConnections or NSURLConnectionDelegates.
2.解析JSON或XML数据
3.把JSON或XML响应到你自己的对象。
因为RestKit都帮你做好了这些事情!不赖吧?从这里,免费设定Foursquare的用户认证来增加对Foursquare API和其例子扩展的更多特性,或找一些其他的你可以使用RestKit 来获取数据的web services
原文地址:http://www.cocoachina.com/applenews/devnews/2014/0102/7641.html


