WEB项目(B/S系统)打包安装(总结篇)
打包安装程序的制作选择性还很多的,有installshield,wise installer,inno setup这几个做打包安装项目都是很强大的,要搞出界面大气个性化的安装,还是得用这几个才行,我这篇说的是.NET自带的安装项目打包WEB系统的,.NET打包安装项目虽然傻傻的,也比较丑,但是搭建安装项目快速也能满足总体的要求,如果没有足够的时间研究重量级的安装工具,短时间内用.NET自带的安装项目也是一个良好的选择。网上有很多关于用.NET打包WEB项目的文章,大体是那样的,但不是很全面,有个别细节并没有涉及,先说下这个安装打包项目的主要功能:
一、安装前系统检测
主要检测SQL SERVER是否安装,站点名称和端口号是否重复等,framework自动检测没有的话先安装,本身自带就有此功能,IIS是必须要求的,不然没法创建站点。
二、项目文件安装到指定文件夹并根据安装时的数据库配置修改webconfig连接
三、附加数据库
打包时可以把mdf文件放到WEB项目文件夹下,生成安装文件时就会自动打包进去,安装时执行附加即可。
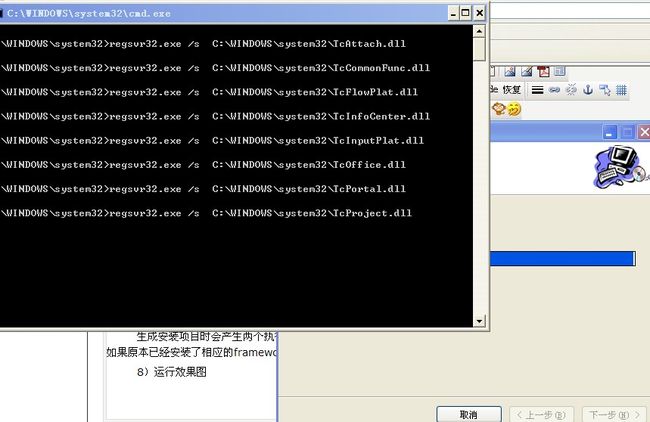
四、注册COM组件(如果项目中涉及到COM的话)
五、创建WEB站点
六 、创建虚拟目录
这里的虚拟目前是根据打包的项目需要进行的,因为有的WEB项目结构比较复杂,比如一个系统除了本身项目的发布文件,还有另外的独立特殊功能的项目作为虚拟目录的形式一起运行,类似于插拔式的插件一样,需要的话直接拷贝到站点下,设置虚拟目录,系统菜单做好链接指向其页面就可以了。
七、创建桌面快捷方式
比如可以把系统的登录页面或其它起始页作为安装时指定的快捷方式
八、项目卸载
项目的卸载主要包括删除项目文件,卸载附加的数据库,删除站点及桌面快捷方式等
安装WEB项目的前提条件是需要在用户电脑上先安装SQL SERVER数据库(或其它数据库)和IIS信息管理器。
1)安装项目主要涉及的是安装类里面的操作,包括安装和卸载的方法重写等,安装时需要记录用户通过安装界面输入的信息,这里我们可以用XML文件作为记录配置文件,主要是在卸载的时候需要用到用户输入的相关信息,数据库连接串的记录操作如下:
/// 获取数据库登录连接字符串
/// </summary>
/// <param name="databasename"> 数据库名称 </param>
/// <returns></returns>
private string GetConnectionString( string databasename)
{
string ConnStr = " server= " + Context.Parameters[ " server " ].ToString() + " ;database= " + ( string .IsNullOrEmpty(databasename) ? " master " : databasename) + " ;uid= " + Context.Parameters[ " user " ].ToString() + " ;pwd= " + Context.Parameters[ " pwd " ].ToString();
if ( string .IsNullOrEmpty(databasename)) // 将连接串写入XML文件,供卸载操作时读取
{
dbpath = Path.Combine( this .Context.Parameters[ " installdir " ].ToString(), " dbconfig.xml " );
OperateXML.UpdateXMLNode(dbpath, " ConnString " , ConnStr);
}
else
{
dbpath = Path.Combine( this .Context.Parameters[ " installdir " ].ToString(), " dbconfig.xml " );
OperateXML.UpdateXMLNode(dbpath, " DbName " , databasename);
}
return ConnStr;
}
2)安装检测
/// 判断是否安装了SQL SERVER
/// </summary>
/// <returns></returns>
private bool ExistSqlServerService()
{
bool Exist = false ;
ServiceController[] service = ServiceController.GetServices();
for ( int i = 0 ; i < service.Length; i ++ )
{
if (service[i].ServiceName.Length > 5 && service[i].ServiceName.Substring( 0 , 5 ) == " MSSQL " ) // if (service[i].ServiceName == "MSSQLSERVER")
{
Exist = true ;
break ;
}
}
return Exist;
}
这里是根据服务名称判断的,如果是SQLSERVER EXPRESS版的话,服务名是MSSQL$EXPRESS,其它的数据库实例也是MSSQL$+实例名
/// 检测IIS及版本号
/// </summary>
/// <returns></returns>
public string GetIISVerstion()
{
RegistryKey key = Registry.LocalMachine.OpenSubKey( @" SOFTWARE\Microsoft\INetStp " );
if (key == null )
return string .Empty;
else
return Convert.ToString(key.GetValue( " MajorVersion " )) + " . " + Convert.ToString(key.GetValue( " MinorVersion " ));
}
/// <summary>
/// 端口号是否重复
/// </summary>
/// <returns></returns>
private bool IsExistSitePort()
{
bool exist = false ;
DirectoryEntry ent = GetDirectoryEntry(entPath);
foreach (DirectoryEntry child in ent.Children)
{
if (child.SchemaClassName == " IIsWebServer " )
{
if (child.Properties[ " ServerBindings " ].Value != null && child.Properties[ " ServerBindings " ].Value.ToString().Split( ' : ' ).Length > 1 )
{
if (child.Properties[ " ServerBindings " ].Value.ToString().Split( ' : ' )[ 1 ] == Context.Parameters[ " siteport " ].ToString())
{
exist = true ;
break ;
}
}
}
}
return exist;
}
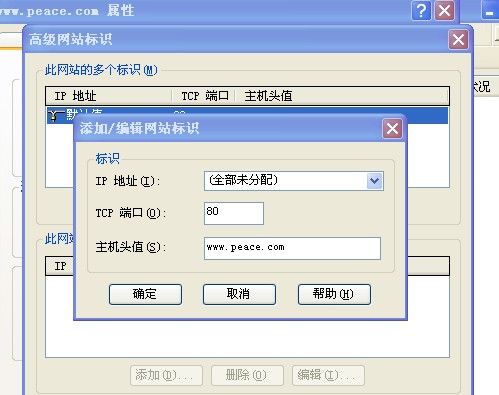
child.Properties["ServerBindings"].Value 是绑定属性,其实就是下面这个图里的属性
但是有的站点可能会分配两个端口,child.Properties["ServerBindings"].Value 就是 System.Object[] 字符
/// 站点名称是否存在
/// </summary>
/// <returns></returns>
private bool IsExistSiteName( string sitename)
{
bool exist = false ;
using (DirectoryEntry root = new DirectoryEntry(entPath))
{
foreach (DirectoryEntry Child in root.Children)
{
if (Child.SchemaClassName == " IIsWebServer " )
{
string WName = Child.Properties[ " ServerComment " ].Value.ToString();
if (sitename == WName)
{
exist = true ;
break ;
}
}
}
root.Close();
}
return exist;
}
3)安装并复制文件
复制文件的操作在OnBeforeInstall方法中就已经完成,在该方法中可以替换数据库连接字符串操作等。
{
if (ExistSqlServerService())
{
if (IsExistSitePort())
{
MessageBox.Show( " 站点端口号重复 " , " 信息提示 " , MessageBoxButtons.OK, MessageBoxIcon.Warning);
return ;
}
if (IsExistSiteName(Context.Parameters[ " sitename " ].ToString()))
{
MessageBox.Show( " 站点名称重复 " , " 信息提示 " , MessageBoxButtons.OK, MessageBoxIcon.Warning);
return ;
}
base .OnBeforeInstall(savedState);
unRAR( " Message.rar " ); //解压文件
unRAR( " MoreUpload.rar " );
/*
* 设置webconfig连接字符串
*/
string webconfigpath = Path.Combine( this .Context.Parameters[ " installdir " ].ToString(), " Web.config " );
string webcofnigstring = File.ReadAllText(webconfigpath).Replace( " #constring# " , GetConnectionString(Context.Parameters[ " dbname " ].ToString()));
webcofnigstring = webcofnigstring.Replace( " #siteport# " , Context.Parameters[ " siteport " ].ToString());
webcofnigstring = webcofnigstring.Replace( " #comConn# " , " Provider=SQLOLEDB.1;Persist Security Info=False;User ID= " + Context.Parameters[ " user " ].ToString() + " ;Password= " + Context.Parameters[ " pwd " ].ToString() + " ;Initial Catalog= " + Context.Parameters[ " dbname " ].ToString() + " ;Data Source= " + Context.Parameters[ " server " ].ToString());
File.WriteAllText(webconfigpath, webcofnigstring);
/// /安装IIS
// if (string.Empty == GetIISVerstion())
// {
// IISInstall(this.Context.Parameters["installdir"].ToString() + "IIS6.0_XPSP3", this.Context.Parameters["installdir"].ToString() + "iis.txt");
// }
}
else
{
MessageBox.Show( " 检测到您的电脑没有安装SQL SERVER,无法继续安装此产品 " , " 信息提示 " , MessageBoxButtons.OK, MessageBoxIcon.Warning);
this .Rollback(savedState);
}
}
上面代码中解压了两个文件,主要是在安装完创建站点时还需要创建虚拟目录。之所以要先压缩放到WEB项目里,是因为生成安装程序时会检测项目的生成是否成功(是否可以不让它检测成功呢? 还不清楚),一般只要我们把发布好的项目COPY到新建项目下就可以,但是独立的项目文件夹有自己独立的bin目录和webconfig文件,是不能混合在一起生成成功的,但是又需要一次完全安装,那么可以先压缩做为WEB项目下的文件,待复制完后再解压。
4)安装
/// 安装
/// </summary>
/// <param name="stateSaver"></param>
public override void Install(IDictionary stateSaver)
{
if (ExistSqlServerService())
{
if (IsExistSitePort())
{
MessageBox.Show( " 站点端口号重复 " , " 信息提示 " , MessageBoxButtons.OK, MessageBoxIcon.Warning);
return ;
}
if (IsExistSiteName(Context.Parameters[ " sitename " ].ToString()))
{
MessageBox.Show( " 站点名称重复 " , " 信息提示 " , MessageBoxButtons.OK, MessageBoxIcon.Warning);
return ;
}
base .Install(stateSaver);
WriteBat();
RegisterCom();
string connectionString = GetConnectionString( null );
try
{
using (SqlConnection connection = new SqlConnection(connectionString))
{
connection.Open();
string sql = " sp_attach_db ' " + Context.Parameters[ " dbname " ].ToString() + " ',' " + Context.Parameters[ " installdir " ].ToString() + " App_Data/Db_Data.MDF',' "
+ Context.Parameters[ " installdir " ].ToString() + " App_Data/Db_Data_Log.LDF' " ;
ExecuteSQL(connection, sql);
connection.Close();
}
}
catch (Exception ex)
{
MessageBox.Show( " 数据库安装失败!\n数据库配置有误,请正确配置信息!\n " + ex.Message, " 出错! " );
this .Rollback(stateSaver);
return ;
}
try
{
CreateDeskTopShortcut();
NewWebSiteInfo siteInfo = new NewWebSiteInfo( string .Empty, Context.Parameters[ " siteport " ].ToString(), "" , Context.Parameters[ " sitename " ].ToString(), Context.Parameters[ " installdir " ].ToString());
CreateNewWebSite(siteInfo);
StartWebSite(siteInfo.BindString);
}
catch // (Exception ex)
{
// MessageBox.Show("创建站点失败!\n" + ex.Message, "出错!");
// this.Rollback(stateSaver);
CreateVirWebSite( " Message " , Context.Parameters[ " installdir " ].ToString() + " Message " );
CreateVirWebSite( " MoreUpload " , Context.Parameters[ " installdir " ].ToString() + " MoreUpload " );
}
}
else
{
MessageBox.Show( " 检测到您的电脑没有安装SQL SERVER,无法继续安装此产品 " , " 信息提示 " , MessageBoxButtons.OK, MessageBoxIcon.Warning);
this .Rollback(stateSaver);
}
}
上面创建网站时会抛出一个文件路径的异常,但是网站是创建成功的,也算一个遗留问题,创建好网站后调用CreateVirWebSite方法创建虚拟目录。
5)安装时用户参数接收
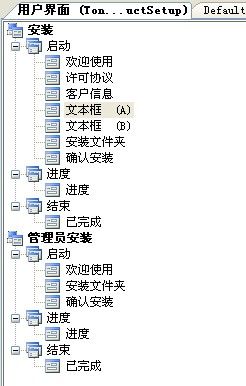
参数的名称在添加安装项目的视图-》用户界面里填写,如下图:
参数的传递在视图——》自定义操作里面设置,如下图:
在CustomActionData里输入所有需要传递到安装类的参数 /dbname=[DBNAME] /server=[SERVER] /user=[UID] /pwd=[PWD] /sitename=[SITENAME] /siteport=[SITEPORT] /startpage=[STARTPAGE] /shortcutname=[SHORTCUTNAME] /installdir="[TARGETDIR]\" 注意这个格式是固定的,尤其安装路径的参数格式installdir="[TARGETDIR]\"这么写
同时要说明的是在卸载的CustomActionData属性只需要给出installdir参数,即使给了其它的参数,卸载时也是读取不到的,只能读取到初始的默认值,如果安装过程中用户重新修改了就不行了,安装文件时选择的路径始终能正确读取到,正因为如此在安装时需要把录入的相关信息以XML配置文件的形式记录下来,这样才能保证正确无误的卸载。
6)卸载
/// 卸载
/// </summary>
/// <param name="savedState"></param>
public override void Uninstall(IDictionary savedState)
{
DeleteWebSite(); // 删除安装文件前先删除站点,因删除站点时需读取安装文件的配置信息
dbpath = Path.Combine( this .Context.Parameters[ " installdir " ].ToString(), " dbconfig.xml " );
string connectionString = OperateXML.GetXmlNodeValue(dbpath, " ConnString " );
string dbName = OperateXML.GetXmlNodeValue(dbpath, " DbName " );
base .Uninstall(savedState);
try
{
using (SqlConnection connection = new SqlConnection(connectionString))
{
connection.Open();
string sql = " if exists(select 1 from master..sysdatabases where name= ' " + dbName + " ') drop database " + dbName;
ExecuteSQL(connection, sql);
connection.Close();
}
if (Directory.Exists(Context.Parameters[ " installdir " ].ToString() + " Message " ))
{
Directory.Delete(Context.Parameters[ " installdir " ].ToString() + " Message " , true );//删除解压产生的文件
if (Directory.Exists(Context.Parameters[ " installdir " ].ToString() + " MoreUpload " ))
{
Directory.Delete(Context.Parameters[ " installdir " ].ToString() + " MoreUpload " , true );
}
}
catch (Exception ex)
{
MessageBox.Show( " 卸载失败!\n " + ex.Message, " 信息提示 " , MessageBoxButtons.OK, MessageBoxIcon.Warning);
this .Rollback(savedState);
return ;
}
}
因为解压产生的文件卸载时不会自动删除,需要单独编写代码删除,这些文件是安装过程中产生的次生文件,它只会自动删除原本WEB项目打包进去的原来文件,至于另外产生的文件
是不会自动删除的。对于解压后的文件进行操作,这里也有个一个必须要注意的地方,就是路径问题,解压产生的次生文件,安装时会读取不到解压后的文件夹路径,事实上文件已经复制解压也完成了,但就是读取不到,对应这种情况办法是建立一个和压缩包一样的空文件夹放到WEB项目里,如果解压后的文件里需要替换webconfig连接串,可以在文件夹里放入Web.xml文件,并设置好要替换的地方,前面说了多个webconfig生成会不成功,这里可以先取名xml,解压后替换连接串再修改文件名OK了。
7)安装项目工程结构
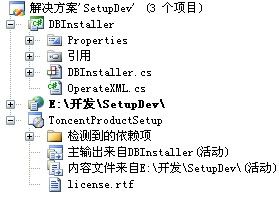
新建一个网站或项目,然后添加安装项目和安装程序类库,如下图
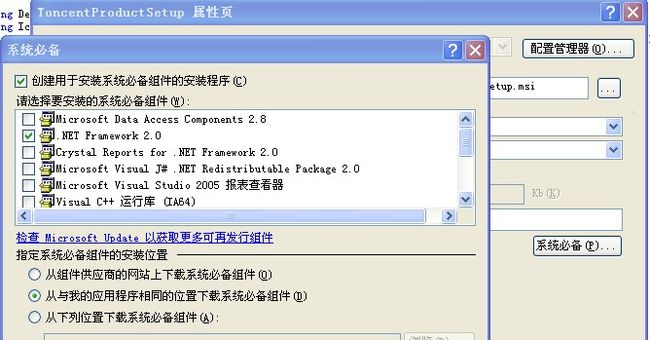
虽然是WEB项目打包安装,这里选择安装项目就可以了,并不需要选择Web 安装项目。安装项目属性里的系统必备选择相应的.NET类库,安装时如果没有装framework也会自动引导安装,如下图:
生成安装项目时会产生两个执行文件,一个.msi 一个setup.exe,msi是打包生成是安装程序,exe是一个引导安装程序,如果电脑上没有安装framework,那么点击exe运行引导安装,如果原本已经安装了相应的framework,那么随便点击那个安装效果是一样的。
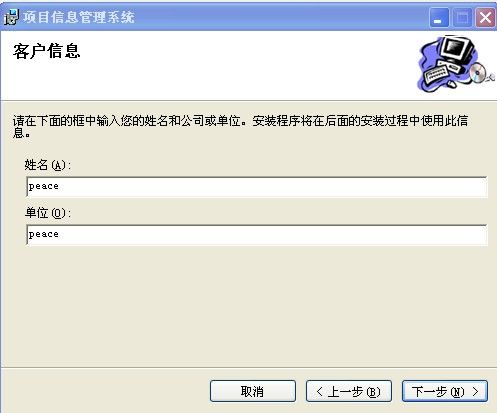
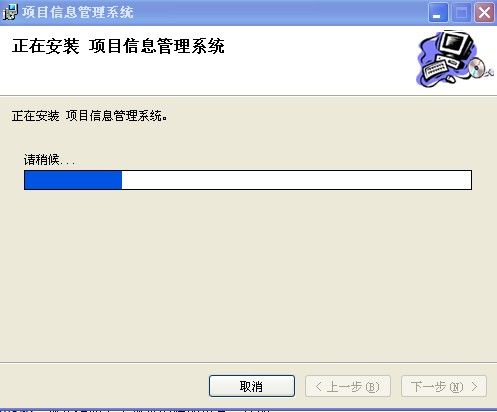
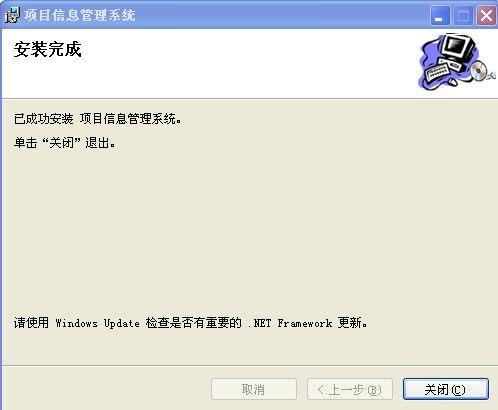
8)运行效果图
上面原本默认的路径是C:\Program Files\peace\项目信息管理系统\ ,如果一级目录原本存在的话会有一个问题,解压时会找不到压缩文件,文件确实是存在的,但是磁盘根目录下却又可以,可能是调用WinRAR解压读写的权限问题。
下面两张是桌面的快捷方式和附加的数据库图
卸载时也完全卸载了所有相关的文件和内容。
9)代码下载
有些代码没贴出来,直接放到源码里下载去看好了,主要是DBInstaller.cs文件里的代码。
源码下载:点击下载
