一起来学Objective-C(3)——如何声明和定义类
通过前边的hello world程序,我们知道了如何包含头文件,以及NSLog的基本用法,从本节开始,通过一个简单的类来讲解如何声明和定义类,以及类中的成员函数长什么摸样。
在第一节中描述的HOME中添加以下三个文件Rec.h、Rec.c、main.m:
/**
* @file Rec.h
* @brief
* @author Don Hao
* @date 2011-8-21 12:14:13
* @version
* <pre><b>copyright: </b></pre>
* <pre><b>email: </b>[email protected]</pre>
* <pre><b>company: </b>http://blog.csdn.net/donhao</pre>
* <pre><b>All rights reserved.</b></pre>
* <pre><b>modification:</b></pre>
* <pre>Write modifications here.</pre>
*/

#import <Foundation/Foundation.h>

@interface Rec : NSObject
{
    int length;
    int width;
}

-(void) setLength: (int) len setWidth: (int) wid;
-(int) getLength;
-(int) getWidth;
+(void) testStaticMethod:(NSString*) nsstr printCStr:(const char*) cstr;
@end
/**
* @file Rec.m
* @brief
* @author Don Hao
* @date 2011-8-21 12:14:13
* @version
* <pre><b>copyright: </b></pre>
* <pre><b>email: </b>[email protected]</pre>
* <pre><b>company: </b>http://blog.csdn.net/donhao</pre>
* <pre><b>All rights reserved.</b></pre>
* <pre><b>modification:</b></pre>
* <pre>Write modifications here.</pre>
*/

#import "Rec.h"

@implementation Rec

-(void) setLength: (int) len setWidth: (int) wid
{
    NSLog(@"SET: Length=%d, Width=%d\n", len, wid);
	length = len;
	width = wid;
}

-(int) getLength
{
    return length;
}

-(int) getWidth
{
    return width;
}

+(void) testStaticMethod:(NSString*) nsstr printCStr:(const char*) cstr
{
    NSLog(@"This is NSString: %@  This is C String: %s\n", nsstr, cstr);
}
@end
/**
* @file main.m
* @brief
* @author Don Hao
* @date 2011-8-21 12:14:13
* @version
* <pre><b>copyright: </b></pre>
* <pre><b>email: </b>[email protected]</pre>
* <pre><b>company: </b>http://blog.csdn.net/donhao</pre>
* <pre><b>All rights reserved.</b></pre>
* <pre><b>modification:</b></pre>
* <pre>Write modifications here.</pre>
*/

#import "Rec.h"

int testCFun(int length, int width)
{
    printf("C FUN: %d %d\n", length, width);
}

int main(int arvc, char* argv[])
{
    testCFun(1, 2);

    Rec* r = [Rec new];

    [r setLength:10 setWidth:20];

    NSLog(@"Length:%d\n", [r getLength]);
    NSLog(@"Width:%d\n", [r getWidth]);

    NSString* nsstr = @"NSSTRING";
    const char* cstr = "CSTRING";

    [Rec testStaticMethod:nsstr printCStr:cstr];
    return 0;
}
Makefile的内容(如果不清楚,请看第一节):
gen:
	gcc -o main main.m Rec.m -I/GNUstep/System/Library/Headers/ -fconstant-string-class=NSConstantString -L/GNUstep/System/Library/Libraries -lobjc -lgnustep-base
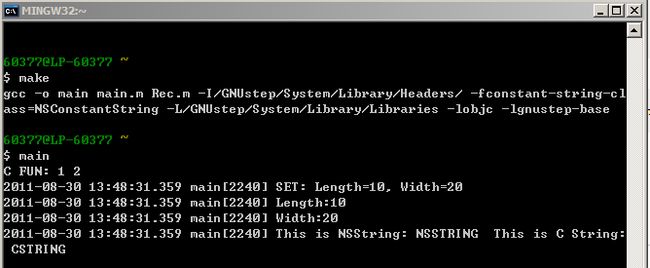
运行结果如下:
下面及后续章节对相关内容逐一进行说明。
大家习惯于C/C++/C#/Java代码风格的话,看到Objective-C的代码难免觉得难以接受。无需有排斥的感觉,等看习惯了就好了。
本节先来将一下Objective-C是如何声明和定义类的。
上边是一个Rec类(矩形),我们将类的声明放到了.h头文件(C++中类的定义可以放到.h中),类的定义放到了.m文件中。
1. 类的声明
类的声明格式为:
@interface 类名 : 父类
{
    //属性
}

//方法声明

@end
其中,该类必须直接或间接继承自NSObject,@interface用于指示这是对类的定义,类名后边的冒号是继承(同C++),属性放到大括弧中,在大括弧之后是类的方法,最后是@end(这个可以不写,但为了让其他人知道这个类定义到这里就结束了,写上更好)。
2. 类的定义
类的定义格式为:
@implementation 类名

//方法定义

@end
3 示例说明
在上边的示例中对类Rec的定义:
a. 类Rec继承自NSObject
b. 有两个属性:length和width
c. 有四个方法:具体的方法下节进行解释。
d. 通过+/-来修饰方法,如果为-,则表明该方法属于对象,如果为+,则表明该方法属于类(即静态方法)
Objective-C与C++的类的不同之处在于:
a. C++通过Class来标识类,而Objective-C通过@interface/@implementation来标识类;
b. C++通过static来区分是否是静态方法,而Objective-C通过+/-来区分;
c. C++类的方法定义在类的大括弧中,而Objective-C在大括弧外;
e. C++对属性和方法有public、private、protected等访问限制属性,而Objective-C中属性为Protected,方法为Public;
f. C++支持多继承,而Objective-C不支持多继承;
一起来学Objective-C(1)——Window下开发环境安装和Hello World
一起来学Objective-C(2)——Hello World深入
一起来学Objective-C(3)——如何声明和定义类
