利用Adobe Flash Catalyst CS5.5制作Flex组件皮肤(Button)实例
利用Adobe FlashCatalyst CS5.5制作Flex组件皮肤(Button)实例
下面是进行button皮肤制作的其中一个方法及步骤
注意事项:1、Catalyst5.5导出的fxp工作文件被Flash Budiler4.6后,提示报错,是因为版本兼容问题,不影响工作作用。
操作步骤:
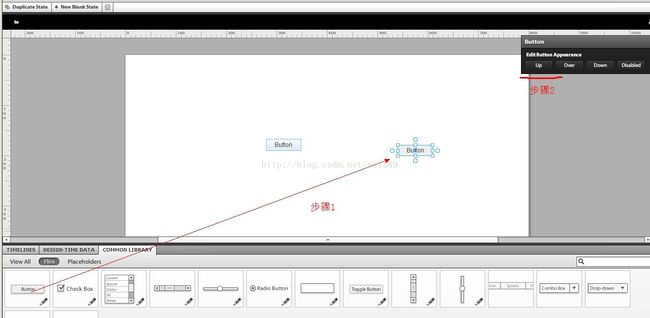
1、 打开CatalystCS5.5,新建一个Catalyst工程,进入主界面。在界面下栏Common LIBRARY标签中将button控件拖入到工作台中,然后在states点击up状态按钮,如图1所示:
图1
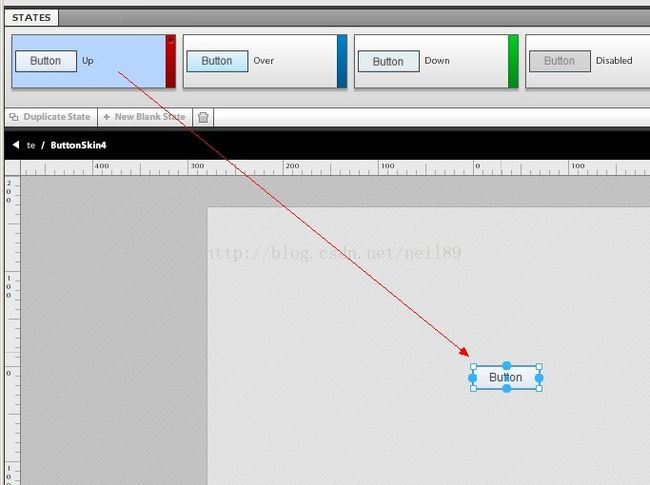
点击up状态后,在菜单栏下面的STATES栏中将会添加button的四个不同状态,如图2所示:
图2
2、 通过第1步,我们的准备工作已经完成,接下来,是要设计好button在四种状态下的不同UI形式,然后在四个状态中进行设计。点击sataes中的up状态,然后在工作台中选中button按钮,图3所示
图3
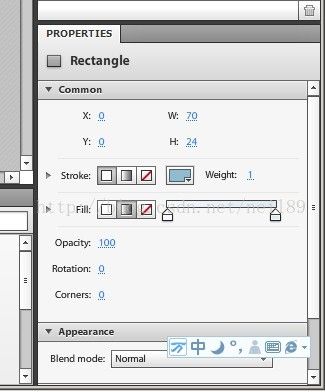
然后在界面右下角的properties栏中对up状态进行设计,在这栏中,可以对button的位置、填充颜色、边框及圆角等进行自定义,如图4所示
图4
通过此栏的自定义设置,up状态的ui设计基本完成,利用同样的方法对over、down、disable进行设计,这样,一个button的四种状态都设计完成了。状态设计完成后,在文件菜单中导出fxp文件。
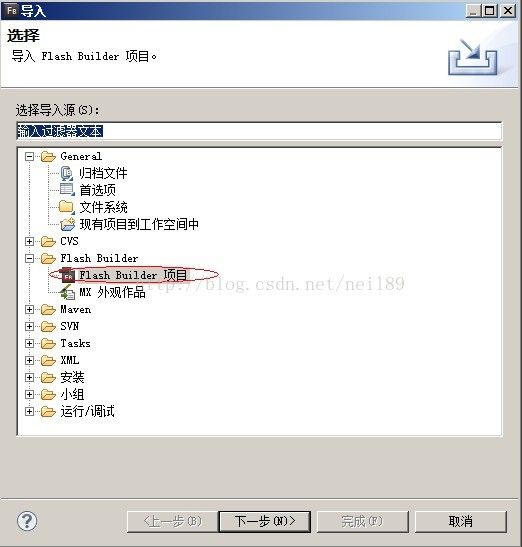
3、打开Flash Buider4.6开发工具,将刚才从Catalyst软件中导出的fxp文件导入到工作空间中,但导入后会出现报错,版本问题此处理忽略。如图5所示
图5
在项目文件目录中找到我们新建的状态皮肤,图6所示
这个文件就是我们想要得到的button皮肤文件了。在Catalyst软件中设计组件的皮肤,步骤比较简单,但灵活性不强,例如如果想制作一个图button皮肤,就需要借助ai软件或图像处理软件的支持。
4、通过以上的步骤,我们已经得到了基本的皮肤需求,但如果想要达到动画的效果,例如鼠标移入移出button,颜色淡入淡出,而不是立即变化,我们也可以通过加入代码达到想要的效果。下面是从catalyst中导出的皮肤源代码
<?xml version="1.0"encoding="utf-8"?>
<s:Skinxmlns:fx="http://ns.adobe.com/mxml/2009" xmlns:s="library://ns.adobe.com/flex/spark"
        xmlns:fc="http://ns.adobe.com/flashcatalyst/2009"
        width="70" height="24">

    <fx:Metadata>
        [HostComponent("spark.components.Button")]
    </fx:Metadata>

    <s:states>
        <s:State name="up"/>
        <s:State name="over"/>
        <s:State name="down"/>
        <s:State name="disabled"/>
    </s:states>

    <!-- background -->
    <s:Rect left="0" right="0" top="0" bottom="0" radiusX="2"
            alpha.disabled="0.5"radiusY.disabled="2"
            radiusX.down="0"
            radiusX.over="0"
            radiusX.up="0">
        <s:stroke>
            <s:SolidColorStroke color="#92BBCF"/>
        </s:stroke>
        <s:fill>
            <s:SolidColor color="#BABABA" color.up="#EEEEEE" color.over="#DDDDDD" color.down="#E4EDEF"/>
        </s:fill>
        <s:fill.up>
            <s:LinearGradient rotation="90">
                <s:GradientEntry alpha="1.0" color="#F5F8FD" ratio="0"/>
                <s:GradientEntry alpha="1.0" color="#DFE9F2" ratio="1"/>
            </s:LinearGradient>
        </s:fill.up>
        <s:fill.over>
            <s:LinearGradient rotation="90">
                <s:GradientEntry alpha="1.0" color="#EBF5F7" ratio="0"/>
                <s:GradientEntry alpha="1.0" color="#B4E6FF" ratio="1"/>
            </s:LinearGradient>
        </s:fill.over>
        <s:fill.down>
            <s:SolidColor color="#E4EDEF"/>
        </s:fill.down>
    </s:Rect>

    <!-- shadow (down state only) -->
    <s:Rect includeIn="down" y="0" left="0" right="0" height="4" radiusX="2">
        <s:fill>
            <s:LinearGradient rotation="90">
                <s:GradientEntry alpha="0.23" color="#DBF7FF" ratio="0"/>
                <s:GradientEntry alpha="0.2" color="#B4E6FF" ratio="0.4"/>
                <s:GradientEntry alpha="0.055" color="#CEEFF8" ratio="0.55"/>
                <s:GradientEntry alpha="0.0" color="#CEEFF8" ratio="0.8"/>
                <s:GradientEntry alpha="0.0" color="#CEEFF8" ratio="0.9254901960784314"/>
            </s:LinearGradient>
        </s:fill>
    </s:Rect>
    <s:Rect includeIn="down" x="0" top="0" bottom="0" width="4" radiusX="2">
        <s:fill>
            <s:LinearGradient rotation="0">
                <s:GradientEntry alpha="0.13" color="#CEEFF8" ratio="0"/>
                <s:GradientEntry alpha="0.12" color="#CEEFF8" ratio="0.2"/>
                <s:GradientEntry alpha="0.0" color="#CEEFF8" ratio="0.55"/>
            </s:LinearGradient>
        </s:fill>
    </s:Rect>

    <!-- label -->
    <s:RichText id="labelDisplay" horizontalCenter="0"verticalCenter="1" verticalCenter.down="2"  textAlign="center"verticalAlign="middle"alpha.disabled="0.5" fontFamily="Arial"/>

</s:Skin>
接下来,我们先对background节点下的代码进行一些修改,如下:
<s:Rectleft="0"
            right="0"
            top="0"
            bottom="0"
            radiusX="2"
            alpha.disabled="0.5"
            radiusY.disabled="2"
            radiusX.down="0"
            radiusX.over="0"
            radiusX.up="0">
        <s:stroke>
            <s:SolidColorStroke color="#92BBCF"/>
        </s:stroke>
        <s:fill>
            <s:LinearGradient rotation="90">
                <s:GradientEntry id="ge1"
                                 alpha="1.0"
                                 color.up="#F5F8FD"
                                 color.over="#EBF5F7"
                                 ratio="0"/>
                <s:GradientEntry id="ge2"
                                 alpha="1.0"
                                 color.up="#DFE9F2"
                                 color.over="#B4E6FF"
                                 ratio="1"/>
            </s:LinearGradient>
        </s:fill>
        <s:fill.down>
            <s:SolidColor color="#E4EDEF"/>
        </s:fill.down>
    </s:Rect>
修改部分为fill.up及fill.down,将状态代码合并到fill中,然后在GradientEntry中添加ID。然后添加动画代码如下:
<!-- Transition -->
    <s:transitions>

        <s:Transition fromState="up"
                      toState="over">
            <s:AnimateColor duration="500"
                            targets="{[ ge1, ge2]}"/>
        </s:Transition>

        <s:Transition fromState="over"
                      toState="up">
            <s:AnimateColor duration="500"
                            targets="{[ ge1, ge2]}"/>
        </s:Transition>

    </s:transitions>
修改后完整的代码如下
ButtonSkin.mxml
<?xml version="1.0"encoding="utf-8"?>

<!--

    ADOBESYSTEMS INCORPORATED
    Copyright2008 Adobe Systems Incorporated
    AllRights Reserved.

    NOTICE:Adobe permits you to use, modify, and distribute this file
    inaccordance with the terms of the license agreement accompanying it.

-->

<!--- The default skin classfor the Spark Button component.

       @see spark.components.Button

      @langversion 3.0
      @playerversion Flash 10
      @playerversion AIR 1.5
      @productversion Flex 4
-->
<s:SparkButtonSkin xmlns:fx="http://ns.adobe.com/mxml/2009"
                  xmlns:s="library://ns.adobe.com/flex/spark"
                   xmlns:fb="http://ns.adobe.com/flashbuilder/2009"
                   minWidth="70"
                   minHeight="24"
                   alpha.disabled="0.5">

    <fx:Metadata>
        <![CDATA[
        /**
         * @copyspark.skins.spark.ApplicationSkin#hostComponent
         */
        [HostComponent("spark.components.Button")]
        ]]>
    </fx:Metadata>

    <!-- states -->
    <s:states>
        <s:State name="up"/>
        <s:State name="over"/>
        <s:State name="down"/>
        <s:State name="disabled"/>
    </s:states>

    <!-- Transition -->
    <s:transitions>

        <s:Transition fromState="up"
                      toState="over">
            <s:AnimateColor duration="500"
                            targets="{[ ge1, ge2]}"/>
        </s:Transition>

        <s:Transition fromState="over"
                      toState="up">
            <s:AnimateColor duration="500"
                            targets="{[ ge1, ge2]}"/>
        </s:Transition>

        <!--<s:Transition fromState="over"
                      toState="down">
            <s:AnimateColorduration="500"
                            targets="{[ge1, ge2, ge3, ge4 ]}"/>
        </s:Transition>

        <s:TransitionfromState="down"
                      toState="up">
            <s:AnimateColorduration="500"
                            targets="{[ge1, ge2, ge3, ge4 ]}"/>
        </s:Transition>-->

    </s:transitions>

    <!-- background -->
    <s:Rect left="0"
            right="0"
            top="0"
            bottom="0"
            radiusX="2"
            alpha.disabled="0.5"
            radiusY.disabled="2"
            radiusX.down="0"
            radiusX.over="0"
            radiusX.up="0">
        <s:stroke>
            <s:SolidColorStroke color="#92BBCF"/>
        </s:stroke>
        <s:fill>
            <s:LinearGradient rotation="90">
                <s:GradientEntry id="ge1"
                                 alpha="1.0"
                                 color.up="#F5F8FD"
                                 color.over="#EBF5F7"
                                 ratio="0"/>
                <s:GradientEntry id="ge2"
                                 alpha="1.0"
                                 color.up="#DFE9F2"
                                 color.over="#B4E6FF"
                                 ratio="1"/>
            </s:LinearGradient>
        </s:fill>
        <s:fill.down>
            <s:SolidColor color="#E4EDEF"/>
        </s:fill.down>
    </s:Rect>

    <!-- shadow (down state only) -->
    <s:Rect includeIn="down"
            y="0"
            left="0"
            right="0"
            height="4"
            radiusX="2">
        <s:fill>
            <s:LinearGradient rotation="90">
                <s:GradientEntry alpha="0.23"
                                 color="#DBF7FF"
                                 ratio="0"/>
                <s:GradientEntry alpha="0.2"
                                 color="#B4E6FF"
                                 ratio="0.4"/>
                <s:GradientEntry alpha="0.055"
                                 color="#CEEFF8"
                                 ratio="0.55"/>
                <s:GradientEntry alpha="0.0"
                                 color="#CEEFF8"
                                 ratio="0.8"/>
                <s:GradientEntry alpha="0.0"
                                 color="#CEEFF8"
                                 ratio="0.9254901960784314"/>
            </s:LinearGradient>
        </s:fill>
    </s:Rect>
    <s:Rect includeIn="down"
            x="0"
            top="0"
            bottom="0"
            width="4"
            radiusX="2">
        <s:fill>
            <s:LinearGradient rotation="0">
                <s:GradientEntry alpha="0.13"
                                 color="#CEEFF8"
                                 ratio="0"/>
                <s:GradientEntry alpha="0.12"
                                 color="#CEEFF8"
                                 ratio="0.2"/>
                <s:GradientEntry alpha="0.0"
                                 color="#CEEFF8"
                                 ratio="0.55"/>
            </s:LinearGradient>
        </s:fill>
    </s:Rect>

    <!-- layer 8: text -->
    <!--- @copyspark.components.supportClasses.ButtonBase#labelDisplay  -->
    <s:Label id="labelDisplay"
             textAlign="center"
             maxDisplayedLines="1"
             horizontalCenter="0"
             verticalCenter="1"
             verticalAlign="middle"
             left="10"
             right="10"
             top="2"
             bottom="2">
    </s:Label>

</s:SparkButtonSkin>
运行测试,效果是不是相分强烈呢?


