centos-6.6安装nginx-1.9.7和php7.0.0(一)
看PHP7.0发布了,尝尝鲜决定自己动手安装部署下,(未安装mysql及php优化加速等,后续完成)现将步骤罗列下:
1、系统添加www用户
#useradd wwwy
2、安装前准备
#yum install epel-* -y
#yum install -y wget unzip gcc gcc-c++ make zlib zlib-devel pcre pcre-devel libjpeg libjpeg-devel libpng libpng-devel freetype freetype-devel libxml2 libxml2-devel glibc glibc-devel glib2 glib2-devel bzip2 bzip2-devel ncurses ncurses-devel curl curl-devel e2fsprogs e2fsprogs-devel krb5 krb5-devel openssl openssl-devel openldap openldap-devel nss_ldap openldap-clients openldap-servers
#wget http://ftp.gnu.org/pub/gnu/libiconv/libiconv-1.14.tar.gz
#tar zxf libiconv-1.14.tar.gz
#cd libiconv-1.14
#./configure --prefix=/usr
#make
#make install
#cd ..
2、下载PHP7.0
#wget http://php.net/distributions/php-7.0.0.tar.bz2
#tar -jxvf php-7.0.0.tar.bz2
#cd php-7.0.0
#./configure --prefix=/usr/local/php70 --sysconfdir=/usr/local/php70/etc --with-config-file-scan-dir=/usr/local/php70/etc --enable-fpm --with-fpm-user=www --with-fpm-group=www --enable-mbstring --enable-sockets --enable-pcntl --enable-pdo --enable-mysqlnd --with-mysql=mysqlnd --with-mysqli=mysqlnd --with-pdo-mysql=mysqlnd --enable-sysvshm --enable-shmop --with-jpeg-dir=/usr --with-freetype-dir=/usr --with-png-dir=/usr --with-zlib-dir=/usr --with-gd --with-openssl --enable-opcache --enable-zip --enable-bcmath --enable-pcntl --enable-ftp --with-curl
#./configure --prefix=/usr/local/php70 --sysconfdir=/usr/local/php70/etc --with-config-file-scan-dir=/usr/local/php70/etc --enable-fpm --with-fpm-user=www --with-fpm-group=www --enable-mbstring --enable-sockets --enable-pcntl --enable-pdo--enable-sysvshm --enable-shmop --with-jpeg-dir=/usr --with-freetype-dir=/usr --with-png-dir=/usr --with-zlib-dir=/usr --with-iconv=/usr/lib --with-gd --with-openssl --enable-opcache=no --enable-zip --enable-bcmath --enable-pcntl --enable-ftp --with-curl
#make
#make install
#cp php.ini-production /usr/local/php70/etc/php.ini
#cp sapi/fpm/init.d.php-fpm /etc/init.d/php-fpm
#cp sapi/fpm/php-fpm.conf /usr/local/php70/etc/php-fpm.conf
#cp sapi/fpm/www.conf /usr/local/php70/etc/php-fpm.d/www.conf
#cd ..
#sed -i 's#short_open_tag = Off#short_open_tag = On#g' /usr/local/php70/etc/php.ini
#chmod +x /etc/init.d/php-fpm
3、安装nginx-1.9.7
#wget http://nginx.org/download/nginx-1.9.7.tar.gz
#tar -zxvf nginx-1.9.7.tar.gz
#cd nginx-1.9.7
#./configure --user=www --group=www --prefix=/usr/local/nginx --with-http_stub_status_module --with-http_ssl_module
#make;make install
#cd ..
#vi /usr/local/nginx/conf/nginx.conf
#将document_root的定义放在location /{}的外面
root html;
index index.html index.htm index.php;
#下面的按照红色标注修改
...
location ~ \.php$ {
root html;
fastcgi_pass 127.0.0.1:9000;
fastcgi_index index.php;
fastcgi_param SCRIPT_FILENAME $document_root$fastcgi_script_name;
include fastcgi_params;
}
4、nginx的启动
#/usr/local/nginx/sbin/nginx
关闭nginx,需要关闭nginx的主进程
查询nginx主进程号
ps -ef | grep nginx
从容停止 kill -QUIT 主进程号
快速停止 kill -TERM 主进程号
强制停止 kill -9 nginx
5、启动php-fpm#/etc/init.d/php-fpm start
相应的关闭及重启为stop,restart
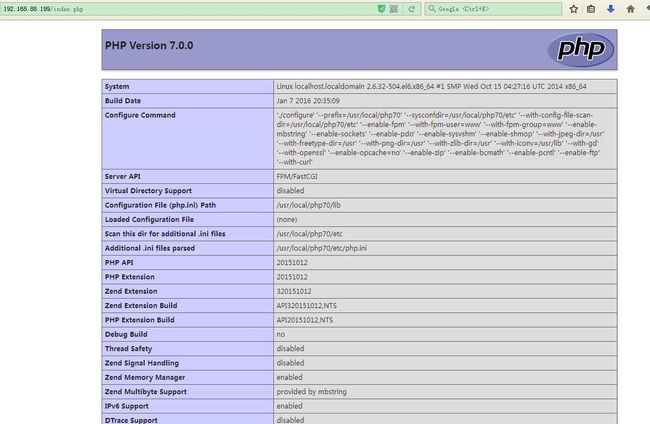
在document的根目录/usr/local/nginx/html下创建一个index.php文件输出phpinfo信息
#echo '<?php phpinfo(); ?>' >/usr/local/nginx/html/index.php
6、访问看到phpinfo
