Android 驱动和系统开发 2. 解析模拟器GPS模块
好久没有写技术博客了,恰逢今天还感冒了,这破天气,晚上凉风一吹,就感冒了,要加强锻炼呀。
好了,废话不多说,由于工作需要,我要移植一个虚拟的gps模块,于是乎,我就参考了android模拟器的gps模块的实现方法,只需稍微改动就完成了我的工作了,随后我也会附上我做的模块的代码,这里主要还是来解析下模拟器上的gps模块代码吧。
相信做过android location方面应用的同志都知道,android 模拟器虽然没有真正的GPS功能,但是DDMS可以模拟GPS,通过telnet连接到adb,然后发送GPS数据,再转化成NMEA格式的信号给android系统,就可以模拟出location功能了,相信用过的童鞋都知道,没用过的同志去搜索一下就知道了,这里我就不多说了,我主要还是来分析一下这个模拟的功能是如何实现的,这里还是膜拜一下写android源码的大神们,多看看源码,学到的东西很多呢。
首先,我们直入主题,对于移植系统的人来说(比如说我),关注的是中间部分的代码,android的framework层我们需要改动的很少,最多就是加点log来调试,驱动层呢,因为模拟器没有真实的设备,也不可能利用PC上的资源区模拟,因为PC是没有GPS模块的(除非你的电脑很高级),但是我想还是可以通过网络来得到地理位置的,虽然不是非常的准确,希望google的工程师可以去完善,呵呵,题外话了。说了这么多,我就是想说,android 模拟器中gps模块的功能主要依赖于2个东西,一个是ddms中的geo fix命令,还有一个是hal层中的gps_qemu.c中作为硬件抽象层的处理,把虚拟的数据上报给framework层。
主要层次如下图

好了,思路清晰了,咱就看代码,位于源码目录下/sdk/emulator/gps/gps_qemu.c
首先我们要搞清楚,在andrroid中HAL 的一个位置问题,HAL是为了更好的封装好硬件驱动存在的,主要是一些接口,编译成库文件,给framework中国的jni来调用,我们这里的GPS模块会被编译成gps.goldfish.so文件,在同目录下的Android.mk中有写到
- LOCAL_CFLAGS += -DQEMU_HARDWARE
- LOCAL_SHARED_LIBRARIES := liblog libcutils libhardware
- LOCAL_SRC_FILES := gps_qemu.c
- LOCAL_MODULE := gps.goldfish
- LOCAL_MODULE_TAGS := debug
然后呢,在jni中会这样调用
- static void android_location_GpsLocationProvider_class_init_native(JNIEnv* env, jclass clazz) {
- int err;
- hw_module_t* module;
- method_reportLocation = env->GetMethodID(clazz, "reportLocation", "(IDDDFFFJ)V");
- method_reportStatus = env->GetMethodID(clazz, "reportStatus", "(I)V");
- method_reportSvStatus = env->GetMethodID(clazz, "reportSvStatus", "()V");
- method_reportAGpsStatus = env->GetMethodID(clazz, "reportAGpsStatus", "(III)V");
- method_reportNmea = env->GetMethodID(clazz, "reportNmea", "(J)V");
- method_setEngineCapabilities = env->GetMethodID(clazz, "setEngineCapabilities", "(I)V");
- method_xtraDownloadRequest = env->GetMethodID(clazz, "xtraDownloadRequest", "()V");
- method_reportNiNotification = env->GetMethodID(clazz, "reportNiNotification",
- "(IIIIILjava/lang/String;Ljava/lang/String;IILjava/lang/String;)V");
- method_requestRefLocation = env->GetMethodID(clazz,"requestRefLocation","(I)V");
- method_requestSetID = env->GetMethodID(clazz,"requestSetID","(I)V");
- method_requestUtcTime = env->GetMethodID(clazz,"requestUtcTime","()V");
- err = hw_get_module(GPS_HARDWARE_MODULE_ID, (hw_module_t const**)&module);
- if (err == 0) {
- hw_device_t* device;
- err = module->methods->open(module, GPS_HARDWARE_MODULE_ID, &device);
- if (err == 0) {
- gps_device_t* gps_device = (gps_device_t *)device;
- sGpsInterface = gps_device->get_gps_interface(gps_device);
- }
- }
- if (sGpsInterface) {
- sGpsXtraInterface =
- (const GpsXtraInterface*)sGpsInterface->get_extension(GPS_XTRA_INTERFACE);
- sAGpsInterface =
- (const AGpsInterface*)sGpsInterface->get_extension(AGPS_INTERFACE);
- sGpsNiInterface =
- (const GpsNiInterface*)sGpsInterface->get_extension(GPS_NI_INTERFACE);
- sGpsDebugInterface =
- (const GpsDebugInterface*)sGpsInterface->get_extension(GPS_DEBUG_INTERFACE);
- sAGpsRilInterface =
- (const AGpsRilInterface*)sGpsInterface->get_extension(AGPS_RIL_INTERFACE);
- }
- }
- err = hw_get_module(GPS_HARDWARE_MODULE_ID, (hw_module_t const**)&module);
这个函数原型在HAL中的hardware.c中
- int hw_get_module_by_class(const char *class_id, const char *inst,
- const struct hw_module_t **module)
- {
- int status;
- int i;
- const struct hw_module_t *hmi = NULL;
- char prop[PATH_MAX];
- char path[PATH_MAX];
- char name[PATH_MAX];
- if (inst)
- snprintf(name, PATH_MAX, "%s.%s", class_id, inst);
- else
- strlcpy(name, class_id, PATH_MAX);
- /*
- * Here we rely on the fact that calling dlopen multiple times on
- * the same .so will simply increment a refcount (and not load
- * a new copy of the library).
- * We also assume that dlopen() is thread-safe.
- */
- /* Loop through the configuration variants looking for a module */
- for (i=0 ; i<HAL_VARIANT_KEYS_COUNT+1 ; i++) {
- if (i < HAL_VARIANT_KEYS_COUNT) {
- if (property_get(variant_keys[i], prop, NULL) == 0) {
- continue;
- }
- snprintf(path, sizeof(path), "%s/%s.%s.so",
- HAL_LIBRARY_PATH2, name, prop);
- if (access(path, R_OK) == 0) break;
- snprintf(path, sizeof(path), "%s/%s.%s.so",
- HAL_LIBRARY_PATH1, name, prop);
- if (access(path, R_OK) == 0) break;
- } else {
- snprintf(path, sizeof(path), "%s/%s.default.so",
- HAL_LIBRARY_PATH1, name);
- if (access(path, R_OK) == 0) break;
- }
- }
- status = -ENOENT;
- if (i < HAL_VARIANT_KEYS_COUNT+1) {
- /* load the module, if this fails, we're doomed, and we should not try
- * to load a different variant. */
- status = load(class_id, path, module);
- }
- return status;
- }
当我们编译gps模块之后会在/system/lib/hw/下生成一个gps.goldfish.so文件,这个函数就是去寻找这个库文件,然后调用load函数去打开这个库文件,来得到库中的函数接口
- static int load(const char *id,
- const char *path,
- const struct hw_module_t **pHmi)
- {
- int status;
- void *handle;
- struct hw_module_t *hmi;
- /*
- * load the symbols resolving undefined symbols before
- * dlopen returns. Since RTLD_GLOBAL is not or'd in with
- * RTLD_NOW the external symbols will not be global
- */
- handle = dlopen(path, RTLD_NOW);
- if (handle == NULL) {
- char const *err_str = dlerror();
- LOGE("load: module=%s\n%s", path, err_str?err_str:"unknown");
- status = -EINVAL;
- goto done;
- }
- /* Get the address of the struct hal_module_info. */
- const char *sym = HAL_MODULE_INFO_SYM_AS_STR;
- hmi = (struct hw_module_t *)dlsym(handle, sym);
- if (hmi == NULL) {
- LOGE("load: couldn't find symbol %s", sym);
- status = -EINVAL;
- goto done;
- }
- /* Check that the id matches */
- if (strcmp(id, hmi->id) != 0) {
- LOGE("load: id=%s != hmi->id=%s", id, hmi->id);
- status = -EINVAL;
- goto done;
- }
- hmi->dso = handle;
- /* success */
- status = 0;
- done:
- if (status != 0) {
- hmi = NULL;
- if (handle != NULL) {
- dlclose(handle);
- handle = NULL;
- }
- } else {
- LOGV("loaded HAL id=%s path=%s hmi=%p handle=%p",
- id, path, *pHmi, handle);
- }
- *pHmi = hmi;
- return status;
- }
这里我介绍的比较简洁,因为在我之前的博客中已经介绍过这部分的内容了,可以参考这里: http://blog.csdn.net/zhangjie201412/article/details/7225617
好了,回到我们GPS模块的代码上来
之后就会调用
- err = module->methods->open(module, GPS_HARDWARE_MODULE_ID, &device);
来打开设备,来看下HAL中的代码
- static int open_gps(const struct hw_module_t* module, char const* name,
- struct hw_device_t** device)
- {
- struct gps_device_t *dev = malloc(sizeof(struct gps_device_t));
- memset(dev, 0, sizeof(*dev));
- dev->common.tag = HARDWARE_DEVICE_TAG;
- dev->common.version = 0;
- dev->common.module = (struct hw_module_t*)module;
- // dev->common.close = (int (*)(struct hw_device_t*))close_lights;
- dev->get_gps_interface = gps__get_gps_interface;
- *device = (struct hw_device_t*)dev;
- return 0;
- }
这里只是做了一些初始化,然后把接口函数挂钩一下
- dev->get_gps_interface = gps__get_gps_interface;
这个回调函数很简单
- static const GpsInterface qemuGpsInterface = {
- sizeof(GpsInterface),
- qemu_gps_init,
- qemu_gps_start,
- qemu_gps_stop,
- qemu_gps_cleanup,
- qemu_gps_inject_time,
- qemu_gps_inject_location,
- qemu_gps_delete_aiding_data,
- qemu_gps_set_position_mode,
- qemu_gps_get_extension,
- };
- const GpsInterface* gps__get_gps_interface(struct gps_device_t* dev)
- {
- return &qemuGpsInterface;
- }
返回qemuGpsInterface结构体,这个机构提中就是一大堆的回调函数。
下面我们按照调用顺序来一个一个介绍这些回调函数。
首先就是qume_gps_init函数
- static int
- qemu_gps_init(GpsCallbacks* callbacks)
- {
- GpsState* s = _gps_state;
- if (!s->init)
- gps_state_init(s, callbacks);
- if (s->fd < 0)
- return -1;
- return 0;
- }
这里我发现了一个很好玩的东西,这里这个GpsState* s是如何得到全局的实例的呢,是通过_gps_state,而_gps_state的定义是这样的
- typedef struct {
- int init;
- int fd;
- GpsCallbacks callbacks;
- pthread_t thread;
- int control[2];
- } GpsState;
- static GpsState _gps_state[1];
这里我的理解是在全局静态的定义了一个结构体指针,并分配了内存。
为何不在init函数中使用malloc来分配内存,然后使用呢,有点意思,现在还不知道有什么好处,难道只是卖弄吗?
好了,不多说了,接下去看调用的gps_state_init函数
在这之前,我来介绍下GpsState结构体中成员的作用吧
int init:
一个初始化的标志,为1表示初始化了,为0表示未初始化
int fd:
socket读写的文件描述符,如果是真实的硬件的话,应该是串口读写的描述符
callbacks:
这个是从jni传下来的回调函数,得到数据之后就回调
thread:
这个没什么好说的,就是一个线程
int control[2]:
本地使用的socket来进程间通信,会面会讲到。
继续init函数
- static void
- gps_state_init( GpsState* state, GpsCallbacks* callbacks )
- {
- state->init = 1;
- state->control[0] = -1;
- state->control[1] = -1;
- state->fd = -1;
- state->fd = qemud_channel_open(QEMU_CHANNEL_NAME);
- if (state->fd < 0) {
- D("no gps emulation detected");
- return;
- }
- D("gps emulation will read from '%s' qemud channel", QEMU_CHANNEL_NAME );
- if ( socketpair( AF_LOCAL, SOCK_STREAM, 0, state->control ) < 0 ) {
- LOGE("could not create thread control socket pair: %s", strerror(errno));
- goto Fail;
- }
- state->thread = callbacks->create_thread_cb( "gps_state_thread", gps_state_thread, state );
- if ( !state->thread ) {
- LOGE("could not create gps thread: %s", strerror(errno));
- goto Fail;
- }
- state->callbacks = *callbacks;
- D("gps state initialized");
- return;
- Fail:
- gps_state_done( state );
- }
首先书初始化赋值工作,看到没,把init变量赋值为1了。然后调用了qemud_channel_open函数来得到了adb tcp的socket文件描述符。然后调用socketpair创建本地的socket通信对来实现进程间通信,然后创建了线程,赋值回调函数,下图描述了代码执行的流程。
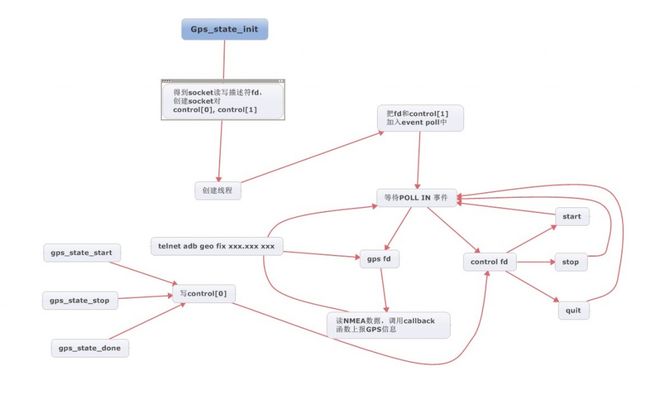
这图有点丑,不过大体思路还是清楚的,可以对照着代码看,这里使用的是event poll技术进行事件的处理,在线程中,把fd和control[1]加入了epoll中,设置为POLLIIN模式,当有事件发生是,就会调用相应的代码,这里的control[1],在这里做控制作用,只要是控制gps的开始和停止的,所以在线程外面对control[0]进行写操作的话,对应的control[1]就会收到相应的指令,然后采取措施。具体代码如下
- static void
- gps_state_thread( void* arg )
- {
- GpsState* state = (GpsState*) arg;
- NmeaReader reader[1];
- int epoll_fd = epoll_create(2);
- int started = 0;
- int gps_fd = state->fd;
- int control_fd = state->control[1];
- nmea_reader_init( reader );
- // register control file descriptors for polling
- epoll_register( epoll_fd, control_fd );
- epoll_register( epoll_fd, gps_fd );
- D("gps thread running");
- // now loop
- for (;;) {
- struct epoll_event events[2];
- int ne, nevents;
- nevents = epoll_wait( epoll_fd, events, 2, -1 );
- if (nevents < 0) {
- if (errno != EINTR)
- LOGE("epoll_wait() unexpected error: %s", strerror(errno));
- continue;
- }
- D("gps thread received %d events", nevents);
- for (ne = 0; ne < nevents; ne++) {
- if ((events[ne].events & (EPOLLERR|EPOLLHUP)) != 0) {
- LOGE("EPOLLERR or EPOLLHUP after epoll_wait() !?");
- return;
- }
- if ((events[ne].events & EPOLLIN) != 0) {
- int fd = events[ne].data.fd;
- if (fd == control_fd)
- {
- char cmd = 255;
- int ret;
- D("gps control fd event");
- do {
- ret = read( fd, &cmd, 1 );
- } while (ret < 0 && errno == EINTR);
- if (cmd == CMD_QUIT) {
- D("gps thread quitting on demand");
- return;
- }
- else if (cmd == CMD_START) {
- if (!started) {
- D("gps thread starting location_cb=%p", state->callbacks.location_cb);
- started = 1;
- nmea_reader_set_callback( reader, state->callbacks.location_cb );
- }
- }
- else if (cmd == CMD_STOP) {
- if (started) {
- D("gps thread stopping");
- started = 0;
- nmea_reader_set_callback( reader, NULL );
- }
- }
- }
- else if (fd == gps_fd)
- {
- char buff[32];
- D("gps fd event");
- for (;;) {
- int nn, ret;
- ret = read( fd, buff, sizeof(buff) );
- if (ret < 0) {
- if (errno == EINTR)
- continue;
- if (errno != EWOULDBLOCK)
- LOGE("error while reading from gps daemon socket: %s:", strerror(errno));
- break;
- }
- D("received %d bytes: %.*s", ret, ret, buff);
- for (nn = 0; nn < ret; nn++)
- nmea_reader_addc( reader, buff[nn] );
- }
- D("gps fd event end");
- }
- else
- {
- LOGE("epoll_wait() returned unkown fd %d ?", fd);
- }
- }
- }
- }
- }
好了,android 模拟器的虚拟hal层就介绍到这边,下面来看一下geo fix命令的实现源码,我也是找了好久才找到的,在external/qemu/android/console.c中
- static int
- do_geo_fix( ControlClient client, char* args )
- {
- // GEO_SAT2 provides bug backwards compatibility.
- enum { GEO_LONG = 0, GEO_LAT, GEO_ALT, GEO_SAT, GEO_SAT2, NUM_GEO_PARAMS };
- char* p = args;
- int top_param = -1;
- double params[ NUM_GEO_PARAMS ];
- int n_satellites = 1;
- static int last_time = 0;
- static double last_altitude = 0.;
- if (!p)
- p = "";
- /* tokenize */
- while (*p) {
- char* end;
- double val = strtod( p, &end );
- if (end == p) {
- control_write( client, "KO: argument '%s' is not a number\n", p );
- return -1;
- }
- params[++top_param] = val;
- if (top_param + 1 == NUM_GEO_PARAMS)
- break;
- p = end;
- while (*p && (p[0] == ' ' || p[0] == '\t'))
- p += 1;
- }
- /* sanity check */
- if (top_param < GEO_LAT) {
- control_write( client, "KO: not enough arguments: see 'help geo fix' for details\r\n" );
- return -1;
- }
- /* check number of satellites, must be integer between 1 and 12 */
- if (top_param >= GEO_SAT) {
- int sat_index = (top_param >= GEO_SAT2) ? GEO_SAT2 : GEO_SAT;
- n_satellites = (int) params[sat_index];
- if (n_satellites != params[sat_index]
- || n_satellites < 1 || n_satellites > 12) {
- control_write( client, "KO: invalid number of satellites. Must be an integer between 1 and 12\r\n");
- return -1;
- }
- }
- /* generate an NMEA sentence for this fix */
- {
- STRALLOC_DEFINE(s);
- double val;
- int deg, min;
- char hemi;
- /* format overview:
- * time of fix 123519 12:35:19 UTC
- * latitude 4807.038 48 degrees, 07.038 minutes
- * north/south N or S
- * longitude 01131.000 11 degrees, 31. minutes
- * east/west E or W
- * fix quality 1 standard GPS fix
- * satellites 1 to 12 number of satellites being tracked
- * HDOP <dontcare> horizontal dilution
- * altitude 546. altitude above sea-level
- * altitude units M to indicate meters
- * diff <dontcare> height of sea-level above ellipsoid
- * diff units M to indicate meters (should be <dontcare>)
- * dgps age <dontcare> time in seconds since last DGPS fix
- * dgps sid <dontcare> DGPS station id
- */
- /* first, the time */
- stralloc_add_format( s, "$GPGGA,%06d", last_time );
- last_time ++;
- /* then the latitude */
- hemi = 'N';
- val = params[GEO_LAT];
- if (val < 0) {
- hemi = 'S';
- val = -val;
- }
- deg = (int) val;
- val = 60*(val - deg);
- min = (int) val;
- val = 10000*(val - min);
- stralloc_add_format( s, ",%02d%02d.%04d,%c", deg, min, (int)val, hemi );
- /* the longitude */
- hemi = 'E';
- val = params[GEO_LONG];
- if (val < 0) {
- hemi = 'W';
- val = -val;
- }
- deg = (int) val;
- val = 60*(val - deg);
- min = (int) val;
- val = 10000*(val - min);
- stralloc_add_format( s, ",%02d%02d.%04d,%c", deg, min, (int)val, hemi );
- /* bogus fix quality, satellite count and dilution */
- stralloc_add_format( s, ",1,%02d,", n_satellites );
- /* optional altitude + bogus diff */
- if (top_param >= GEO_ALT) {
- stralloc_add_format( s, ",%.1g,M,0.,M", params[GEO_ALT] );
- last_altitude = params[GEO_ALT];
- } else {
- stralloc_add_str( s, ",,,," );
- }
- /* bogus rest and checksum */
- stralloc_add_str( s, ",,,*47" );
- /* send it, then free */
- android_gps_send_nmea( stralloc_cstr(s) );
- stralloc_reset( s );
- }
- return 0;
- }
通过穿进去的经纬度,海拔等信息转化成NMEA格式的gps数据,然后通过socket发出去。
这部分就介绍到这里,之后会更精彩,哈哈。
希望这篇文章对读者有帮助,完全是参考android源码的,对我来说源码是最好的学习途径。
原文地址 http://blog.csdn.net/vv0_0vv/article/details/7998596 ,这篇文章相对其他文章,更深入一点,提到了在gps HAL中用到的socket。