How to Access a Free Yahoo! Mail Account in Mozilla Thunderbird
首先要完成的事情:
还有几点需要注意:
1。开通Yahoo的POP功能。Yahoo以邮件订阅作为支持POP的条件,我们打开这样一个网址http://edit.my.yahoo.com/config/set_popfwd?.src=ym&done=http://cn.<andyyard>.mail.com/
2。首先到插件下载页面去下载 Thunderbird 的扩展,其中 WebMail 这个扩展是必须的。另外再根据您的邮箱种类下载相应扩展,比如我们要用的 Hotmail。点击这里进入插件下载页面
在下载的时候请使用 Firefox 浏览器的兄弟们用鼠标右键点击下载连接然后选另存,否则FF会傻傻的以为是自己的扩展。
然后打开TB,在菜单栏选 工具 —> 扩展 —> 安装。 找到你下载的扩展然后一一安装。重新启动TB后看看你的扩展列表:

查看 WebMail 这个扩展的首选项:
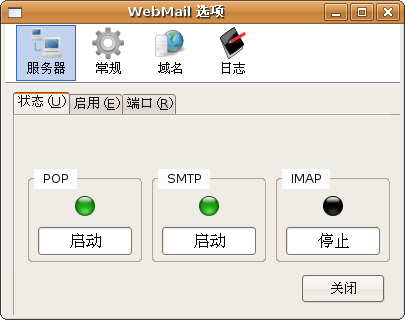
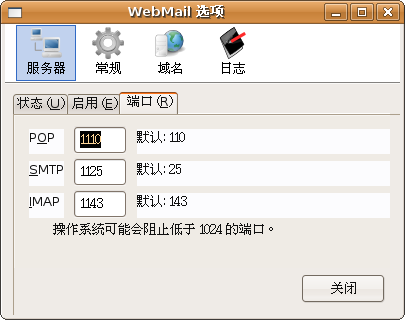
上图中可以看到POP和SMTP都启用了。这个插件的IMAP功能可以用但不是很完善,所以我没有开启这个服务。启用和关闭服务可以在上图中的“启用”标签中调整。另外Linux用户可能需要改一下默认端口配置,因为好多Linux发行版默认把1024以下的端口都屏蔽了。如果在后面您发现收/发邮件的时候都显示无法连接服务器,就在“端口”标签中把端口编号修改成1024以上:
然后在看看我们的 WebMail-Hotmail 这个扩展的首选项。如果您使用了 Windows Live Custom Domains 邮箱,那么请先在这里添加您的域,比如我使用的家园网邮箱: jaya.cn。

另外就是“帐户”这里了:

这个标签请在设置完邮件帐户以后再来更改。如果您有不止一个hotmail帐户,那么您可以针对每个帐户做出不同的设置。这里的默认选项是Hotmail网站(产品)。如果您的hotmail信箱还是传统的hotmail界面请选择 Hotmail网站(产品),如果您已经升级成了空间为2G的Windows Live Mail,那么请选择 Hotmail网站(BETA)。
还有一个需要完善的功能是:无论您在 SMTP 标签内是否选中“在已发送消息中保存备份”,事实上当你通过SMTP发送邮件以后都会被存储在服务器上的"已发送的邮件"中。但是当从WEB上登录并你点击这封邮件的时候服务器并不能识别这是已经发送的邮件。感觉上就像是直接进入草稿编写状态一样,而且邮件头会变成一堆代码。
注意:两个扩展的首选项如果做了任何修改,请重新启动TB来应用设置。
3.yahoo邮箱要切换到最新的。
Of course, the web-based access to Yahoo! Mail is indispensable. It is also universal, easy and useful. It is not, however, all that Mozilla Thunderbird is.
If you want to use Mozilla Thunderbird to read and write your Yahoo! Mail messages, YPOPs! provides a smart manner of access.
Access a Free Yahoo! Mail Account in Mozilla Thunderbird
To set up a free Yahoo! Mail account in Mozilla Thunderbird:
- Install YPOPs! and make sure it is running.
- Select Tools | Account Settings... from the menu in Mozilla Thunderbird.
- Click Add Account....
- Make sure Email account is selected.
- Click Continue.
- Enter your name under Your Name:.
- Type your Yahoo! Mail address ("[email protected]", for example) under Email Address:.
- Click Continue.
- Make sure POP is selected under Select the type of incoming server you are using..
- Type "localhost" under Incoming Server:.
- If you use Windows Vista or run into troubles later, try using "127.0.0.1" instead of "localhost".
- Click Continue.
- Enter your Yahoo! Mail user name (e.g. "example") under Incoming User Name:.
- Mozilla Thunderbird should already have entered that for you.
- Click Continue.
- Type a name for your new Yahoo! Mail account under Account Name: (e.g. "Yahoo! Mail").
- Click Continue.
- Now click Done.
-
To make sure we can send mail in addition to receiving it (and optionally have a copy of all send messages stored in Yahoo! Mail's online Sent folder):
- Highlight Outgoing Server (SMTP) in the list of account on the left.
- Click Add....
- Type "localhost" under Server Name:.
- If you use Windows Vista or run into troubles later, again try using "127.0.0.1" instead of "localhost".
- Make sure Use name and password is checked.
- Type your Yahoo! Mail user name under User Name:.
- Click OK.
- Highlight the Yahoo! Mail account we created before.
- Under Outgoing Server (SMTP):, make sure localhost is selected.
- Click OK.