Android布局
1.什么是布局
一个Android应用的用户界面是由View和ViewGroup构建的,他们有很多的种类,并且都是View的子类,View类的一些子类被称为“widgets(工具)”,他们提供了诸如文本输入框和按钮之类的UI对象的完整实现。ViewGroup是View的一个扩展,它可以容纳多个字View。ViewGroup类同样可以被扩展用作layout(布局管理器),如LinearLayout(线性布局),TableLayout(表格布局),RelativeLayout(相对布局)等。
视图层次如下图所示:
如图所示,多个视图组建(View)可以放在一个视图容器(ViewGroup)中,并且这个容器还可以和其它组建一起放在另一个容器中
Layout(布局):
最常用的方法是xml布局文件,xml文件中的每个元素都是View或ViewGroup对象,或者是它们的子类。Xml元素的名称与它体现的Java类相对应,所以一个TextView元素将在UI中生成一个TextView对象
Widgets(部件)
是为用户交互界面提供服务的视图对象,Android提供了一整套部件实现,包括按钮,复选框,文本输入框,以助于快速构建UI
2.布局(Layout)
在主窗口列出的布局类型有四种,分别是FrameLayout(帧布局),LinearLayout(线性布局),TabelLayout(表格布局)RelativeLayout(相对布局)。
2.1 线性布局(LinearLayout):该标签下的所有子元素会根据它的orientation属性值来决定是按行还是按列来显示
示例代码如下,<?xml version="1.0"encoding="utf-8"?>
<LinearLayout xmlns:android="http://schemas.android.com/apk/res/android"
android:layout_width="fill_parent"
android:layout_height="fill_parent"
android:orientation="vertical">
<TextView
android:layout_width="fill_parent"
android:layout_height="wrap_content"
android:text="@string/name_text"/>
<EditText
android:layout_width="fill_parent"
android:layout_height="wrap_content"
/>
<Button android:layout_width="wrap_content"
android:layout_height="wrap_content"
android:text="@string/ok_text"
/>
<Button android:layout_width="wrap_content"
android:layout_height="wrap_content"
android:text="@string/canel_text"
/>
</LinearLayout>
显示结果为:
其中属性“xmlns:android”指定命名空间,顶级元素必须指定命名空间,而在该命名空间中的控件的属性如layout_width,要在属性前面加上”android:”做前缀。Layout_width指定了这个元素的宽度,Layout_height指定这个元素的高度。而属性”orientation”指定了子元素的排列方式,当指定为“vertical”时,是子元素垂直排列,每个子元素会站独立的一行,而为“horizontal”时,表示子元素要水平排列。
2.2 RelativeLayout(相对布局)
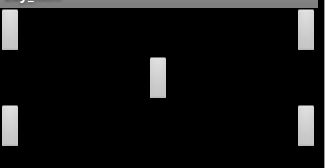
相对布局中的视图是按相互之间的相对位置来确定的,并不是线性布局中的必须按行或按列单个显示,相对布局文件如下:
<?xml version="1.0"encoding="utf-8"?>
<RelativeLayout xmlns:android="http://schemas.android.com/apk/res/android"
android:layout_width="match_parent"
android:layout_height="match_parent">
<Button
android:layout_width="wrap_content"
android:layout_height="wrap_content"
android:layout_alignParentLeft="true"/>
<Button
android:id="@+id/button1"
android:layout_width="wrap_content"
android:layout_height="wrap_content"
android:layout_alignParentRight="true"/>
<Button
android:id="@+id/button2"
android:layout_width="wrap_content"
android:layout_height="wrap_content"
android:layout_below="@+id/button1"
android:layout_centerHorizontal="true"/>
<Button
android:layout_width="wrap_content"
android:layout_height="wrap_content"
android:layout_alignParentLeft="true"
android:layout_below="@+id/button2"/>
<Button
android:layout_width="wrap_content"
android:layout_height="wrap_content"
android:layout_alignParentRight="true"
android:layout_below="@+id/button2"/>
</RelativeLayout>
显示效果如图:
2.3 表格布局(TableLayout)
表格布局的风格和heml中表格布局的风格很像,只是采用的标签不一样,<TableLayout>是顶级元素,说明采用的是顶级元素,<TableRow>定义一个行,<TextView>定义一个单元格,演示代码如下:
其中”android:stretchColumns=“0,1,2,3””指定的是列
<?xml version="1.0"encoding="utf-8"?>
<TableLayout xmlns:android="http://schemas.android.com/apk/res/android"
android:layout_width="match_parent"
android:layout_height="match_parent"
android:stretchColumns="0,1,2,3">
<TableRow>
<TextView
android:layout_width="wrap_content"
android:layout_height="wrap_content"
android:text="@string/name"
/>
<TextView
android:layout_width="wrap_content"
android:layout_height="wrap_content"
android:text="@string/gender"
/>
<TextView
android:layout_width="wrap_content"
android:layout_height="wrap_content"
android:text="@string/age"
/>
<TextView
android:layout_width="wrap_content"
android:layout_height="wrap_content"
android:text="@string/phone"
/>
</TableRow>
<TableRow>
<TextView
android:layout_width="wrap_content"
android:layout_height="wrap_content"
android:text="@string/namezs"
/>
<TextView
android:layout_width="wrap_content"
android:layout_height="wrap_content"
android:text="@string/genderzs"
/>
<TextView
android:layout_width="wrap_content"
android:layout_height="wrap_content"
android:text="@string/agezs"
/>
<TextView
android:layout_width="wrap_content"
android:layout_height="wrap_content"
android:text="@string/phonezs"
/>
</TableRow>
<TableRow>
<TextView
android:layout_width="wrap_content"
android:layout_height="wrap_content"
android:text="@string/namels"
/>
<TextView
android:layout_width="wrap_content"
android:layout_height="wrap_content"
android:text="@string/genderls"
/>
<TextView
android:layout_width="wrap_content"
android:layout_height="wrap_content"
android:text="@string/agels"
/>
<TextView
android:layout_width="wrap_content"
android:layout_height="wrap_content"
android:text="@string/phonels"
/>
</TableRow>
</TableLayout>
显示效果如下图:
2.4 FrameLayout(帧布局)
帧布局中的每个组件都代表着一个画面,默认以左上角的(0,0)坐标按组件的先后顺序依次显现出来,后面出现的会覆盖前面的画面,用这个布局可以实现动画效果
下面举个例子来说明,例子是三张图合成一个动画的。
首先,先写它的布局文件frame_layout.xml,在这个布局文件中定义一个id为frame的帧,代码如下:
<?xml version="1.0"encoding="utf-8"?>
<FrameLayout xmlns:android="http://schemas.android.com/apk/res/android"
android:layout_width="match_parent"
android:layout_height="match_parent"
android:layout_gravity="center"
android:id="@+id/frame"
>
</FrameLayout>
然后编写它的Activity文件,代码如下:
package cn.csdn.android.view;
import android.app.Activity;
import android.graphics.drawable.Drawable;
import android.os.Bundle;
import android.os.Handler;
import android.os.Message;
import android.view.View;
import android.view.View.OnClickListener;
import android.widget.FrameLayout;
public class ViewActivity extends Activity{
privateboolean flag = true;
FrameLayoutframe = null;
protectedvoid onCreate(Bundle savedInstanceState) {
//TODO Auto-generated method stub
super.onCreate(savedInstanceState);
this.setContentView(R.layout.frame_layout);
findViews();
finalMyHandler myHandler = new MyHandler();
myHandler.sleep(10);
frame.setOnClickListener(newOnClickListener() {
publicvoid onClick(View v) {
flag= !flag;
myHandler.sleep(10);
}
});
}
privatevoid findViews() {
frame= (FrameLayout) this.findViewById(R.id.frame);
}
classMyHandler extends Handler {
inti = 0;
@Override
publicvoid handleMessage(Message msg) {
i++;
show(i% 3);
sleep(10);
}
publicvoid sleep(long delayMillis) {
if(flag) {
this.sendMessageDelayed(obtainMessage(10),delayMillis);
}
}
}
privatevoid show(int j) {
Drawablepic[] = new Drawable[3];
pic[0]= this.getResources().getDrawable(R.drawable.p1);
pic[1]= this.getResources().getDrawable(R.drawable.p2);
pic[2]= this.getResources().getDrawable(R.drawable.p3);
frame.setForeground(pic[j]);
}
}
原理:由于FrameLayout中后来出现的Ui控件会覆盖前面出现的UI控件,每次只能显示一个UI控件,所以通过在Activity中对每次显示的图片内容进行切换来实现动画效果。其中,用到了Android提供的消息通讯类Handler,这个类可以实现非主线程和负责UI主线程之间的通信,进而间接实现非主线程更新UI界面,由于sleep()方法中的“sendMessageDelayed(obtainMessage(10),delayMillis)”本身会延迟发送一个消息,这个消息会被框架传送给handleMessage事件,我们在handleMessage()方法中再次调用sleep()方法,形成一个循环调用,进而形成动画效果


