智能指针auto_ptr介绍
智能指针auto_ptr介绍
我们大家都知道,new一定要和delete配合使用,但是有一种情况可能会使这种配对失效,如下程序:
|
1
2
3
4
5
6
7
8
9
10
11
12
13
14
15
16
17
18
19
20
21
22
23
24
25
26
27
28
29
30
31
|
#include <iostream>
using
namespace
std;
class
normal_pointer_example
{
public
:
normal_pointer_example(){cout<<
"构造函数执行!\n"
;}
~normal_pointer_example(){cout<<
"析构函数执行!\n"
;}
};
class
normal_pointer_wrong{};
//normal_pointer_wrong异常
bool
quit;
void
quit_func()
{
if
(quit==
true
)
cout<<
"调用quit_func函数!\n"
;
throw
normal_pointer_wrong();
}
int
main()
{
try
{
normal_pointer_example *Npointer=
new
normal_pointer_example;
quit=
true
;
quit_func();
delete
Npointer;
}
catch
(normal_pointer_wrong)
{
cout<<
"输出normal_pointer_wrong异常!!\n"
;
}
return
0;
}
|
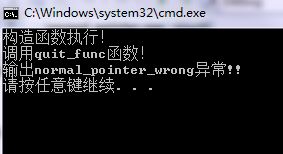
该程序的输出结果为:
注意上面这个输出,我们看到当程序全部执行完了都没有能够调用析构函数将对象析构掉!这就说明并没有把对象delete掉!!这个就是问题,因为这样就有可能产生不易察觉的内存泄露。
针对上面这个情况,我们就要使用智能指针类auto_ptr来避免这种情况出现。们来看一个auto_ptr类的声明:
  1 template<class _Ty>
  2     class auto_ptr
  3         {    // wrap an object pointer to ensure destruction
  4 public:
  5     typedef _Ty element_type;
  6
  7     explicit auto_ptr(_Ty *_Ptr = 0) _THROW0()
  8         : _Myptr(_Ptr)
  9         {    // construct from object pointer
 10         }
 11
 12     auto_ptr(auto_ptr<_Ty>& _Right) _THROW0()
 13         : _Myptr(_Right.release())
 14         {    // construct by assuming pointer from _Right auto_ptr
 15         }
 16
 17     auto_ptr(auto_ptr_ref<_Ty> _Right) _THROW0()
 18         {    // construct by assuming pointer from _Right auto_ptr_ref
 19         _Ty *_Ptr = _Right._Ref;
 20         _Right._Ref = 0;    // release old
 21         _Myptr = _Ptr;    // reset this
 22         }
 23
 24     template<class _Other>
 25         operator auto_ptr<_Other>() _THROW0()
 26         {    // convert to compatible auto_ptr
 27         return (auto_ptr<_Other>(*this));
 28         }
 29
 30     template<class _Other>
 31         operator auto_ptr_ref<_Other>() _THROW0()
 32         {    // convert to compatible auto_ptr_ref
 33         _Other *_Cvtptr = _Myptr;    // test implicit conversion
 34         auto_ptr_ref<_Other> _Ans(_Cvtptr);
 35         _Myptr = 0;    // pass ownership to auto_ptr_ref
 36         return (_Ans);
 37         }
 38
 39
 40     template<class _Other>
 41         auto_ptr<_Ty>& operator=(auto_ptr<_Other>& _Right) _THROW0()
 42         {    // assign compatible _Right (assume pointer)
 43         reset(_Right.release());
 44         return (*this);
 45         }
 46
 47     template<class _Other>
 48         auto_ptr(auto_ptr<_Other>& _Right) _THROW0()
 49         : _Myptr(_Right.release())
 50         {    // construct by assuming pointer from _Right
 51         }
 52
 53     auto_ptr<_Ty>& operator=(auto_ptr<_Ty>& _Right) _THROW0()
 54         {    // assign compatible _Right (assume pointer)
 55         reset(_Right.release());
 56         return (*this);
 57         }
 58
 59     auto_ptr<_Ty>& operator=(auto_ptr_ref<_Ty> _Right) _THROW0()
 60         {    // assign compatible _Right._Ref (assume pointer)
 61         _Ty *_Ptr = _Right._Ref;
 62         _Right._Ref = 0;    // release old
 63         reset(_Ptr);    // set new
 64         return (*this);
 65         }
 66
 67     ~auto_ptr()
 68         {    // destroy the object
 69         delete _Myptr;
 70         }
 71
 72     _Ty& operator*() const _THROW0()
 73         {    // return designated value
 74
 75  #if _HAS_ITERATOR_DEBUGGING
 76         if (_Myptr == 0)
 77             _DEBUG_ERROR("auto_ptr not dereferencable");
 78  #endif /* _HAS_ITERATOR_DEBUGGING */
 79
 80         __analysis_assume(_Myptr);
 81
 82         return (*get());
 83         }
 84
 85     _Ty *operator->() const _THROW0()
 86         {    // return pointer to class object
 87
 88  #if _HAS_ITERATOR_DEBUGGING
 89         if (_Myptr == 0)
 90             _DEBUG_ERROR("auto_ptr not dereferencable");
 91  #endif /* _HAS_ITERATOR_DEBUGGING */
 92
 93         return (get());
 94         }
 95
 96     _Ty *get() const _THROW0()
 97         {    // return wrapped pointer
 98         return (_Myptr);
 99         }
100
101     _Ty *release() _THROW0()
102         {    // return wrapped pointer and give up ownership
103         _Ty *_Tmp = _Myptr;
104         _Myptr = 0;
105         return (_Tmp);
106         }
107
108     void reset(_Ty* _Ptr = 0)
109         {    // destroy designated object and store new pointer
110         if (_Ptr != _Myptr)
111             delete _Myptr;
112         _Myptr = _Ptr;
113         }
114
115 private:
116     _Ty *_Myptr;    // the wrapped object pointer
117     };
118 _STD_END
从上面这个定义就可以看出来,定义个智能指针就相当于创建了一个auto_ptr类的对象。现在我们再来看看这个类的析构函数:
|
1
2
3
4
|
~auto_ptr()
{
// destroy the object
delete
_Myptr;
}
|
这里我们就可以看到,由于在私有数据成员中定义了一个模板指针:
_Ty *_Myptr;
|
所以说在上面的析构函数里面,当我们删除_Myptr指针的时候,其实就是调用delete删除_Myptr所指向的内存块。所以每当我们定义一个智能指针,就是定义了一个auto_ptr类的对象,如:
auto_ptr<string> p (
new
string);
|
这句话就定义了一个auto_ptr类的对象p,尖括号里面的string用了初始化它的模板成员_Ty的类型。那么这里面,只要auto_ptr对象存在,它指向的字符串就存在,同理,如果auto_ptr对象不存在,会利用auto_ptr类中的析构函数自动销毁它所指向的字符串,也就避免了内存泄露。
好了,下面我们来用智能指针重写上面的程序,看看会有什么结果。
|
1
2
3
4
5
6
7
8
9
10
11
12
13
14
15
16
17
18
19
20
21
22
23
24
25
26
27
28
29
30
31
32
|
#include <iostream>
#include <memory>
using
namespace
std;
class
normal_pointer_example
{
public
:
normal_pointer_example(){cout<<
"构造函数执行!\n"
;}
~normal_pointer_example(){cout<<
"析构函数执行!\n"
;}
};
class
normal_pointer_wrong{};
//normal_pointer_wrong异常
bool
quit;
void
quit_func()
{
if
(quit==
true
)
cout<<
"调用quit_func函数!\n"
;
throw
normal_pointer_wrong();
}
int
main()
{
try
{
auto_ptr<normal_pointer_example> Apointer (
new
normal_pointer_example);
quit=
true
;
quit_func();
//delete Npointer;
}
catch
(normal_pointer_wrong)
{
cout<<
"输出normal_pointer_wrong异常!!\n"
;
}
return
0;
}
|
首先需要注意的是,要调用auto_ptr智能指针,必须包含头文件<memory>。另外,程序的输出:
看到没有,这样一来,析构函数就执行咯~~
« 上一篇: “模板”学习笔记(8)-----具有多个参数的模板
» 下一篇: 如何让程序显示运行时间和当前日期
» 下一篇: 如何让程序显示运行时间和当前日期
参考:
string _myptr 百度
string _myptr函数 谷歌

