PyCairo指南--基本绘图
透明度
在这份PyCairo指南的这个部分,我们将讨论透明度。我们将提供一些基本的定义和三个有趣的透明度的例子。
透明度是指透过一种材料能够看到事物的品质。理解透明度最简单的方法就是想象一块玻璃或这水。技术上来说,光线可以穿透玻璃,从而我们可以看到玻璃后面的物体。
在计算机图形学中,我们可以用alpha通道来实现透明度效果。Alpha通道就是一个组合一幅图片和一个背景来创建部分透明的外观的过程。组合过程使用一个alpha通道。在图像文件格式中,alpha通道是一个8-bit的layer,它被用于表达半透明(透明度)。每像素额外的8 bits被用作一个mask和代表256级的半透明度。
透明的矩形
在第一个例子中,我们将绘制10个具有不同的半透明度的矩形。
|
1
2
3
4
5
|
def
on_draw(self, wdith, cr):
for
i in
range(1, 11):
cr.set_source_rgba(0, 0, 1, i *
0.1)
cr.rectangle(50
*
i, 20, 40, 40)
cr.fill()
|
|
1
2
3
4
|
for
i in
range(1, 11):
cr.set_source_rgba(0, 0, 1, i *
0.1)
cr.rectangle(50
*
i, 20, 40, 40)
cr.fill()
|
这段代码创建了10个矩形,它们的alpha值分别为0.1,...,1.
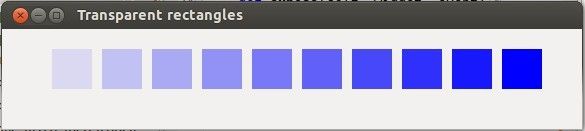
Figure: Transparent rectangles
Puff效果
在下面的这个例子中,我们将创建一个puff效果。例子将会显示一个增长的居中的文字,它在一些点逐渐的褪色。这是一个非常常见的效果,我们经常可以在闪光动画中看到它。paint_with_alpha()方法对于创建这个效果是非常重要的。
|
1
2
3
4
5
6
7
8
9
10
11
12
13
14
15
16
17
18
19
20
21
22
23
24
25
26
27
28
29
30
31
32
33
34
35
36
37
38
39
40
41
42
43
44
45
46
47
48
49
50
51
52
53
54
55
56
57
58
59
60
61
62
63
64
65
66
67
68
69
70
71
72
73
74
75
76
77
78
79
80
81
82
83
84
85
86
87
|
#!/usr/bin/python
'''
ZetCode PyCairo tutorial
This program creates a 'puff'
effect.
author: Jan Bodnar
website: zetcode.com
last edited: August 2012
'''
import
gtk, glib
import
cairo
class
cv(object):
SPEED =
14
TEXT_SIZE_MAX =
20
ALPHA_DECREASE =
0.01
SIZE_INCREASE =
0.8
class
MainWindow(gtk.Window):
def
__init__(self):
super(self.__class__, self).__init__()
self.init_ui()
def
init_ui(self):
self.darea =
gtk.DrawingArea()
self.darea.connect("expose_event", self.expose)
self.add(self.darea)
self.timer =
True
self.alpha =
1.0
self.size =
1.0
glib.timeout_add(cv.SPEED, self.on_timer)
self.set_title("Puff")
self.resize(350, 200)
self.set_position(gtk.WIN_POS_CENTER)
self.connect("delete-event", gtk.main_quit)
self.show_all()
def
on_timer(self):
if
(not
self.timer):
return
False
self.darea.queue_draw()
return
True
def
expose(self, widget, event):
self.context =
widget.window.cairo_create()
self.on_draw(300, self.context)
def
on_draw(self, wdith, cr):
w, h =
self.get_size()
cr.set_source_rgb(0.5, 0, 0)
cr.paint()
cr.select_font_face("Courier", cairo.FONT_SLANT_NORMAL,
cairo.FONT_WEIGHT_BOLD)
self.size =
self.size +
cv.SIZE_INCREASE
if
(self.size > cv.TEXT_SIZE_MAX):
self.alpha =
self.alpha -
cv.ALPHA_DECREASE
cr.set_font_size(self.size)
cr.set_source_rgb(1, 1, 1)
(x, y, width, height, dx, dy) =
cr.text_extents("ZetCode")
cr.move_to(w /2
-
width /2, h /2)
cr.text_path("ZetCode")
cr.clip()
cr.paint_with_alpha(self.alpha)
if
self.alpha <=
0:
self.timer =
False
def
main():
window =
MainWindow()
gtk.main()
if
__name__ ==
"__main__":
main()
|
这个例子在窗口中创建一段不断增长并褪色的文本。
|
1
2
3
4
5
|
class
cv(object):
SPEED =
14
TEXT_SIZE_MAX =
20
ALPHA_DECREASE =
0.01
SIZE_INCREASE =
0.8
|
这里定义一些例子中将会要用到的常量。
|
1
2
|
self.alpha =
1.0
self.size =
1.0
|
这两个变量存储当前的alpha值和字体大小。
|
1
|
glib.timeout_add(cv.SPEED, self.on_timer)
|
每隔14 ms,on_timer()方法被调用一次。
|
1
2
3
4
5
6
|
def
on_timer(self):
if
(not
self.timer):
return
False
self.darea.queue_draw()
return
True
|
在on_timer()方法中,我们用queue_draw()方法来重新绘制DrawingArea widget。
|
1
2
3
4
5
6
7
8
9
|
def
on_draw(self, wdith, cr):
w, h =
self.get_size()
cr.set_source_rgb(0.5, 0, 0)
cr.paint()
cr.select_font_face("Courier", cairo.FONT_SLANT_NORMAL,
cairo.FONT_WEIGHT_BOLD)
...
|
在on_draw()方法中,我们获取到窗口的客户区域的宽度和高度。这些值被用于使文字居中。我们将以某种暗红色来填充窗口的背景。我们为文字选择一个Courier字体。
|
1
|
(x, y, width, height, dx, dy) =
cr.text_extents("ZetCode")
|
我们获取文字的一些度量值。我们将仅仅是用文字宽度。
|
1
|
cr.move_to(w /2
-
width /2, h /2)
|
我们将移动到一个可以使文字在窗口中居中的位置。
|
1
2
3
|
cr.text_path("ZetCode")
cr.clip()
cr.paint_with_alpha(self.alpha)
|
我们用text_path()方法来获取文字的path。我们用clip()方法来将绘制限定在当前的path。paint_with_alpha()方法使用一个alpha值的mask,在当前的裁剪区域内,绘制当前的source。
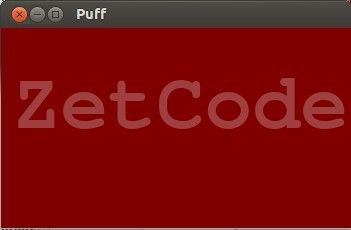
Figure: Puff effect
图像倒影
在下一个例子中,我么将秀出一个倒影图像。这个效果创造了一种图像倒映在水中一样的感觉。
|
1
2
3
4
5
6
7
8
9
10
11
12
13
14
15
16
17
18
19
20
21
22
23
24
25
26
27
28
29
30
31
32
33
34
35
36
37
38
39
40
41
42
43
44
45
46
47
48
49
50
51
52
53
54
55
56
57
58
59
60
61
62
63
64
65
66
67
68
69
70
71
72
73
74
75
76
77
78
79
80
81
82
83
84
85
86
87
88
89
90
|
#!/usr/bin/python
'''
ZetCode PyCairo tutorial
This program creates an image reflection.
author: Jan Bodnar
website: zetcode.com
last edited: August 2012
'''
import
gtk
import
cairo
import
sys
class
MainWindow(gtk.Window):
def
__init__(self):
super(self.__class__, self).__init__()
self.init_ui()
self.load_image()
self.init_vars()
def
init_ui(self):
self.darea =
gtk.DrawingArea()
self.darea.connect("expose_event", self.expose)
self.add(self.darea)
self.set_title("Reflection")
self.resize(300, 350)
self.set_position(gtk.WIN_POS_CENTER)
self.connect("delete-event", gtk.main_quit)
self.show_all()
def
load_image(self):
try:
self.s =
cairo.ImageSurface.create_from_png("slanec.png")
except
Exception, e:
print
e.message
sys.exit()
def
init_vars(self):
self.imageWidth =
self.s.get_width()
self.imageHeight =
self.s.get_height()
self.gap =
40
self.border =
20
def
expose(self, widget, event):
self.context =
widget.window.cairo_create()
self.on_draw(300, self.context)
def
on_draw(self, wdith, cr):
w, h =
self.get_size()
lg =
cairo.LinearGradient(w/2, 0, w/2, h *
3)
lg.add_color_stop_rgba(0, 0, 0, 0, 1)
lg.add_color_stop_rgba(h, 0.2, 0.2, 0.2, 1)
cr.set_source(lg)
cr.paint()
cr.set_source_surface(self.s, self.border, self.border)
cr.paint()
alpha =
0.7
step =
1.0
/
self.imageHeight
cr.translate(0, 2
*
self.imageHeight +
self.gap)
cr.scale(1, -1)
i =
0
while
(i < self.imageHeight):
cr.rectangle(self.border, self.imageHeight -
i,
self.imageWidth, 1)
i =
i +
1
cr.save()
cr.clip()
cr.set_source_surface(self.s, self.border, self.b<span></span>order)
alpha =
alpha -
step
cr.paint_with_alpha(alpha)
cr.restore()
def
main():
window =
MainWindow()
gtk.main()
if
__name__ ==
"__main__":
main()
|
一个倒映的城堡的废墟就显示在窗口中了。
|
1
2
3
4
5
6
|
def
load_image(self):
try:
self.s =
cairo.ImageSurface.create_from_png("slanec.png")
except
Exception, e:
print
e.message
sys.exit()
|
在load_image()方法中,有一幅PNG图片创建一个图像surface。
|
1
2
3
4
5
|
def
init_vars(self):
self.imageWidth =
self.s.get_width()
self.imageHeight =
self.s.get_height()
self.gap =
40
self.border =
20
|
在init_vars()方法中,我们获取图像的宽度和高度。同时也定义两个变量。
|
1
2
3
4
5
6
|
lg =
cairo.LinearGradient(w/2, 0, w/2, h *
3)
lg.add_color_stop_rgba(0, 0, 0, 0, 1)
lg.add_color_stop_rgba(h, 0.2, 0.2, 0.2, 1)
cr.set_source(lg)
cr.paint()
|
窗口的背景有一个渐变绘画填充。绘画是一个平滑的有黑色到深灰色的变化过程。
|
1
2
|
cr.translate(0, 2
*
self.imageHeight +
self.gap)
cr.scale(1, -1)
|
这段code翻转图像,并将它平移到原始图像的下方。平移操作是必须的,由于放缩操作使得使得图像翻转并将图像向上平移。为了理解发生了什么,可以简单的那一张照片,将它放在桌子上,然后反转它。
|
1
2
3
4
5
6
7
8
9
10
11
12
13
14
|
i =
0
while
(i < self.imageHeight):
cr.rectangle(self.border, self.imageHeight -
i,
self.imageWidth, 1)
i =
i +
1
cr.save()
cr.clip()
cr.set_source_surface(self.s, self.border, self.border)
alpha =
alpha -
step
cr.paint_with_alpha(alpha)
cr.restore()
|
这是最后的部分。我们使第二幅图片变得透明。但透明度不是固定的。这幅图片渐渐的褪色。倒影图片是一行接一行的绘制的。clip()方法将绘制限定在高度为1的矩形中。paint_with_alpha()在绘制图像surface的当前裁剪区域是会将透明度也考虑进来。
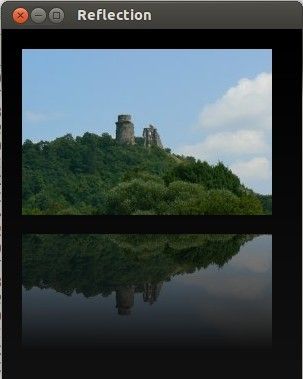
Figure: Reflected image
等待效果demo
在这个例子中,我们将使用透明效果来创建一个等待效果的demo。我们画8跳线,它们逐渐的淡出,以创造一种假象,好像线在移动一般。这种效果经常被用于告知用户,一个耗时比较久的任务正在背后运行。一个例子是Interne上的流视频。
|
1
2
3
4
5
6
7
8
9
10
11
12
13
14
15
16
17
18
19
20
21
22
23
24
25
26
27
28
29
30
31
32
33
34
35
36
37
38
39
40
41
42
43
44
45
46
47
48
49
50
51
52
53
54
55
56
57
58
59
60
61
62
63
64
65
66
67
68
69
70
71
72
73
74
75
76
77
78
79
80
81
82
83
|
#!/usr/bin/python
'''
ZetCode PyCairo tutorial
This program creates a 'waiting' effect.
author: Jan Bodnar
website: zetcode.com
last edited: August 2012
'''
import
gtk, glib
import
cairo
import
math
class
cv(object):
trs =
(
(0.0, 0.15, 0.30, 0.5, 0.65, 0.80, 0.9, 1.0),
(1.0, 0.0, 0.15, 0.30, 0.5, 0.65, 0.80, 0.9),
(0.9, 1.0, 0.0, 0.15, 0.30, 0.5, 0.65, 0.80),
(0.80, 0.9, 1.0, 0.0, 0.15, 0.30, 0.5, 0.65),
(0.65, 0.80, 0.9, 1.0, 0.0, 0.15, 0.30, 0.5),
(0.5, 0.65, 0.80, 0.9, 1.0, 0.0, 0.15, 0.30),
(0.30, 0.5, 0.65, 0.80, 0.9, 1.0, 0.0, 0.15),
(0.15, 0.30, 0.5, 0.65, 0.80, 0.9, 1.0, 0.0),
)
SPEED =
80
CLIMIT =
1000
NLINES =
8
class
MainWindow(gtk.Window):
def
__init__(self):
super(self.__class__, self).__init__()
self.init_ui()
def
init_ui(self):
self.darea =
gtk.DrawingArea()
self.darea.connect("expose_event", self.expose)
self.add(self.darea)
self.count =
0
glib.timeout_add(cv.SPEED, self.on_timer)
self.set_title("Waiting")
self.resize(250, 150)
self.set_position(gtk.WIN_POS_CENTER)
self.connect("delete-event", gtk.main_quit)
self.show_all()
def
on_timer(self):
self.count =
self.count +
1
if
self.count >=
cv.CLIMIT:
self.count =
0
self.darea.queue_draw()
return
True
def
expose(self, widget, event):
self.context =
widget.window.cairo_create()
self.on_draw(250, self.context)
def
on_draw(self, wdith, cr):
cr.set_line_width(3)
cr.set_line_cap(cairo.LINE_CAP_ROUND)
w, h =
self.get_size()
cr.translate(w/2, h/2)
for
i in
range(cv.NLINES):
cr.set_source_rgba(0, 0, 0, cv.trs[self.count %
8][i])
cr.move_to(0.0, -10.0)
cr.line_to(0.0, -40.0)
cr.rotate(math.pi /
4)
cr.stroke()
def
main():
window =
MainWindow()
gtk.main()
if
__name__ ==
"__main__":
main()
|
我们以八个不同的alpha值绘制了8条直线。
|
1
2
3
4
5
6
7
8
9
10
11
12
|
class
cv(object):
trs =
(
(0.0, 0.15, 0.30, 0.5, 0.65, 0.80, 0.9, 1.0),
(1.0, 0.0, 0.15, 0.30, 0.5, 0.65, 0.80, 0.9),
(0.9, 1.0, 0.0, 0.15, 0.30, 0.5, 0.65, 0.80),
(0.80, 0.9, 1.0, 0.0, 0.15, 0.30, 0.5, 0.65),
(0.65, 0.80, 0.9, 1.0, 0.0, 0.15, 0.30, 0.5),
(0.5, 0.65, 0.80, 0.9, 1.0, 0.0, 0.15, 0.30),
(0.30, 0.5, 0.65, 0.80, 0.9, 1.0, 0.0, 0.15),
(0.15, 0.30, 0.5, 0.65, 0.80, 0.9, 1.0, 0.0),
)
...
|
这是一个透明度值的二维元组,demo中会用到。有8行,每一行表示一种状态。8条直线将会持续的使用这些值。
|
1
2
3
|
SPEED =
80
CLIMIT =
1000
NLINES =
8
|
SPEED常量控制动画的速度。CLIMIT是self.count变量的最大值。达到这个限制之后,则变量会重新被设为0.NLINES是这个例子中绘制的直线的条数。
|
1
|
glib.timeout_add(cv.SPEED, self.on_timer)
|
我们使用一个定时器函数来创建动画。每一个cv.SPEED ms,on_timer()方法会被调用一次。
|
1
2
3
4
5
6
7
8
|
def
on_timer(self):
self.count =
self.count +
1
if
self.count >=
cv.CLIMIT:
self.count =
0
self.darea.queue_draw()
return
True
|
在on_timer()方法中,我们增加self.count变量。如果变量达到了cv.CLIMIT常量,则它会被设为0。我们避免溢出,并且不使用非常大的数字。
|
1
2
3
4
|
def
on_draw(self, wdith, cr):
cr.set_line_width(3)
cr.set_line_cap(cairo.LINE_CAP_ROUND)
...
|
我们使线更粗一点,以使得他们更容易被看到。我们用rounded caps来绘制直线。
|
1
2
|
w, h =
self.get_size()
cr.translate(w/2, h/2)
|
我们将我们的绘制定位在窗口的中心。
|
1
2
3
4
5
6
|
for
i in
range(cv.NLINES):
cr.set_source_rgba(0, 0, 0, cv.trs[self.count %
8][i])
cr.move_to(0.0, -10.0)
cr.line_to(0.0, -40.0)
cr.rotate(math.pi /
4)
cr.stroke()
|
早for循环中,我们用不同的透明度值,画了八条旋转的直线。线之间由45度角隔开。
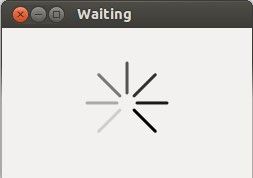
Figure: Waiting demo