GeekOS内核的源码级调试
在进一步研究GeekOS内核之前,有必要掌握调试这个技能,有了调试器,可以更直观地查看内部变量的值,也可以单步跟踪程序运行的轨迹。
这里研究的调试,当然是指源码级的调试。
首先从apt里安装的bochs模拟器可能是没有gdb stub的,也就是不能支持和gdb进行远程连接调试,为了支持这个功能,需要从bochs网站上下载最新版本的源代码,并且手工加入调试支持参数进行编译,下载地址为:
http://bochs.sourceforge.net/getcurrent.html
下载后解压到任意文件夹,然后进行设置和编译:
这样就得到了带有gdb-stub的bochs。
接下来还需要设置bochs的配置文件,使之开启gdb-stub,并且配置端口。
在.bochsrc中加入如下一行。
接下来引导系统,在build文件夹下运行bochs:
就会打开一个黑色没有内容的主界面,控制台显示:
Waiting for gdb connection on port 1234
这说明Bochs正在等待gdb的连接。
进入geekos-0.3.0/src/project0/build/geekos目录,查看编译得到的文件:
会发现多出来很多.o文件和kernel.bin以及kernel.exe,其中kernel.exe是内核文件:
接下来我们就用gdb载入这个文件:
GDB会显示载入调试符号成功的信息:
现在我们可以源码级调试内核了,试试查看源代码:
也可以查看其他文件的源代码,比如main.c:
设置断点在第58行:
尝试运行一下,因为远程连接到的进程已经启动,所以只能使用continue:
执行下一条语句:
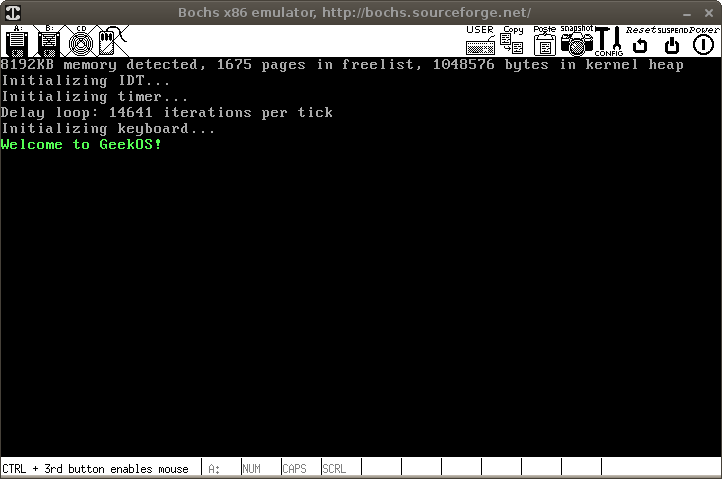
此时屏幕就会显示刚才打印的那行字了:

关于gdb的语法请参考gdb手册。
有的朋友很少用命令行的调试器,而习惯可视化的调试器,类似一边点鼠标一边观察值的,可以用ddd:
连接Bochs的步骤和gdb下一样,只是界面是图形的并且一些常用命令都集成到菜单里了,下面是效果图:
这里研究的调试,当然是指源码级的调试。
首先从apt里安装的bochs模拟器可能是没有gdb stub的,也就是不能支持和gdb进行远程连接调试,为了支持这个功能,需要从bochs网站上下载最新版本的源代码,并且手工加入调试支持参数进行编译,下载地址为:
http://bochs.sourceforge.net/getcurrent.html
下载后解压到任意文件夹,然后进行设置和编译:
$ ./configure --enable-gdb-stub
$ make
# make install
这样就得到了带有gdb-stub的bochs。
接下来还需要设置bochs的配置文件,使之开启gdb-stub,并且配置端口。
在.bochsrc中加入如下一行。
gdbstub: enabled=1, port=1234, text_base=0, data_base=0, bss_base=0
接下来引导系统,在build文件夹下运行bochs:
$ bochs选择Begin simulation
就会打开一个黑色没有内容的主界面,控制台显示:
Waiting for gdb connection on port 1234
这说明Bochs正在等待gdb的连接。
进入geekos-0.3.0/src/project0/build/geekos目录,查看编译得到的文件:
$ ls
bget.o       idt.o  kernel.bin   kthread.o   mem.o      synch.o
crc32.o      int.o  kernel.exe   lowlevel.o  screen.o   timer.o
fd_boot.bin  io.o   kernel.syms  main.o      segment.o  trap.o
gdt.o        irq.o  keyboard.o   malloc.o    setup.bin  tss.o
会发现多出来很多.o文件和kernel.bin以及kernel.exe,其中kernel.exe是内核文件:
kernel.exe: ELF 32-bit LSB executable, Intel 80386, version 1 (SYSV), statically linked, not stripped
接下来我们就用gdb载入这个文件:
$ gdb kernel.exe
GDB会显示载入调试符号成功的信息:
Reading symbols from /home/user/work/geekos-0.3.0/src/project0/build/geekos/kernel.exe...done.
然后连接到远程端口,当然其实是本机端口:
(gdb) target remote localhost:1234
Remote debugging using localhost:1234
0x0000fff0 in ?? ()
现在我们可以源码级调试内核了,试试查看源代码:
(gdb) l
1	/*
2	 * GeekOS IDT initialization code
3	 * Copyright (c) 2001, David H. Hovemeyer <[email protected]>
4	 * $Revision: 1.9 $
5	 *
6	 * This is free software.  You are permitted to use,
7	 * redistribute, and modify it as specified in the file "COPYING".
8	 */
9
10	#include <geekos/kassert.h>
也可以查看其他文件的源代码,比如main.c:
(gdb) l main.c:0
warning: Source file is more recent than executable.
1	/*
2	 * GeekOS C code entry point
3	 * Copyright (c) 2001,2003,2004 David H. Hovemeyer <[email protected]>
4	 * Copyright (c) 2003, Jeffrey K. Hollingsworth <[email protected]>
5	 * Copyright (c) 2004, Iulian Neamtiu <[email protected]>
6	 * $Revision: 1.51 $
7	 *
8	 * This is free software.  You are permitted to use,
9	 * redistribute, and modify it as specified in the file "COPYING".
10	 */
(gdb)
11
12	#include <geekos/bootinfo.h>
13	#include <geekos/string.h>
14	#include <geekos/screen.h>
15	#include <geekos/mem.h>
16	#include <geekos/crc32.h>
17	#include <geekos/tss.h>
18	#include <geekos/int.h>
19	#include <geekos/kthread.h>
20	#include <geekos/trap.h>
设置断点在第58行:
(gdb) b main.c:58
Breakpoint 1 at 0x1647b: file ../src/geekos/main.c, line 58.
尝试运行一下,因为远程连接到的进程已经启动,所以只能使用continue:
(gdb) c
Continuing.

Breakpoint 1, Main (bootInfo=0x101ff8) at ../src/geekos/main.c:58
58	    Print("Welcome to GeekOS!\n");
执行下一条语句:
(gdb) n
59	    Set_Current_Attr(ATTRIB(BLACK, GRAY));
此时屏幕就会显示刚才打印的那行字了:

关于gdb的语法请参考gdb手册。
有的朋友很少用命令行的调试器,而习惯可视化的调试器,类似一边点鼠标一边观察值的,可以用ddd:
# apt-get install ddd启动调试器调试内核文件:
$ ddd kernel.exe
连接Bochs的步骤和gdb下一样,只是界面是图形的并且一些常用命令都集成到菜单里了,下面是效果图:
