Pentaho 之Schame workbench入门实例
Introduction to Mondrian OLAP schema
by Yogaraj Khanal on December 4th, 2011
Introduction
This article demonstrates how you can design Mondrian OLAP Schema using Schema Workbench. I am using MySQL database for this article purpose.
Background
Mondrian in java based OLAP engine which executes MDX queries from RDBMS.
Detail
In this article I am showing you how you can create a basic Mondrian schema using Schema Workbench by connecting to MySQL RDBMS and show the data using Saiku as plug-in in Pentaho BI suite which works on this schema. Also I will show you how to publish the schema in the series of steps.
Prerequisite for this article:
MySQL Database and Query Browser (optional) which can be freely downloaded from here:
http://dev.mysql.com/downloads/mysql/
http://dev.mysql.com/downloads/gui-tools/5.0.html
Use this DDL to create a database and a table to be used for the purpose of this tutorial
Insert some data and verify that they are there using these DML statements
I am keeping database this simple and clean for this article purpose.
Now let's get into the Schema Workbench part. I am using the latest stable build to date version 3.3.0 for this article. Download the latest stable build of Schema workbench from here:
http://wiki.pentaho.com/display/COM/Latest+Stable+Builds
http://sourceforge.net/projects/mondrian/files/schema%20workbench/
After you download and extract put the drivers for the database. I have three drivers here:

MySQL driver is required for this tutorial. This can be downloaded from bottom part of this article where I have provided distribution of the MySQL JDBC driver, sql script and actual schema that you can import from schema workbench and viewed.
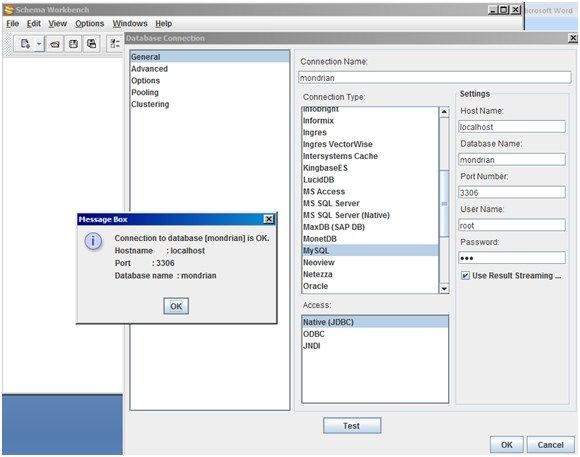
This screen can be viewed from by clicking Options->Connection providing your credentials to connect to database and clicking on the test button shown above.

You can do the File->New->JDBC explorer and expand the tree to view your table as shown above in the screen shot.
In the screen above I did File->New->Schema and gave a schema a name mondrianS.
Also notice the * on the first highlight from the top indicating that you have to save it.
Right click and to Add cube and give it a name in this case mondrianC.
In this screen I did right click on the cube and added the table that we just created and connected which should be shown in drop down under name section if you did everything correctly.
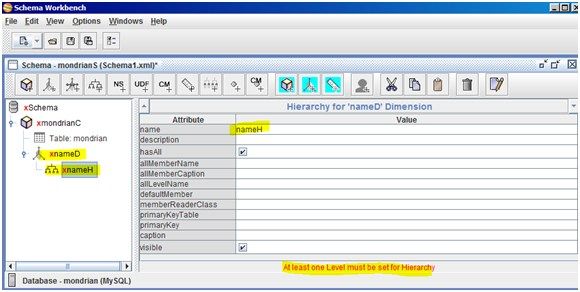
In this screen I have added a dimension called name and gave it nameD corresponding to our table column name. Also hierarchy is also added by default which I gave name called nameH. If you notice the error in the bottom of the screen that says “At least one Level must be set for Hierarchy” but when you go to add Level you will see it grayed out and the work around is posted in this post which took me a while to figure out that this is limitation of Schema Workbench. So let try the work around shown below.
http://jira.pentaho.com/browse/MONDRIAN-662
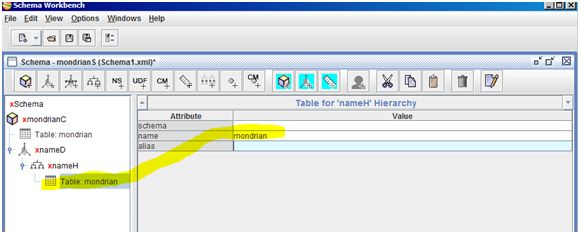
Let's first add a table before adding the Level and then lets delete the table as shown in screen shot below.
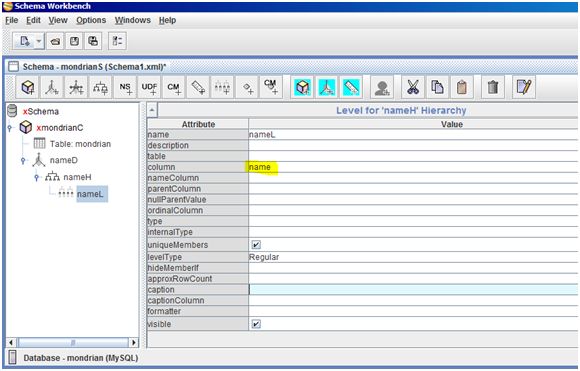
The points to not in this screen are the yellow highlighted column name is required field which should be available in drop down. Also I have deleted the temporary table I added in the screen shot above.
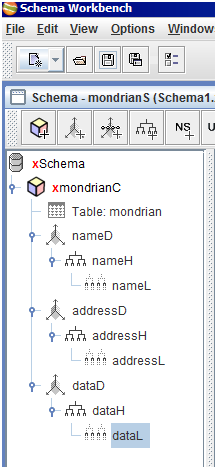
I have repeated the same steps explained above to add two more dimension addressD and dataD that corresponds to the column in our database we created.
The last important thing that is required to add is measure. So let's go ahead and add it.
You have to right click on the cube to add it. Yellow highlighted part shows its required field that should be available from drop down.
Now let's save our schema somewhere and run basic MDX query to make sure it has no errors in it. File->New->MDX Query
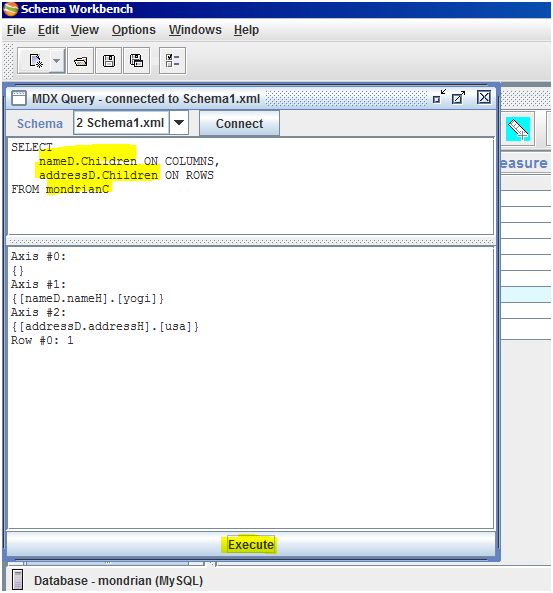
If you followed everything you should be able to see no error like in the screen above.
Observer that you are selecting two dimension one on ROWS and one on columns from a Cube.
Now it's time to publish our schema in Pentaho BI and use Saiku plugin to view the data.
Please follow this article on how to install Saiku in Pentaho BI.
http://codeissue.com/articles/a04e87158bb8552/pentaho-bi-ctools-cdf-cda-cde-saiku-analytics-etc-using-cygwin
You have click Schema then go to File->Publish to get the screen to publish the schema as shown in screen shot below.
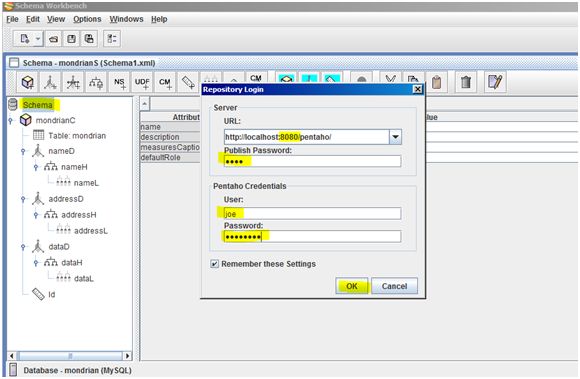
I assumed that you are running pentaho on localhost on port 8080 and using default pentaho test login joe/password if not use PAC to set and adjust the information accordingly.
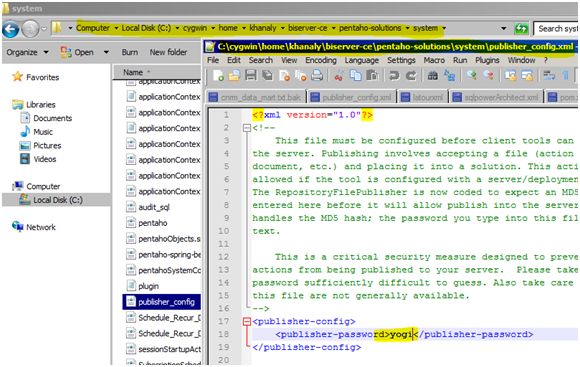
You have to set the password in this location
<PENTAHO_HOME>\biserver-ce\pentaho-solutions\system\publisher_config.xml and use same in Publish Password field above.
You can right click in PUC to create a new folder to place your published file. Let's create a folder name MondrianSchema folder to publish our schema which will be created in pentaho solutions folder.
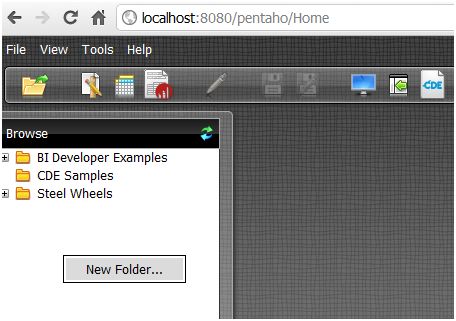
Let's create a folder name MondrianSchema folder to publish our schema which will be created in pentaho-solutions folder.
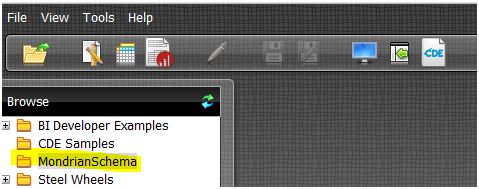
Yellow highlighted part shows our new folder that we are going to use to publish schema.
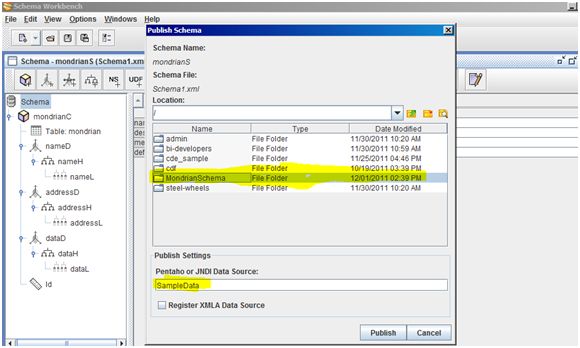
You should be able to browser to that folder now from Schema Workbench as shown in the screen shot above. See the second yellow highlight section which we should correct first to publish the schema. You should have preexisting JNDI Data Source and have same exact name here to publish otherwise it won't like it. So let's go ahead and create one Using PUC using option:
File->New->Datasource
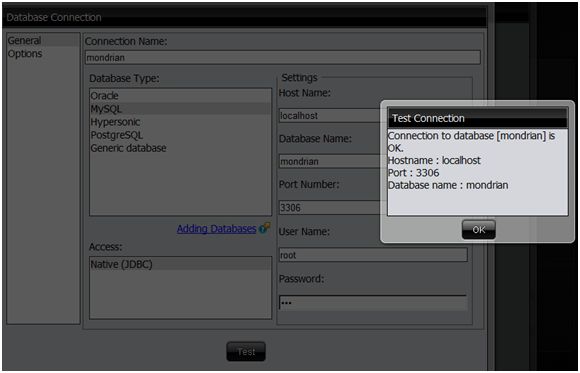
Let's select data to make sure we can see it from here.
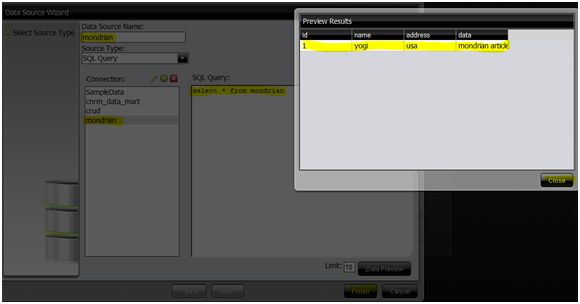
Now we can use this JNDI Data Source name that we just created with confidence in Schema Workbench to publish data. After clicking Close and Finish button make sure to save default model and restart the bi server to make sure that JNDI resource exist in many cases it gives problem if you don't do so. So take it as required important step.
Here I am getting publishing error since I didn't start the Pentaho BI server running on Tomcat which you can see in screen shot below.
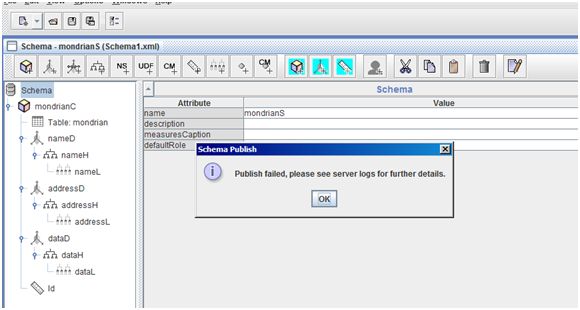
Also I need to be inside the Mondrian Schema folder to publish it as shown in screen shot below.
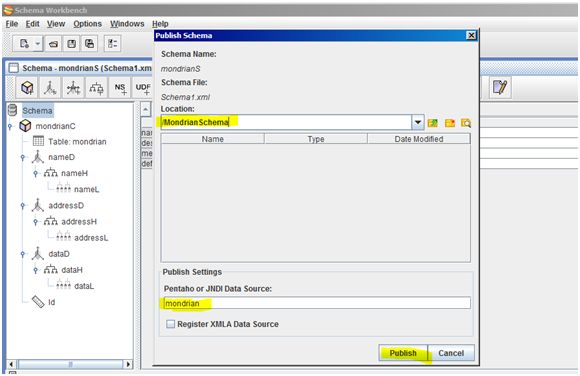
In above screen I was outside of the folder and didn't restart the BI server that is why publishing filed I am documenting these steps here to show you all scenario.
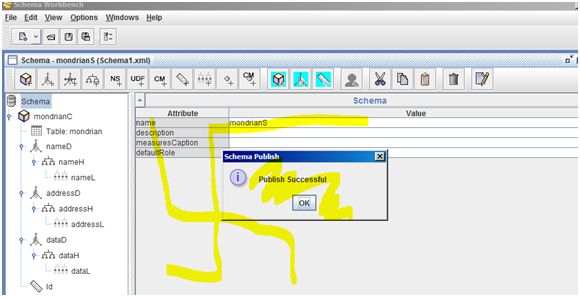
If you those all the steps I did you should be able to see this message.
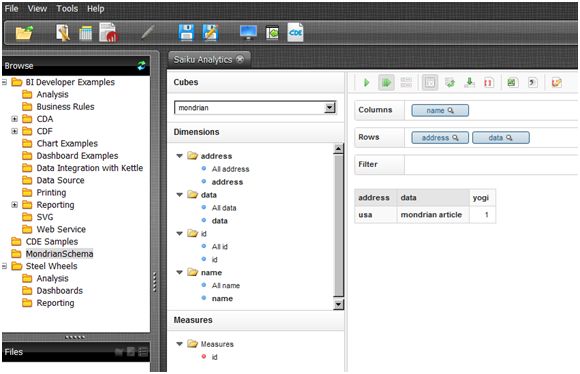
Now you can use Saiku in PUC to view the data as shown in screen shot below.
I hope this article servers the purpose of helping you learn creating OLAP Schema and short and simple and complete enough to grasp the concept and able to use Saiku in PUC to view your data.
Prerequisite for this article:
MySQL Database and Query Browser (optional) which can be freely downloaded from here:
http://dev.mysql.com/downloads/mysql/
http://dev.mysql.com/downloads/gui-tools/5.0.html
Use this DDL to create a database and a table to be used for the purpose of this tutorial
CREATE database mondrian;
USE mondrian;
CREATE TABLE mondrian (
     id INT NOT NULL AUTO_INCREMENT PRIMARY KEY,
	 name varchar(100),
     address varchar(100),
     data VARCHAR(100)
     )ENGINE=InnoDB;
INSERT INTO mondrian(name,address,data) values('yogi','usa','mondrian article');
SELECT * from mondrian;
Now let's get into the Schema Workbench part. I am using the latest stable build to date version 3.3.0 for this article. Download the latest stable build of Schema workbench from here:
http://wiki.pentaho.com/display/COM/Latest+Stable+Builds
http://sourceforge.net/projects/mondrian/files/schema%20workbench/
After you download and extract put the drivers for the database. I have three drivers here:

MySQL driver is required for this tutorial. This can be downloaded from bottom part of this article where I have provided distribution of the MySQL JDBC driver, sql script and actual schema that you can import from schema workbench and viewed.

This screen can be viewed from by clicking Options->Connection providing your credentials to connect to database and clicking on the test button shown above.

You can do the File->New->JDBC explorer and expand the tree to view your table as shown above in the screen shot.
In the screen above I did File->New->Schema and gave a schema a name mondrianS.
Also notice the * on the first highlight from the top indicating that you have to save it.
Right click and to Add cube and give it a name in this case mondrianC.
In this screen I did right click on the cube and added the table that we just created and connected which should be shown in drop down under name section if you did everything correctly.

In this screen I have added a dimension called name and gave it nameD corresponding to our table column name. Also hierarchy is also added by default which I gave name called nameH. If you notice the error in the bottom of the screen that says “At least one Level must be set for Hierarchy” but when you go to add Level you will see it grayed out and the work around is posted in this post which took me a while to figure out that this is limitation of Schema Workbench. So let try the work around shown below.
http://jira.pentaho.com/browse/MONDRIAN-662

Let's first add a table before adding the Level and then lets delete the table as shown in screen shot below.

The points to not in this screen are the yellow highlighted column name is required field which should be available in drop down. Also I have deleted the temporary table I added in the screen shot above.

I have repeated the same steps explained above to add two more dimension addressD and dataD that corresponds to the column in our database we created.
The last important thing that is required to add is measure. So let's go ahead and add it.
You have to right click on the cube to add it. Yellow highlighted part shows its required field that should be available from drop down.
Now let's save our schema somewhere and run basic MDX query to make sure it has no errors in it. File->New->MDX Query

If you followed everything you should be able to see no error like in the screen above.
Observer that you are selecting two dimension one on ROWS and one on columns from a Cube.
Now it's time to publish our schema in Pentaho BI and use Saiku plugin to view the data.
Please follow this article on how to install Saiku in Pentaho BI.
http://codeissue.com/articles/a04e87158bb8552/pentaho-bi-ctools-cdf-cda-cde-saiku-analytics-etc-using-cygwin
You have click Schema then go to File->Publish to get the screen to publish the schema as shown in screen shot below.

I assumed that you are running pentaho on localhost on port 8080 and using default pentaho test login joe/password if not use PAC to set and adjust the information accordingly.

You have to set the password in this location
<PENTAHO_HOME>\biserver-ce\pentaho-solutions\system\publisher_config.xml and use same in Publish Password field above.
You can right click in PUC to create a new folder to place your published file. Let's create a folder name MondrianSchema folder to publish our schema which will be created in pentaho solutions folder.

Let's create a folder name MondrianSchema folder to publish our schema which will be created in pentaho-solutions folder.

Yellow highlighted part shows our new folder that we are going to use to publish schema.

You should be able to browser to that folder now from Schema Workbench as shown in the screen shot above. See the second yellow highlight section which we should correct first to publish the schema. You should have preexisting JNDI Data Source and have same exact name here to publish otherwise it won't like it. So let's go ahead and create one Using PUC using option:
File->New->Datasource

Let's select data to make sure we can see it from here.

Now we can use this JNDI Data Source name that we just created with confidence in Schema Workbench to publish data. After clicking Close and Finish button make sure to save default model and restart the bi server to make sure that JNDI resource exist in many cases it gives problem if you don't do so. So take it as required important step.
Here I am getting publishing error since I didn't start the Pentaho BI server running on Tomcat which you can see in screen shot below.

Also I need to be inside the Mondrian Schema folder to publish it as shown in screen shot below.

In above screen I was outside of the folder and didn't restart the BI server that is why publishing filed I am documenting these steps here to show you all scenario.

If you those all the steps I did you should be able to see this message.

Now you can use Saiku in PUC to view the data as shown in screen shot below.
I hope this article servers the purpose of helping you learn creating OLAP Schema and short and simple and complete enough to grasp the concept and able to use Saiku in PUC to view your data.
Conclusion
This article demonstrates how you can build the basic Mondrian cube and publish it to the Pentaho BI server and use Saiku plugin installed on it to view your data. Please free to send me your comments, suggestions and questions through this website.
References
http://wiki.pentaho.com/display/COM/Latest+Stable+Builds
http://sourceforge.net/projects/mondrian/files/schema%20workbench/
http://dev.mysql.com/downloads/mysql/
http://dev.mysql.com/downloads/gui-tools/5.0.html
http://type-exit.org/adventures-with-open-source-bi/2010/07/creating-a-basic-mondrian-olap-cube/
http://sourceforge.net/projects/mondrian/files/schema%20workbench/
http://dev.mysql.com/downloads/mysql/
http://dev.mysql.com/downloads/gui-tools/5.0.html
http://type-exit.org/adventures-with-open-source-bi/2010/07/creating-a-basic-mondrian-olap-cube/
Download
Click here to download source code