spring 的JDBCtemplate试用
简述:
用spring配置JDBCtemplate 做数据库连接管理
(如基本bean的封装还可以增强如加入使用rowmapper)使得接口更清晰,之后会再做改进
这里是spring的注入的入门
步骤:
1. 在eclipse的Help => eclipse markerplace 下载spring插件
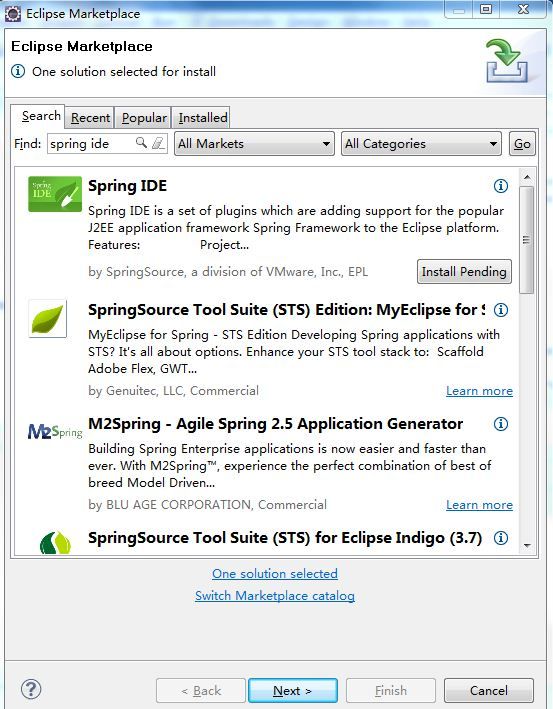
下载下来 Spring IDE
2. 在WEB-INF里新建一个spring bean configuration file,
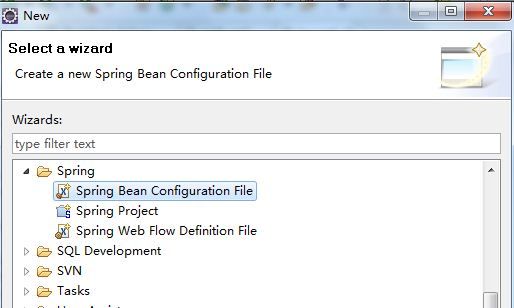
命名为 applicationContext.xml
applicationContext.xml
<?xml version="1.0" encoding="GBK"?>
<!-- 指定Spring配置文件的Schema信息 -->
<beans xmlns="http://www.springframework.org/schema/beans"
	xmlns:xsi="http://www.w3.org/2001/XMLSchema-instance"
	xmlns:aop="http://www.springframework.org/schema/aop"
	xmlns:tx="http://www.springframework.org/schema/tx"
	xsi:schemaLocation="http://www.springframework.org/schema/beans
	http://www.springframework.org/schema/beans/spring-beans-2.5.xsd
	http://www.springframework.org/schema/tx
	http://www.springframework.org/schema/tx/spring-tx-2.5.xsd
	http://www.springframework.org/schema/aop
	http://www.springframework.org/schema/aop/spring-aop-2.5.xsd">

	<!-- 定义数据源Bean,使用C3P0数据源实现 -->
	<bean id="dataSource" class="com.mchange.v2.c3p0.ComboPooledDataSource" destroy-method="close">
		<!-- 指定连接数据库的驱动 -->
		<property name="driverClass" value="com.mysql.jdbc.Driver" />
		<!-- 指定连接数据库的URL -->
		<property name="jdbcUrl" value="jdbc:mysql://localhost:3306/test" />
		<!-- 指定连接数据库的用户名 -->
		<property name="user" value="root" />
		<!-- 指定连接数据库的密码 -->
		<property name="password" value="sql" />
		<!-- 指定连接数据库连接池的最大连接数 -->
		<property name="maxPoolSize" value="40" />
		<!-- 指定连接数据库连接池的最小连接数 -->
		<property name="minPoolSize" value="1" />
		<!-- 指定连接数据库连接池的初始化连接数 -->
		<property name="initialPoolSize" value="1" />
		<!-- 指定连接数据库连接池的连接的最大空闲时间 -->
		<property name="maxIdleTime" value="20" />
	</bean>

	<bean id="jdbcTemplate" class="org.springframework.jdbc.core.JdbcTemplate">
		<property name="dataSource">
			<ref local="dataSource" />
		</property>
	</bean>

	<bean id="personInfoDAO" class="webproj.dao.PersonInfoDAO">
		<property name="jdbcTemplate">
			<ref local="jdbcTemplate" />
		</property>
	</bean>


</bean>
其中配置了 spring的jdbc的连接
3. 新建PersonInfoDAO类(设计接口不全,知识做一个连接数据库的测试)
PersonInfoDAO.java
package webproj.dao;

import java.util.List;

import org.springframework.jdbc.core.JdbcTemplate;

public class PersonInfoDAO{
	private JdbcTemplate jdbcTemplate;

	public JdbcTemplate getJdbcTemplate(){
		return jdbcTemplate;
	}

	public void setJdbcTemplate(JdbcTemplate jdbcTemplate){
		this.jdbcTemplate = jdbcTemplate;
	}

	//select all person infomation from PersonInfo schema
	public List selectPersonInfo(){
		String sql = "select * from PersonInfo";
		List list = jdbcTemplate.queryForList(sql);
		return list;
	}
}
4. 关键的web.xml
主要有servlet的映射在URL上
<?xml version="1.0" encoding="UTF-8"?>
<web-app xmlns:xsi="http://www.w3.org/2001/XMLSchema-instance" xmlns="http://java.sun.com/xml/ns/javaee" xmlns:web="http://java.sun.com/xml/ns/javaee/web-app_2_5.xsd" xsi:schemaLocation="http://java.sun.com/xml/ns/javaee http://java.sun.com/xml/ns/javaee/web-app_2_5.xsd" id="WebApp_ID" version="2.5">
  <display-name>WebProj2.5</display-name>

	<!-- 配置Web应用启动时候加载Spring容器 -->
	<listener>
		<listener-class>org.springframework.web.context.ContextLoaderListener
		</listener-class>
	</listener>

	<servlet>
		<servlet-name>ShowPersonInfoServlet</servlet-name>
		<servlet-class>webproj.servlet.ShowPersonInfoServlet</servlet-class>
	</servlet>

	<servlet-mapping>
		<servlet-name>ShowPersonInfoServlet</servlet-name>
		<url-pattern>/ShowPersonInfo</url-pattern>
	</servlet-mapping>
</web-app>
5. ShowPersonInfoServlet.java
用到绝对路径,应该有方法指定相对路径的,之后再研究
package webproj.servlet;

import java.io.IOException;
import java.util.List;

import javax.servlet.ServletException;
import javax.servlet.http.HttpServlet;
import javax.servlet.http.HttpServletRequest;
import javax.servlet.http.HttpServletResponse;

import org.springframework.beans.factory.BeanFactory;
import org.springframework.context.ApplicationContext;
import org.springframework.context.support.ClassPathXmlApplicationContext;
import org.springframework.context.support.FileSystemXmlApplicationContext;

import webproj.dao.PersonInfoDAO;

public class ShowPersonInfoServlet extends HttpServlet{
	private static final long serialVersionUID = 1L;

	public void doGet(HttpServletRequest request, HttpServletResponse response)
	throws ServletException, IOException {
		ApplicationContext ctx = new FileSystemXmlApplicationContext("C:/Users/anialy.anialy-PC/Desktop/eclipse work space 2/WebProj2.5/WebContent/WEB-INF/applicationContext.xml");
		PersonInfoDAO personInfoDAO = (PersonInfoDAO)ctx.getBean("personInfoDAO");
		response.setContentType("text/html;charset=utf-8");
		List list = personInfoDAO.selectPersonInfo();
		for(Object obj : list){
			response.getWriter().append(obj.toString() + "<br>");
		}
	}

}
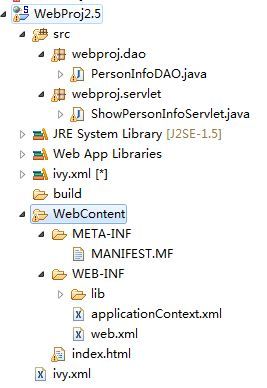
6. 最后整个项目文件结构如下
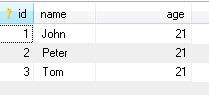
这里是MySQL数据库PersonInfo表的信息:
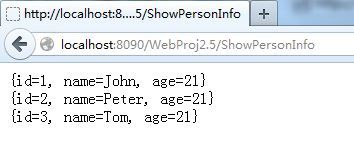
最后是程序的输出: