VC++ API实现串口通信
【原文】http://dev.yesky.com/401/2308901.shtml
之前有篇博文讲过用ocx控件来写串口通信,但是那种方法不够好,每次把代码拷到其他电脑上还要重新注册一遍ocx插件,太繁琐,而win32 API的方式则方便的多,程序移植没有后顾之忧。
一、API描述
在WIN32 API中,串口使用文件方式进行访问,其操作的API基本上与文件操作的API一致。打开串口
Win32 中用于打开串口的API 函数为CreateFile,其原型为:
HANDLE CreateFile (
 LPCTSTR lpFileName, //将要打开的串口逻辑名,如COM1 或COM2
 DWORD dwAccess, //指定串口访问的类型,可以是读取、写入或两者并列
 DWORD dwShareMode, //指定共享属性,由于串口不能共享,该参数必须置为0
 LPSECURITY_ATTRIBUTES lpsa, //引用安全性属性结构,缺省值为NULL
 DWORD dwCreate, //创建标志,对串口操作该参数必须置为OPEN EXISTING
 DWORD dwAttrsAndFlags, //属性描述,用于指定该串口是否可进行异步操作,
 //FILE_FLAG_OVERLAPPED:可使用异步的I/O
 HANDLE hTemplateFile //指向模板文件的句柄,对串口而言该参数必须置为NULL
);
例如,以下程序用于以同步读写方式打开串口COM1:
HANDLE hCom;
DWORD dwError;
hCon = CreateFile("COM1", GENERIC_READ | GENERIC_WRITE, 0, NULL, OPEN_EXISTING, 0, NULL);
if (hCom == (HANDLE)0xFFFFFFFF)
{
 dwError = GetLastError();
 MessageBox(dwError);
}
对于dwAttrsAndFlags参数及FILE_FLAG_OVERLAPPED标志的由来,可解释如下:Windows文件操作分为同步I/O和重叠I/O(Overlapped I/ O)两种方式,在同步I/O方式中,API会阻塞直到操作完成以后才能返回(在多线程方式中,虽然不会阻塞主线程,但是仍然会阻塞监听线程);而在重叠I/O方式中,API会立即返回,操作在后台进行,避免线程的阻塞。重叠I/O非常灵活,它也可以实现阻塞(例如我们可以设置一定要读取到一个数据才能进行到下一步操作)。如果进行I/O操作的API 在没有完成操作的情况下返回,我们可以通过调用GetOverLappedResult()函数阻塞到I/O操作完成后返回。
配置串口
配置串口是通过改变设备控制块DCB(Device Control Block) 的成员变量值来实现的,接收缓冲区和发送缓冲区的大小可通过SetupComm函数来设置。
DCB结构体定义为:
typedef struct _DCB { // dcb
 DWORD DCBlength; // sizeof(DCB)
 DWORD BaudRate; // current baud rate
 DWORD fBinary: 1; // binary mode, no EOF check
 DWORD fParity: 1; // enable parity checking
 DWORD fOutxCtsFlow:1; // CTS output flow control
 DWORD fOutxDsrFlow:1; // DSR output flow control
 DWORD fDtrControl:2; // DTR flow control type
 DWORD fDsrSensitivity:1; // DSR sensitivity
 DWORD fTXContinueOnXoff:1; // XOFF continues Tx
 DWORD fOutX: 1; // XON/XOFF out flow control
 DWORD fInX: 1; // XON/XOFF in flow control
 DWORD fErrorChar: 1; // enable error replacement
 DWORD fNull: 1; // enable null stripping
 DWORD fRtsControl:2; // RTS flow control
 DWORD fAbortOnError:1; // abort reads/writes on error
 DWORD fDummy2:17; // reserved
 WORD wReserved; // not currently used
 WORD XonLim; // transmit XON threshold
 WORD XoffLim; // transmit XOFF threshold
 BYTE ByteSize; // number of bits/byte, 4-8
 BYTE Parity; // 0-4=no,odd,even,mark,space
 BYTE StopBits; // 0,1,2 = 1, 1.5, 2
 char XonChar; // Tx and Rx XON character
 char XoffChar; // Tx and Rx XOFF character
 char ErrorChar; // error replacement character
 char EofChar; // end of input character
 char EvtChar; // received event character
 WORD wReserved1; // reserved; do not use
} DCB;
而SetupComm函数的原型则为:
BOOL SetupComm(
 HANDLE hFile, // handle to communications device
 DWORD dwInQueue, // size of input buffer
 DWORD dwOutQueue // size of output buffer
);
以下程序将串口设置为:波特率为9600,数据位数为7位,停止位为2 位,偶校验,接收缓冲区和发送缓冲区大小均为1024个字节,最后用PurgeComm函数终止所有的后台读写操作并清空接收缓冲区和发送缓冲区:
DCB dcb;
dcb.BaudRate = 115200; //波特率为115200
dcb.ByteSize = 8; //数据位数为8位
dcb.Parity = NOPARITY; //奇偶校验
dcb.StopBits = 1; //1个停止位
dcb.fBinary = TRUE;
dcb.fParity = TRUE;
if (!SetCommState(hCom, &dcb))
{
 MessageBox("串口设置出错!");
}
SetupComm(hCom, 1024, 1024);
PurgeComm(hCom, PURCE_TXABORT | PURGE_RXABORT | PURGE_TXCLEAR | PURGE_RXCLEAR);
超时设置
超时设置是通过改变COMMTIMEOUTS结构体的成员变量值来实现的,COMMTIMEOUTS的原型为:
typedef struct _COMMTIMEOUTS
{
 DWORD ReadIntervalTimeout; //定义两个字符到达的最大时间间隔,单位:毫秒
 //当读取完一个字符后,超过了ReadIntervalTimeout,仍未读取到下一个字符,就会
 //发生超时
 DWORD ReadTotalTimeoutMultiplier;
 DWORD ReadTotalTimeoutConstant;
 //其中各时间所满足的关系如下:
 //ReadTotalTimeout = ReadTotalTimeOutMultiplier* BytesToRead + ReadTotalTimeoutConstant
 DWORD WriteTotalTimeoutMultiplier;
 DWORD WriteTotalTimeoutConstant;
} COMMTIMEOUTS, *LPCOMMTIMEOUTS;
以下程序将串口读操作的超时设定为10 毫秒:
COMMTIMEOUTS to;
memset(&to, 0, sizeof(to));
to.ReadIntervalTimeout = 10;
SetCommTimeouts(hCom, &to);
与SetCommTimeouts对应的GetCommTimeouts()函数的原型为:
BOOL GetCommTimeouts(
 HANDLE hFile, // handle of communications device
 LPCOMMTIMEOUTS lpCommTimeouts // pointer to comm time-out structure
);
事件设置
在读写串口之前,需要用SetCommMask ()函数设置事件掩模来监视指定通信端口上的事件,其原型为:
BOOL SetCommMask(
 HANDLE hFile, //标识通信端口的句柄
 DWORD dwEvtMask //能够使能的通信事件
);
有了Set当然还会有Get,与SetCommMask对应的GetCommMask()函数的原型为:
BOOL GetCommMask(
 HANDLE hFile, //标识通信端口的句柄
 LPDWORD lpEvtMask // address of variable to get event mask
);
串口上可以发生的事件可以是如下事件列表中的一个或任意组合:EV_BREAK、EV_CTS、EV_DSR、EV_ERR、EV_RING、EV_RLSD、EV_RXCHAR、EV_RXFLAG、EV_TXEMPTY。
我们可以用WaitCommEvent()函数来等待串口上我们利用SetCommMask ()函数设置的事件:
BOOL WaitCommEvent(
 HANDLE hFile, //标识通信端口的句柄
 LPDWORD lpEvtMask, // address of variable for event that occurred
 LPOVERLAPPED lpOverlapped, // address of overlapped structure
);
WaitCommEvent()函数一直阻塞,直到串口上发生我们用所SetCommMask ()函数设置的通信事件为止。一般而言,当WaitCommEvent()返回时,程序员可以由分析*lpEvtMask而获得发生事件的类别,再进行相应的处理。
读串口
对串口进行读取所用的函数和对文件进行读取所用的函数相同,读函数原型如下:
BOOL ReadFile(
 HANDLE hFile, // handle of file to read
 LPVOID lpBuffer, // pointer to buffer that receives data
 DWORD nNumberOfBytesToRead, // number of bytes to read
 LPDWORD lpNumberOfBytesRead, // pointer to number of bytes read
 LPOVERLAPPED lpOverlapped // pointer to structure for overlapped I/O
);
写串口
对串口进行写入所用的函数和对文件进行写入所用的函数相同,写函数原型如下:
BOOL WriteFile(
 HANDLE hFile, // handle to file to write to
 LPCVOID lpBuffer, // pointer to data to write to file
 DWORD nNumberOfBytesToWrite, // number of bytes to write
 LPDWORD lpNumberOfBytesWritten, // pointer to number of bytes written
 LPOVERLAPPED lpOverlapped // pointer to structure for overlapped I/O
);
关闭串口
利用API 函数实现串口通信时关闭串口非常简单,只需使用CreateFile 函数返回的句柄作为参数调用CloseHandle 即可:
BOOL CloseHandle(
 HANDLE hObject // handle to object to close
);
二、例程
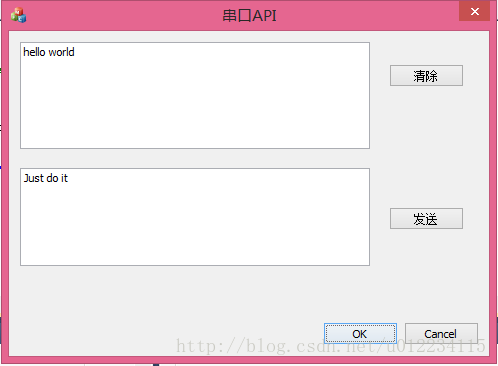
1,新建一个mfc对话框程序,在面板上添加两个编辑框,发送框关联字符串变量m_send,接收方关联变量m_receive,添加两个按钮,一个坐位发送,一个作为清除屏幕。
2,定义一个h文件和一个cpp文件,里面写串口的初始化,和创建线程监听函数。
SerialPort.h
#ifndef _SERIAL_PORT_CONTROL_H
#define _SERIAL_PORT_CONTROL_H

#define COM_RECVDATA WM_USER+0x001//自定义消息

extern HANDLE hCom; //全局变量,串口句柄
extern HANDLE hCommThread; //全局变量,串口线程
//串口监视线程控制函数
extern DWORD WINAPI SerialPort1ThreadProcess(HWND hWnd);
//打开并设置PC串口1(COM1)
extern BOOL OpenSerialPort1();

#endif
SerialPort.cpp
#include "StdAfx.h"
#include "SerialPort.h"

HANDLE hCom; //全局变量,串口句柄
HANDLE hCommThread; //全局变量,串口线程

BOOL OpenSerialPort()   //初始化串口
{
	//打开并设置COM1
	hCom=CreateFile(L"COM3", GENERIC_READ|GENERIC_WRITE, 0,NULL , OPEN_EXISTING, 0, NULL);  //COM3这里可以弄一个combobox选择
	if (hCom==(HANDLE)-1)
	{
		AfxMessageBox(L"打开COM3失败");
		return false;
	}
	else
	{
		COMMTIMEOUTS TimeOuts;
		//设定读超时
		TimeOuts.ReadIntervalTimeout=MAXDWORD;
		TimeOuts.ReadTotalTimeoutMultiplier=0;
		TimeOuts.ReadTotalTimeoutConstant=0;
		//在读一次输入缓冲区的内容后读操作就立即返回,
		//而不管是否读入了要求的字符。


		//设定写超时
		TimeOuts.WriteTotalTimeoutMultiplier=100;
		TimeOuts.WriteTotalTimeoutConstant=500;
		SetCommTimeouts(hCom,&TimeOuts); //设置超时
		SetupComm(hCom,100,100); //输入缓冲区和输出缓冲区的大小都是1024
		DCB wdcb;
		GetCommState (hCom, &wdcb);
		wdcb.BaudRate=115200;//波特率:9600,其他:不变
		wdcb.ByteSize=8;   //每个字节8位
		wdcb.Parity=NOPARITY;  //无停止位
		SetCommState (hCom, &wdcb);
		PurgeComm(hCom,PURGE_TXCLEAR|PURGE_RXCLEAR);
	}
	return true;
}

//以一个线程监控串口接收的数据
DWORD WINAPI SerialPort1ThreadProcess( HWND hWnd)//主窗口句柄
{
	char str[101];
	DWORD wCount; //读取的字节数
	while(1)
	{
		ReadFile(hCom,str, 100, &wCount, NULL);
		if(wCount > 0) //收到数据
		{
			str[wCount] = '\0';
			::PostMessage(hWnd, COM_RECVDATA, (unsigned int) str, wCount);
			//发送消息给对话框主窗口,以进行接收内容的显示
		}
	}
	return TRUE;
}
3,在xxDlg类中添加自定义消息,afx_msg LRESULT OnRecvData(WPARAM wParam, LPARAM lParam); 消息ID写在SerialPort.h头文件里(因为在SerialPort.cpp里调用了) #define COM_RECVDATA WM_USER+0x001
在自定义的消息函数体种写接收数据代码LRESULT CPortDlg::OnRecvData(WPARAM wParam, LPARAM lParam)
{
CString recvStr((char *)wParam);
m_receive += recvStr;
UpdateData(false);
return TRUE;
}4,为发送按钮添加发送数据代码
void CPortDlg::OnBnClickedButton2()
{
	// TODO: Add your control notification handler code here
	UpdateData(true);
	DWORD wCount = 0;
	WriteFile(hCom, m_send, m_send.GetLength(), &wCount, NULL);//发送数据
}
5,未清屏按钮添加代码
void CPortDlg::OnBnClickedButton1()
{
	// TODO: Add your control notification handler code here
	m_receive="";
	UpdateData(false);
}
6,给xxDlg添加系统消息WM_CLOSE,在程序退出时关闭串口连接,也可以专门弄一个按钮打开
void CPortDlg::OnClose()
{
	// TODO: Add your message handler code here and/or call default
	CloseHandle(hCom);
	CDialogEx::OnClose();
}

注意:
- 发送和接收双方串口的波特率,奇偶校验,停止位要保持一致,且符合芯片硬件。
- 上面的程序有bug,接收正常,但是发送过去,对方只能收到第一个字母,搞了好久不知道问题在哪,还请哪位大神赐教一二啊!!