如何在OC4J 10g (10.1.3)? 中配置使用MQ JCA 1.5 资源
First Created: 09-15-2006
作者 : Sandeep Bangera
- 介绍
- 先决条件
- 你应该知道什么
- 软件需求
- 记号
- 编译程序
- 预览
- 更新 ActiveMQ rar 到 可发布的 OC4J中
- Inbound Communication – 配置 MDB 接受从 ActiveMQ来的消息
- Outbound Communication – 配置 Session Bean 发送消息到 ActiveMQ
- 运行程序
- 运行程序
- 运行程序
- 启动 OC4J 实例
- 启动 ActiveMQ 实例
- 启动 ActiveMQ 实例
- 产生,编译,发布,运行应用程序
- 运行应用程序
- 简化后的步骤
- 总结
介绍
此 Demo application演示了如何配置和发布 Active MQ JCA 1.5 资源适配器到 OC4J 10g 10.1.3. 此资源适配器允许在 OC4J中使用 ActiveMQ
此 Demo application演示你如何做:
Outbound Communication: 配置 Stateless Session Bean 发送消息到一个 ActiveMQ的 queue中
Inbound Communication: 配置一个 Message Driven Bean接受从 ActiveMQ发送的消息。
先决条件
你应该知道什么
- 你应该熟悉这些技术 : JMS, MDB, EJB;
- 链接到 OC4J Howto's on OTN
软件需求
- Oracle Containers for J2EE 10g (10.1.3) , standalone 版 , 随带一个以配置好的 Web站点 (比如 http-web-site)
- Sun's JDK 1.5 版或以上
- Apache Ant 1.6.2 或以上以编译程序
- ActiveMQ 4.0.1或以上
- 任何 HTML 浏览器,如 Mozilla, Microsoft Internet Explorer, Netscape, 等 .
记号
- %ORACLE_HOME% - OC4J 的安装目录
- %JAVA_HOME% - JDK的安装目录
- %ACTIVEMQ_HOME% - ActiveMQ的安装目录
- %HOWTO_HOME% - 此 Demo的解压目录
编译程序
此程序的 Javadoc位于 %HOWTO_HOME%/doc/javadoc/ 目录 .
配置文件位于 %HOWTO_HOME%/etc 目录 , 包括部署描述文件比如 application.xml.
预览
上图展示了例子中的消息的流向,一个独立的 JMS 客户程序产生 JMS 文本消息并把它放到 queue.inbound 队列里。这些 inbound 消息被 MDB 消费,此 MDB 然后调用 Stateless EJB 。 Stateless EJB 从 MDB 中取出输入然后发布一个简单的响应消息到 queue.outbound 队列中。
更新 ActiveMQ rar 到 可发布的 OC4J中
ActiveMQ rar 不能直接发布到 OC4J中 .需做如下的小修改 :
- 解压原始的 ActiveMQ 资源适配文件 %ACTIVEMQ_HOME% /lib/optional/activemq-ra-4.0.1.rar 到,比如 C:/temp
- 将在 %HOWTO_HOME%/etc/connector 目录下的 oc4j-ra.xml 到一解压目录,比如 C:/temp/META-INF
- 修改 ra.xml 别且注释掉嵌入式 broker的使用
<!--
<config-property-value>xbean:broker-config.xml</config-property-value>
-->
<!-
<config-property-value>vm://localhost</config-property-value>
--> - 移除所有除主 ra.jar,即 activemq-ra-4.0.1.jar,的 .jar文件。 ra需要的 jar文件将被发布为对应用程序可用的共享库。
- 修改后,创建一个新的 rar
jar -cvfm C:/temp/activemq-ra.rar META-INF/MANIFEST.MF META-INF/* activemq-ra-4.0.1.jar broker-config.xml - 拷贝新的 activemq-ra.rar 到 %HOWTO_HOME%/activemq-lib
注意 : 这些步骤在当前的 ActiveMQ 4.0.1 howto 中已经修改 . 如果你有用更新的 ActiveMQ ,你需要在最新的 ActiveMQ RAR 中作以上修改 .
- 为所有需要的 ActiveMQ 资源适配器创建一个共享库并将它发布到 OC4J 中。幸运的是, activeMQ.jar 已经包含了所有 ActiveMQ 需要的库文件 ,因此,我们只需要 export此 jar为共享库
<oracle:publishSharedLibrary
deployerUri="deployer:oc4j:${oc4j.host}:${oc4j.admin.port}"
userId="${oc4j.admin.user}"
password="${oc4j.admin.password}"
libraryName="${shared.library.name}"
libraryVersion="4.0.1"
logFile="${log.dir}/publish-library.log">
<oracle:uploadCodeSource path="${activemq.home}/${activemq.core.jar}" />
<!-- You may need to add these files to the shared library if you are interested
in ActiveMQ persistence features.
In adddition you will need to modify broker-config.xml in ra.jar to use spring properties -->
<!--
<oracle:uploadCodeSource path="${activemq.home}/lib/optional/spring-1.2.6.jar" />
<oracle:uploadCodeSource path="${activemq.home}/lib/optional/xbean-spring-2.2.jar" />
-->
</oracle:publishSharedLibrary>
- 在 orion-application.xml中 Import 共享库
<imported-shared-libraries>
<import-shared-library name="activemq.rar" max-version="4.0.1"/>
</imported-shared-libraries>
Inbound Communication – 配置 MDB 接受从 ActiveMQ来的消息
Message Driven Bean
ActiveMQMessageDrivenEJBBean在 ejb-jar.xml中的部署描述如下:
<message-driven>
<description>Message Driven Bean</description>
<display-name>ActiveMQMessageDrivenEJB</display-name>
<ejb-name>ActiveMQMessageDrivenEJB</ejb-name>
<ejb-class>com.oracle.howto.activemq.ActiveMQMessageDrivenEJBBean</ejb-class>
<messaging-type>javax.jms.MessageListener</messaging-type>
<transaction-type>Container</transaction-type>
<activation-config>
<activation-config-property>
<activation-config-property-name>destination</activation-config-property-name>
<activation-config-property-value>queue.inbound </activation-config-property-value>
</activation-config-property>
<activation-config-property>
<activation-config-property-name>destinationType</activation-config-property-name>
<activation-config-property-value>javax.jms.Queue</activation-config-property-value>
</activation-config-property>
<activation-config-property>
<activation-config-property-name>acknowledgeMode</activation-config-property-name>
<activation-config-property-value>Auto-acknowledge</activation-config-property-value>
</activation-config-property>
<activation-config-property>
<activation-config-property-name>messageSelector</activation-config-property-name>
<activation-config-property-value/>
</activation-config-property>
</activation-config>
</message-driven>
activation-config-property 用于将 MDB连接到 JCA。 destination属性值只能是与 ActiveMQ相关的特定值,并且只能是 MDB监听的队列的物理名。
Connector
上面定义的两个 activation configuration 与下面的定义在 ra.xml中的元素相关:
<inbound-resourceadapter>
<messageadapter>
<messagelistener>
<messagelistener-type>javax.jms.MessageListener</messagelistener-type>
<activationspec>
<activationspec-class>org.apache.activemq.ra.ActiveMQActivationSpec</activationspec-class>
<required-config-property>
<config-property-name>destination</config-property-name>
</required-config-property>
<required-config-property>
<config-property-name>destinationType</config-property-name>
</required-config-property>
</activationspec>
</messagelistener>
</messageadapter>
</inbound-resourceadapter>
Additional Glue Steps
用实际的目的 JNDI信息更新 orion-ejb-jar.xml. 它用于连接 inbound JMS Destination到 MDB
<message-driven-deployment name="ActiveMQMessageDrivenEJB" resource-adapter="activemq-rar"
connection-factory-location="activeMQ/QueueConnectionFactory" destination-location="activeMQJMS/MyQ">
</message-driven-deployment>
在 ejb.-jar.xml中更新 onMessage 需要的 transaction 信息
<container-transaction>
<method>
<ejb-name>ActiveMQMessageDrivenEJB</ejb-name>
<method-name>onMessage</method-name>
<method-params>
<method-param>javax.jms.Message</method-param>
</method-params>
</method>
<trans-attribute>Required</trans-attribute>
</container-transaction>
Outbound Communication – 配置 Session Bean 发送消息到 ActiveMQ
Stateless Session Bean
- 在 ejb-jar.xml中 ActiveMQEJBBean的描述如下:
<resource-ref>
<res-ref-name>jms/QCF</res-ref-name>
<res-type>javax.jms.QueueConnectionFactory</res-type>
<res-auth>Container</res-auth>
<res-sharing-scope>Unshareable</res-sharing-scope>
</resource-ref>
<resource-env-ref>
<resource-env-ref-name>jms/QUEUE</resource-env-ref-name>
<resource-env-ref-type>javax.jms.Queue</resource-env-ref-type>
</resource-env-ref>
jms/QCF 是 ActiveMQEJBBean用 来查找 javax.jms.QueueConnectionFactory的 JNDI 名字,我们将配置它来指向 ActiveMQ QueueConnectionFactory.
- 在 orion-ejb-jar.xml 中连接实际 JNDI名字与上面相似
<session-deployment name="ActiveMQEJB">
<resource-ref-mapping name="jms/QCF" location="activeMQ/QueueConnectionFactory" />
<resource-env-ref-mapping name="jms/QUEUE" location="activeMQJMS/MyQ" />
</session-deployment>
The Connector
上面定义的 resource-ref defined 将用来连接在 ra.xml中的如下元素
<outbound-resourceadapter>
<connection-definition>
<managedconnectionfactory-class>org.apache.activemq.ra.ActiveMQManagedConnectionFactory</managedconnectionfactory-class>
<connectionfactory-interface>javax.jms.ConnectionFactory</connectionfactory-interface>
<connectionfactory-impl-class>org.apache.activemq.ra.ActiveMQConnectionFactory</connectionfactory-impl-class>
<connection-interface>javax.jms.Connection</connection-interface>
<connection-impl-class>org.apache.activemq.ra.ManagedConnectionProxy</connection-impl-class>
</connection-definition>
<adminobject>
<adminobject-interface>javax.jms.Queue</adminobject-interface>
<adminobject-class>org.apache.activemq.command.ActiveMQQueue</adminobject-class>
<config-property>
<config-property-name>PhysicalName</config-property-name>
<config-property-type>java.lang.String</config-property-type>
</config-property>
</adminobject>
Glue Code
下面的片段用以连接 Outbound队列 . 下面的片段位于 oc4j-connectors.xml 中
<connector name="activemq-rar" path="activemq-ra.rar" >
<adminobject-config location="activeMQJMS/MyQ">
<adminobject-class>org.apache.activemq.command.ActiveMQQueue</adminobject-class>
<config-property name="PhysicalName" value="queue.outbound"/>
</adminobject-config>
<adminobject-config location="activeMQJMS/MyT">
<adminobject-class>org.apache.activemq.command.ActiveMQTopic</adminobject-class>
<config-property name="PhysicalName" value="topic.outbound"/>
</adminobject-config>
</connector>
连接工厂在 oc4j-ra.xml中
<connector-factory location="activeMQ/QueueConnectionFactory" connector-name="activemq-rar">
<connection-pooling use="none">
</connection-pooling>
<security-config use="none">
</security-config>
<connectionfactory-interface>javax.jms.QueueConnectionFactory</connectionfactory-interface>
</connector-factory>
运行程序
下面指示如何在 Oracle Containers for J2EE 10g (10.1.3). 中运行此演示程序
检查例子的文件目录
- how-to-use-activemq-JCA-RA/src/java – 包含例子的所有 java代码 .
- client/
- ActiveMQApp.java - JMS 客户:发送消息到 ActiveMQ的队列中
- ejb/
- ActiveMQEJB.java - ActiveMQ Stateless EJB 远程接口 .
- ActiveMQEJBHome.java - ActiveMQ Stateless EJB home 接口
- ActiveMQEJBBean.java - ActiveMQ Stateless EJB 实现 .
- ActiveMQEJBLocal.java - ActiveMQ Stateless EJB 本地 接口 .
- ActiveMQEJBLocalHome.java - ActiveMQ Stateless EJB 本地 home 接口 .
- ActiveMQMessageDrivenEJBBean.java - ActiveMQ MDB:监听 ActiveMQ的 inbound队列
- client/
- how-to-use-activemq-JCA-RA/lib/
- active-mq.ear – 可发布的 J2EE应用程序文件 .
- active-mq-client.jar – JMS客户端 测试 jar 文件
- how-to-use-activemq-JCA-RA/etc – 包含所有必须的应用程序描述符
- connector/
- oc4j-ra.xml - OC4J 特定的 rar 描述文件
- ear /
- application.xml
- oc4j-connectors.xml
- orion-application.xml
- ejb/
- ejb-jar.xml
- orion-ejb-jar.xml
- connector/
- how-to-use-activemq-JCA-RA/doc
- how-to-use-activemq-JCA-RA.html – 此文档 .
- javadoc – 所有源文件的 javadoc
- how-to-use-activemq-JCA-RA/build.xml – 主要的 Ant build 文件
- how-to-use-activemq-JCA-RA/common.xml – 被 build.xml使用
- how-to-use-activemq-JCA-RA/ant-oracle.properties -被 build.xml使用
- how-to-use-activemq-JCA-RA/activemq-lib
- activemq-ra-4.0.1.rar.orig –从 ActiveMQ 发布 %ACTIVEMQ_HOME% /lib/optional的原始 ActiveMQ Resource Adapter
- activemq-ra.rar - The modified ActiveMQ resource adapter ready to be deployed to OC4J.
- how-to-use-activemq-JCA-RA/build – build中使用的临时目录
- how-to-use-activemq-JCA-RA/log – 存放 build/deploy 日志的临时目录
- how-to-use-activemq-JCA-RA/lib – 存放能够发布的程序包 (如 ., ear, war, rar, jar files)
配置环境
请检查并确保下面的属性在 howto.properties( 位于例子的根目录 ) 文件中正确配置 (注意 : 一些属性依赖于定义的环境变量,如果这些环境变量已经被设置,这些属性就不需要修改 ). 如果不要,根据你的环境修改如下变量 :
- oracle.home - oracle安装的根目录 . 缺省设置为 ORACLE_HOME环境变量 .
- java.home - JDK 安装的根目录 . 缺省设置为 JAVA_HOME 环境变量 .
- oc4j.host – OC4J实例运行的主机名 , 缺省设置为 localhost.
- oc4j.http.port - OC4J HTTP监听的端口 . 缺省设置为 8888.
- oc4j.admin.port - OC4J administration 进程监听的端口, . 缺省设置为 23791.
- oc4j.admin.user - OC4J administrator的名字 . 缺省设置为 "admin".
- oc4j.admin.password - OC4J administrator口令 . 缺省设置为 "welcome".
ActiveMQ 特定的属性
- activemq.port - ActiveMQ administration进程监听的端口 . 缺省设置为 61616.
- activemq.core.jar – 缺省的 activeMQ jar名字,包含所有 ActiveMQ要求的, 在 ActiveMQ 4.0.1 中,此 jar文件在 %ACTIVEMQ_HOME%/ incubator-activemq-4.0.1.jar中可以被找到 . 对 4.0.1而言,缺省设置为 incubator-activemq-4.0.1.jar
- activemq.home – ActiveMQ安装的根目录 . 缺省设置为 ACTIVEMQ_HOME 环境变量 .
另外,请确保与 OC4J ant发布包联系的 ant命令在你的执行目录中 (%OC4J_HOME%/ant/bin ).
启动 OC4J 实例
打开一新的 console 窗口 . 启动一 OC4J 10.1.3 实例 :
%OC4J_HOME%/bin/oc4j start
注意 oc4j 命令 要求 JAVA_HOME 环境变量,此变量指向安装好的 JDK
启动 ActiveMQ 实例
打开一新的 console窗口 . 启动一 ActiveMQ 10.1.3 实例 :
-
- %ACTIVEMQ_HOME%/bin/activemq
注意 activemq 命令 要求 JAVA_HOME 环境变量,此变量指向安装好的 JDK
产生,编译,发布,运行应用程序
打开一新的 console窗口,设置 ORACLE_HOME, ACTIVEMQ_HOME, JAVA_HOME环境变量。在 %HOWTO_HOME% 目录键入下面的命令以运行应用程序
- ant
现在,在 %HOWTO_HOME%/lib 目录 ,你应该创建了 active-mq.ear .
如果编译成功,此命令会试图发布应用程序。它将首先测试 OC4J是否运行。发布后,它将运行测试程序。测试程序将执行 JMS client, JMS client会发布消息带 MDB(通过 ActiveMQ的资源适配器) 监听的 ActiveMQ的 inbound队列中 。
你将在键入 ant命令的 console中看到如下消息:
" Sent message: Hello world to ActiveMQ inbound queue!"
转到启动 OC4J的 console中,你就看到 MDB 和 Stateless EJB 产生的输出:
"Inside MDB, received from inbound queue: Hello world to ActiveMQ inbound queue!
Message Received from MDB inside Session Bean: Hello world to ActiveMQ inbound queue!
Sending Message from Stateless EJB to ActiveMQ outbound queue: Hello world to ActiveMQ inbound queue!"
为验证 Stateless EJB发送到 ActiveMQ outbound队列“ queue.outbound”是否被 ActiveMQ成功接收,我们将使用 jconsole(JDK15缺省自带的 JMX浏览器 )
.
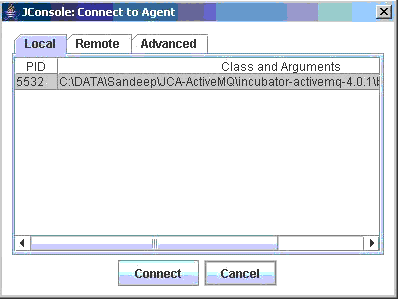
- %JAVA_HOME/bin/jconsole. 现在,你将看到一个连接到代理的 Jconsole窗口,其中列有 ActiveMQ进程。选择并点击此连接
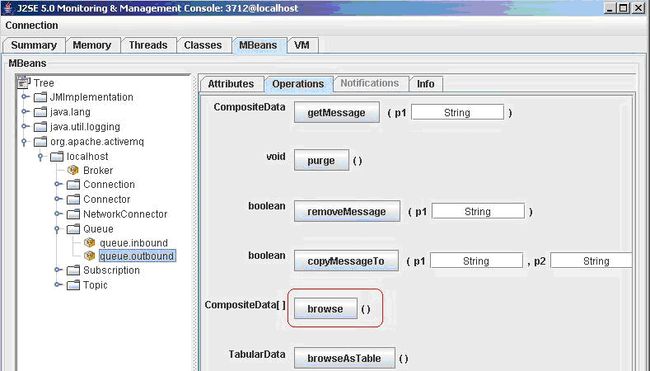
- 在 Jconsole中转到 MBeans.
- 点击 browse按钮,就可以看到从 Stateless Session Bean发送到 ActiveMQ outbound队列的消息,请滚到到最后面看文本消息
注:你也可以单独发布应用程序。 确保 已经设置 %ORACLE_HOME% 环境变量 ,从 %HOWTO_HOME% 目录,键入命令 :
- ant deploy
如果你只有兴趣运行客户端,请键入命令:
- ant run
简化后的步骤:
你需要四个 console窗口运行此测试
- 在第一个 console窗口,运行 %OC4J_HOME%/bin/oc4j start启动 OC4J
- 在第二个 console 窗口,运行 %ACTIVEMQ_HOME%/bin/activemq 启动 ActiveMQ
- 在第三个 console 窗口,设置 ORACLE_HOME, ACTIVEMQ_HOME, JAVA_HOME 环境变量,到 %HOWTO_HOME% 目录并键入 ant命令。请确保 %ORACLE_HOME/ant/bin在 PATH环境变量中
- 在第四个 console 窗口, 键入 jconsole,你可以用 jconsole来验证收到的 outbound消息
总结
通过此文档,你应该可以 :
- 知道 OC4J 10g (10.1.3) 完全支持 JCA 1.5
学到在 OC4J 中如何配置和使用 ActiveMQ 的资源适配器进行 inbound 和 outbound 通讯。


