opencv在linux下的安装
环境:
Ubuntu12.04
Opencv-2.0.0
Cmake-gui 2.8.0
g++ / gcc 4.4.3
libgtk2.0-dev (这个一定要记得安装,安装方式:# apt-get install libgtk2.0-dev)
安装过程:
1、先安装 libgtk2.0-dev 和 pkg-config,这个包要先于opencv安装,否则后期编译运行程序会出现类似如下的问题:
OpenCV Error: Unspecified error (The function is not implemented. Rebuild the library with Windows, GTK+ 2.x or Carbon support. If you are on Ubuntu or Debian, install libgtk2.0-dev and pkg-config, then re-run cmake or configure script) in cvNamedWindow, file /usr/local/opencv/OpenCV-2.0.0/src/highgui/window.cpp, line 100
terminate called after throwing an instance of 'cv::Exception'
安装命令如下:
# apt-get install libgtk2.0-dev
# apt-get install pkg-config
2、把下载的OpenCV-2.0.0.tar.bz2解压到 usr/local/opencv 目录下,解压后的文件夹名为:OpenCV-2.0.0
然后在usr/local/opencv/OpenCV-2.0.0 新建一个 build 文件夹,作为CMake编译PC版本的工作目录
# mkdir build
如下所示:
3、然后在终端调出CMake gui
# cmake-gui
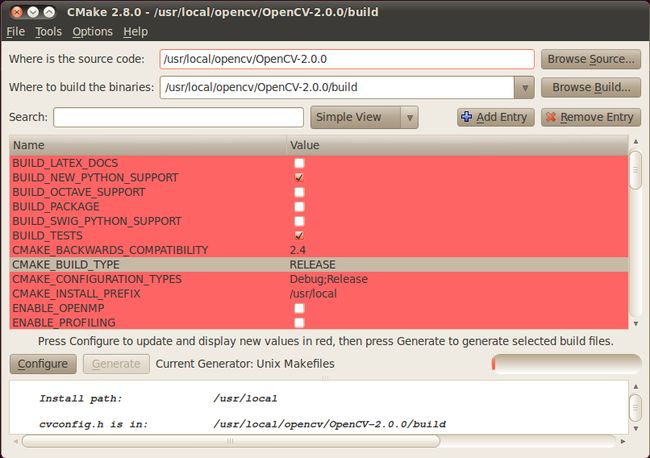
按照下图方式选择源码目录和build目录
然后点击Configure按钮,选择如下:点击“Finish”按钮,出现如下界面,更改CMAKE_BUILD_TYPE=RELEASE,如下图所示,其他不用变
(默认的安装路径为 /usr/local)
再次点击“configure”按钮,然后点击"Generate"按钮。
4、在终端,进入 usr/local/opencv/OpenCV-2.0.0/build 目录
输入命令:
# make
之后就是make ; make install 当然这中间也遇到一些问题。具体如下:
(1)../include/opencv/cxcore.hpp:169:13: error: 'ptrdiff_t' does not name a type
../include/opencv/cxoperations.hpp:1916:15: error: 'ptrdiff_t' does not name a type
../include/opencv/cxoperations.hpp:2465:31: error: 'ptrdiff_t' does not name a type
../include/opencv/cxmat.hpp:356:15: error: expected ';' before 'delta1'
../include/opencv/cxmat.hpp:358:9: error: 'delta1' was not declared in this scope
../include/opencv/cxmat.hpp:367:31: error: 'delta2' was not declared in this scope
上面这个问题只需要在OpenCV2.0.0/include/opencv/cxcore.hpp文件中加入:
using std::vector;
using std::string;
+using std::ptrdiff_t;
template<typename _Tp> class CV_EXPORTS Size_;
template<typename _Tp> class CV_EXPORTS Point_;
加了这一句话就好了
(2)undefined reference to `cvCreateCameraCapture_V4L(int)'
这个问题可以参考:https://code.ros.org/trac/opencv/changeset/5206,解决如下:
修改OpenCV2.0.0/cvconfig.h.cmake文件如下:
19 19 /* V4L2 capturing support */
20 20 #cmakedefine HAVE_CAMV4L2
21
22 /* V4L/V4L2 capturing support via libv4l */ //增加这一行
23#cmakedefine HAVE_LIBV4L //增加这一行
21 24
22 25 /* Carbon windowing environment */
修改 OpenCV2.0.0/src/highgui/cvcap.cpp如下:
172 172 return capture;
173 173 #endif
174 #if defined (HAVE_CAMV4L) || defined (HAVE_CAMV4L2) //删除这一行
174 #if defined HAVE_LIBV4L || (defined (HAVE_CAMV4L) && defined (HAVE_CAMV4L2)) //增加这一行
175 175 capture = cvCreateCameraCapture_V4L (index);
176 176 if (capture)
修改 OpenCV2.0.0/src/highgui/cvcap_libv4l.cpp如下:
227 #if !defined WIN32 && defined HAVE_CAMV4L && defined HAVE_CAMV4L2 //删除这一行
227 #if !defined WIN32 && defined HAVE_LIBV4L //增加这一行
228 228
229 229 #define CLEAR(x) memset (&(x), 0, sizeof (x))
… …
242 242 #include <sys/ioctl.h>
243 243
244#ifdef HAVE_CAMV4L //增加这一行
244 245 #include <linux/videodev.h>
246#endif //增加这一行
247#ifdef HAVE_CAMV4L2 //增加这一行
245 248 #include <linux/videodev2.h>
249#endif //增加这一行
246 250
247 251 #include <libv4l1.h>
编译成功之后会出现如下界面:
接着输入安装命令:
#make install
安装成功之后的部分截图如下所示:
在相应的文件夹里也会出现opencv的相关文件,如下图所示:
5、添加库的环境路径:
在 /etc/ld.so.conf.d/ 中添加 opencv.conf 文件,
sudo gedit /etc/ld.so.conf.d/opencv.conf
在文件中添加:
/usr/local/lib
保存之后,在终端运行如下命令:
# ldconfig
添加PKG_CONFIG_PATH变量,
sudo gedit /etc/bash.bashrc
把下面两行添加至 /etc/bash.bashrc 文件的末尾:
PKG_CONFIG_PATH=$PKG_CONFIG_PATH:/usr/local/lib/pkgconfig
export PKG_CONFIG_PATH
6、接着就可以测试opencv安装的效果了
进入文件夹 usr/local/opencv/OpenCV-2.0.0/samples/c
chmod +x build_all.sh
./build_all.sh
进行编译
再执行./edge
至此,Opencv2.0.0在Ubuntu上的安装结束!
补充:
如果在安装使用的过程在遇到如下问题:
error 1:
./drawing: error while loading shared libraries: libcv.so.2.0: cannot open shared object file: No such file or directory
(解决:库的环境路径没有配置好,查看上文第5条)
error 2:
OpenCV Error: Unspecified error (The function is not implemented. Rebuild the library with Windows, GTK+ 2.x or Carbon support. If you are on Ubuntu or Debian, install libgtk2.0-dev and pkg-config, then re-run cmake or configure script) in cvNamedWindow, file /usr/local/opencv/OpenCV-2.0.0/src/highgui/window.cpp, line 100
terminate called after throwing an instance of 'cv::Exception'
(解决:libgtk2.0-dev and pkg-config没有先于编译opencv前安装,请查看第1条,先安装libgtk2.0-dev 和 pkg-config,然后再用cmake-gui重新生成编译环境,重新编译安装opencv)


