andriod+phonegap显示手机所在地天气状况(序)
上一篇介绍了andriod+phonegap显示所在地天气情况的总体思路,详细说明了web端的设置和编程。
本篇主要介绍一下如何使用phonegap调用java,获取天气信息。
phonegap调用java使用插件形式,主要流程是,java编写底层插件(plugin),并注册(在xml文件中标明),phonegap会调用pluginmanager来读取xml文件寻找相应的插件,熟悉struts2.0的应该很容易明白,这两个有异曲同工之妙,具体的调用流程和原理不再详细描述,有兴趣可以查阅相应的文档。
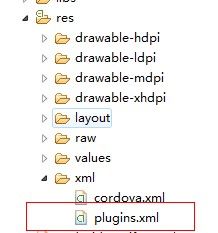
首先我们需要phonegap的js文件和plugin.xml配置文件,在eclipse里配置好后(配置细节网上一大片),就可以编写自己的插件。
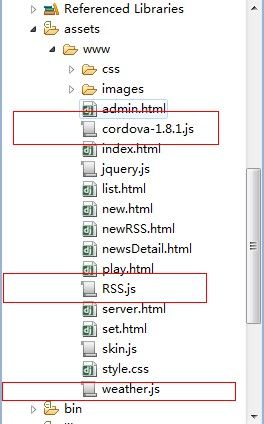
贴一下我工程(assert/www)的目录文件
第一个是phonegap提供的js,另外圈出来的两个是自己编写的js,用来调用底层的java插件,接下来看一下weather.js的代码
var weatherPlugin=function(){}
weatherPlugin.prototype.getWeatherByLocation=function(location,callback,fail){
	return PhoneGap.exec(function(args){
		callback(args);
	},function(args){
		fail(args);
	},'WeatherPlugin','getWeatherByLocation',[location]);//第一个单引号里是java插件的名称,第二个单引号是插件的action(下面会细讲),第三个就是我们要从web传给java插件的参数,可以写多个,用中括号括起来,逗号隔开
}
PhoneGap.addConstructor(function(){
	PhoneGap.addPlugin('weatherPlugin',new weatherPlugin());//这句很重要,这句作用是:当你在web端调用weatherPlugin这个函数时,会去xml配置文件里查找‘weatherPlugin’这个名字对应的java插件类
});
可能还有一些疑惑,我们看一下plugin,xml文件里的配置,plugin.xml这个配置文件里写了许多插件名称和java类的映射,包括phonegap自己的插件,当然自己定义的插件也要写在这里面,那么我们就把weatherPlugin插件在配置文件里面关联一下
<?xml version="1.0" encoding="utf-8"?>
<!--
       Licensed to the Apache Software Foundation (ASF) under one
       or more contributor license agreements.  See the NOTICE file
       distributed with this work for additional information
       regarding copyright ownership.  The ASF licenses this file
       to you under the Apache License, Version 2.0 (the
       "License"); you may not use this file except in compliance
       with the License.  You may obtain a copy of the License at

         http://www.apache.org/licenses/LICENSE-2.0

       Unless required by applicable law or agreed to in writing,
       software distributed under the License is distributed on an
       "AS IS" BASIS, WITHOUT WARRANTIES OR CONDITIONS OF ANY
       KIND, either express or implied.  See the License for the
       specific language governing permissions and limitations
       under the License.
-->
<plugins>
    <plugin name="App" value="org.apache.cordova.App"/>
    <plugin name="Geolocation" value="org.apache.cordova.GeoBroker"/>
    <plugin name="Device" value="org.apache.cordova.Device"/>
    <plugin name="Accelerometer" value="org.apache.cordova.AccelListener"/>
    <plugin name="Compass" value="org.apache.cordova.CompassListener"/>
    <plugin name="Media" value="org.apache.cordova.AudioHandler"/>
    <plugin name="Camera" value="org.apache.cordova.CameraLauncher"/>
    <plugin name="Contacts" value="org.apache.cordova.ContactManager"/>
    <plugin name="File" value="org.apache.cordova.FileUtils"/>
    <plugin name="NetworkStatus" value="org.apache.cordova.NetworkManager"/>
    <plugin name="Notification" value="org.apache.cordova.Notification"/>
    <plugin name="Storage" value="org.apache.cordova.Storage"/>
    <plugin name="Temperature" value="org.apache.cordova.TempListener"/>
    <plugin name="FileTransfer" value="org.apache.cordova.FileTransfer"/>
    <plugin name="Capture" value="org.apache.cordova.Capture"/>
    <plugin name="Battery" value="org.apache.cordova.BatteryListener"/>
    <plugin name="SplashScreen" value="org.apache.cordova.SplashScreen"/>
    <plugin name="RSSPlugin" value="com.RSS.Plugin.RSSPlugin"></plugin>
    <plugin name="DataPlugin" value="com.RSS.Plugin.DataPlugin"></plugin>
    <plugin name="WeatherPlugin" value="com.weather.Plugin.WeatherPlugin"></plugin>
</plugins>
最后一项就是我们配置的weatherplugin插件了,这项指明了类文件的所在。
这里我们整理一下,从web端到java底层的调用过程:
window.plugins.weatherPlugin.getWeatherByLocation(location,function(args){
//args是调用插件成功后java返回的参数,在这里编辑调用成功的逻辑
},function(args){
//这里是调用失败的逻辑
});
上面是在web端调用weatherPlugin函数,我们可以再weather.js里看到
PhoneGap.exec(function(args){
		callback(args);
	},function(args){
		fail(args);
	},'WeatherPlugin','getWeatherByLocation',[location]);
这句话,这句话就是调用pluginmanager,查询xml文件,第一个单引号里的是xml文件配置的plugin name,然后找到对用的java类
把action(第二单引号里的参数)和参数(中括号里的参数)传递给java类
那么我们看一下具体的java类是什么样的
package com.weather.Plugin;

import org.apache.cordova.api.Plugin;
import org.apache.cordova.api.PluginResult;
import org.json.JSONArray;
import org.json.JSONException;
import org.json.JSONObject;

import com.weather.DAO.*;
public class WeatherPlugin extends Plugin {//继承plugin类

	@Override
	public PluginResult execute(String action, JSONArray jsonArray, String callback) {//action参数就是第二个单引号里的参数,JSONArray参数接受中括号里的参数
		PluginResult.Status status=PluginResult.Status.OK;
		PluginResult result=null;
		if (action.equals("getWeatherByLocation")) {//根据当前所在地获取当地天气
			try {
				String location=jsonArray.getString(0);
				JSONObject jsonObject=new JSONObject();
				jsonObject=GetWeather.getWeatherByCityName(location);
				result=new PluginResult(status,jsonObject);
			} catch (JSONException e) {
				result=new PluginResult(status,"fail");
			}
		}
		return result;
	}

}
大家应该明白了这个传值的过程了,java向web端传递值的类型有两种(JSONArray和JSONObject)这两个类型的使用很简单,类似哈希表。
好了,关于phonegap调用java先说到这里,表述不是很清晰。
接下来就说一下怎么获取天气源,之前我们的方案是读取远程的天气服务器给的xml文件,但是我们找到的天气服务器经常罢工,我们就换成了官网的服务器(http://www.webxml.com.cn/WebServices/WeatherWebService.asmx)
最后发现这个其实更方便简单,不说这么多了,上代码
package com.weather.DAO;

import org.json.JSONArray;
import org.json.JSONObject;
import org.ksoap2.SoapEnvelope;
import org.ksoap2.serialization.SoapObject;
import org.ksoap2.serialization.SoapSerializationEnvelope;
import org.ksoap2.transport.HttpTransportSE;

import android.util.Log;

public class GetWeather {
	private static final String NAMESPACE = "http://WebXml.com.cn/";

	// WebService地址
	private static String URL = "http://www.webxml.com.cn/webservices/weatherwebservice.asmx";

	private static final String METHOD_NAME = "getWeatherbyCityName";

	private static String SOAP_ACTION = "http://WebXml.com.cn/getWeatherbyCityName";

	public static JSONObject getWeatherByCityName(String cityName)
	{
		try {
			SoapObject rpcObject=new SoapObject(NAMESPACE, METHOD_NAME);
			rpcObject.addProperty("theCityName", cityName);
			SoapSerializationEnvelope envelope=new SoapSerializationEnvelope(SoapEnvelope.VER11);
			envelope.bodyOut=rpcObject;
			envelope.dotNet=true;
			envelope.setOutputSoapObject(rpcObject);
			HttpTransportSE httpTransportSE=new HttpTransportSE(URL);
			httpTransportSE.debug=true;
			httpTransportSE.call(SOAP_ACTION, envelope);
			SoapObject detail=(SoapObject)envelope.getResponse();
			JSONObject jsonObject=new JSONObject();
			jsonObject.put("city", cityName);
			jsonObject.put("dateTime", detail.getProperty(4).toString().split(" ")[0]);
			jsonObject.put("weather", detail.getProperty(6).toString().split(" ")[1]);
			jsonObject.put("temp", detail.getProperty(5).toString());
			jsonObject.put("imag1", detail.getProperty(8).toString());
			jsonObject.put("imag2", detail.getProperty(9).toString());
			return jsonObject;
		} catch (Exception e) {
			Log.e("weather", e.getMessage());
			// TODO: handle exception
			return null;
		}

	}
}
这个是和上面的weather插件一起的,代码放在一起直接可以使用,别忘了下载天气图片,在官网上给的有链接
上述代码不再详细解释,因为有很多我也是在网上看的,有兴趣可以咨询大牛、百度!

