Ry’s Objective-C Tutorial---Protocols
- Tutorials
- Purchases
- About
| You’re reading Ry’s Objective-C Tutorial |
Protocols
A protocol is a group of related properties and methods that can be implemented by any class. They are more flexible than a normal class interface, since they let you reuse a single API declaration in completely unrelated classes. This makes it possible to represent horizontal relationships on top of an existing class hierarchy.
 Unrelated classes adopting the
StreetLegal protocol
This is a relatively short module covering the basics behind working with protocols. We’ll also see how they fit into Objective-C’s dynamic typing system.
Creating Protocols
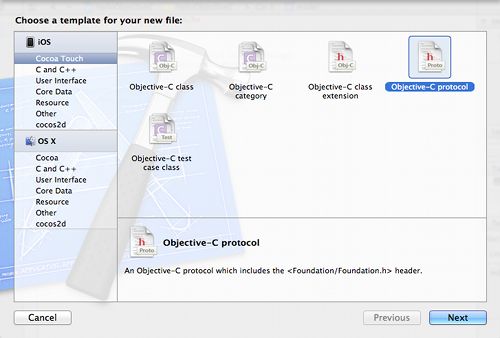
Like class interfaces, protocols typically reside in a .h file. To add a protocol to your Xcode project, navigate to File > New> File… or use theCmd+N shortcut. Select Objective-C protocol under theiOS > Cocoa Touch category.
 Creating a protocol in Xcode
In this module, we’ll be working with a protocol called StreetLegal. Enter this in the next window, and save it in the project root.
Our protocol will capture the necessary behaviors of a street-legal vehicle. Defining these characteristics in a protocol lets you apply them to arbitrary objects instead of forcing them to inherit from the same abstract superclass. A simple version of the StreetLegal protocol might look something like the following:
// StreetLegal.h#import<Foundation/Foundation.h>@protocolStreetLegal<NSObject>-(void)signalStop;-(void)signalLeftTurn;-(void)signalRightTurn;@end
Any objects that adopt this protocol are guaranteed to implement all of the above methods. The <NSObject> after the protocol name incorporates the NSObject protocol (not to be confused with the NSObject class) into the StreetLegal protocol. That is, any objects conforming to the StreetLegal protocol are required to conform to the NSObject protocol, too.
Adopting Protocols
The above API can be adopted by a class by adding it in angled brackets after the class/superclass name. Create a new classed calledBicycle and change its header to the following. Note that you need to import the protocol before you can use it.
// Bicycle.h#import<Foundation/Foundation.h>#import"StreetLegal.h"@interfaceBicycle:NSObject<StreetLegal>-(void)startPedaling;-(void)removeFrontWheel;-(void)lockToStructure:(id)theStructure;@end
Adopting the protocol is like adding all of the methods inStreetLegal.h to Bicycle.h. This would work the exact same way even if Bicycle inherited from a different superclass. Multiple protocols can be adopted by separating them with commas (e.g., <StreetLegal, SomeOtherProtocol>).
There’s nothing special about the Bicycle implementation—it just has to make sure all of the methods declared by Bicycle.h andStreetLegal.h are implemented:
// Bicycle.m#import"Bicycle.h"@implementationBicycle-(void)signalStop{NSLog(@"Bending left arm downwards");}-(void)signalLeftTurn{NSLog(@"Extending left arm outwards");}-(void)signalRightTurn{NSLog(@"Bending left arm upwards");}-(void)startPedaling{NSLog(@"Here we go!");}-(void)removeFrontWheel{NSLog(@"Front wheel is off.""Should probably replace that before pedaling...");}-(void)lockToStructure:(id)theStructure{NSLog(@"Locked to structure. Don't forget the combination!");}@end
Now, when you use the Bicycle class, you can assume it responds to the API defined by the protocol. It’s as though signalStop, signalLeftTurn, and signalRightTurn were declared in Bicycle.h:
// main.m#import<Foundation/Foundation.h>#import"Bicycle.h"intmain(intargc,constchar*argv[]){@autoreleasepool{Bicycle*bike=[[Bicyclealloc]init];[bikestartPedaling];[bikesignalLeftTurn];[bikesignalStop];[bikelockToStructure:nil];}return0;}
Type Checking With Protocols
Just like classes, protocols can be used to type check variables. To make sure an object adopts a protocol, put the protocol name after the data type in the variable declaration, as shown below. The next code snippet also assumes that you have created a Car class that adopts theStreetLegal protocol:
// main.m#import<Foundation/Foundation.h>#import"Bicycle.h"#import"Car.h"#import"StreetLegal.h"intmain(intargc,constchar*argv[]){@autoreleasepool{id<StreetLegal>mysteryVehicle=[[Caralloc]init];[mysteryVehiclesignalLeftTurn];mysteryVehicle=[[Bicyclealloc]init];[mysteryVehiclesignalLeftTurn];}return0;}
It doesn’t matter if Car and Bicycle inherit from the same superclass—the fact that they both adopt the StreetLegal protocol lets us store either of them in a variable declared with id <StreetLegal>. This is an example of how protocols can capture common functionality between unrelated classes.
Objects can also be checked against a protocol using theconformsToProtocol: method defined by the NSObject protocol. It takes a protocol object as an argument, which can be obtained via the @protocol() directive. This works much like the @selector() directive, but you pass the protocol name instead of a method name, like so:
if([mysteryVehicleconformsToProtocol:@protocol(StreetLegal)]){[mysteryVehiclesignalStop];[mysteryVehiclesignalLeftTurn];[mysteryVehiclesignalRightTurn];}
Using protocols in this manner is like saying, “Make sure this object has this particular set of functionality.” This is a very powerful tool for dynamic typing, as it lets you use a well-defined API without worrying about what kind of object you’re dealing with.
Protocols In The Real World
A more realistic use case can be seen in your everyday iOS and OS X application development. The entry point into any app is an “application delegate” object that handles the major events in a program’s life cycle. Instead of forcing the delegate to inherit from any particular superclass, the UIKit Framework just makes you adopt a protocol:
@interfaceYourAppDelegate:UIResponder<UIApplicationDelegate>
As long as it responds to the methods defined by UIApplicationDelegate, you can use any object as your application delegate. Implementing the delegate design pattern through protocols instead of subclassing gives developers much more leeway when it comes to organizing their applications.
You can see a concrete example of this in the Interface Builder chapter of Ry’s Cocoa Tutorial. It uses the project’s default app delegate to respond to user input.
Summary
In this module, we added another organizational tool to our collection. Protocols are a way to abstract shared properties and methods into a dedicated file. This helps reduce redundant code and lets you dynamically check if an object supports an arbitrary set of functionality.
You’ll find many protocols throughout the Cocoa frameworks. A common use case is to let you alter the behavior of certain classes without the need to subclass them. For instance, the Table View, Outline View, and Collection View UI components all use a data source and delegate object to configure their internal behavior. The data source and delegate are defined as protocols, so you can implement the necessary methods in any object you want.
The next module introduces categories, which are a flexible option for modularizing classes and providing opt-in support for an API.
Mailing List
Sign up for my low-volume mailing list to find out when new content is released. Next up is a comprehensive Swift tutorial planned for late January.
You’ll only receive emails when new tutorials are released, and your contact information will never be shared with third parties. Click here to unsubscribe.
- © 2012-2014
- RyPress.com
- All Rights Reserved
- Terms of Service
- Privacy Policy