静态代码检查工具 FindBugs
2.安装Eclipse的FindBugs插件
可以在下面的地址
http://findbugs.sourceforge.net/downloads.html
打开页面内容如下:
下载FindBugs软件以及eclipse和blueJ的插件。
- FindBugs tool (standard version with command line, ant, and Swing interfaces)
- findbugs-1.3.9.tar.gz
- findbugs-1.3.9.zip ----WINDOWS下载FindBugs软件,可独立运行.并可在Ant中使用FindBugs
- findbugs-1.3.9-source.zip
- Eclipse plugin for FindBugs version 1.3.9.20090821 (requires Eclipse 3.3 or later)
- edu.umd.cs.findbugs.plugin.eclipse_1.3.9.20090821.zip --------eclipse 的FindBugs插件,不能独立运行,只能集成到eclipse插件运行
- eclipsePlugin-1.3.9.20090821-source.zip
The Eclipse plugin may also be obtained from one of the FindBugs Eclipse plugin update sites: --FindBugs插件的更新地址有很多,根据类型的不同,包括以下几个:
- http://findbugs.cs.umd.edu/eclipse update site for official releases ---只提供FindBugs的官方释放版本。
- http://findbugs.cs.umd.edu/eclipse-candidate update site for candidate releases and official releases --提供FindBugs的官方释放版本和可选释放版本。
- http://findbugs.cs.umd.edu/eclipse-daily update site for all releases, including developmental ones --提供最新的FindBugs的插件。除了编译通过外并没有进行测试的版本。
单击上面链接即可下载(另存).
也可以在下面的地址:
http://prdownloads.sourceforge.net/findbugs
下载插件的zip文件,将其解压缩到eclipse的plugin目录(<eclipse_install_dir>/plugins)。
安装完插件后,可以使用Help-->About Eclipse Platform-->Plug-in Details来查看FindBugs插件的使用方法。
3. 在Eclipse中使用FindBugs插件
运行FindBugs插件的方法很简单,选中一个Java工程后,点击右键,选择Find Bugs,这时就会启动FindBugs,并且会在有问题的源代码中显示标记。
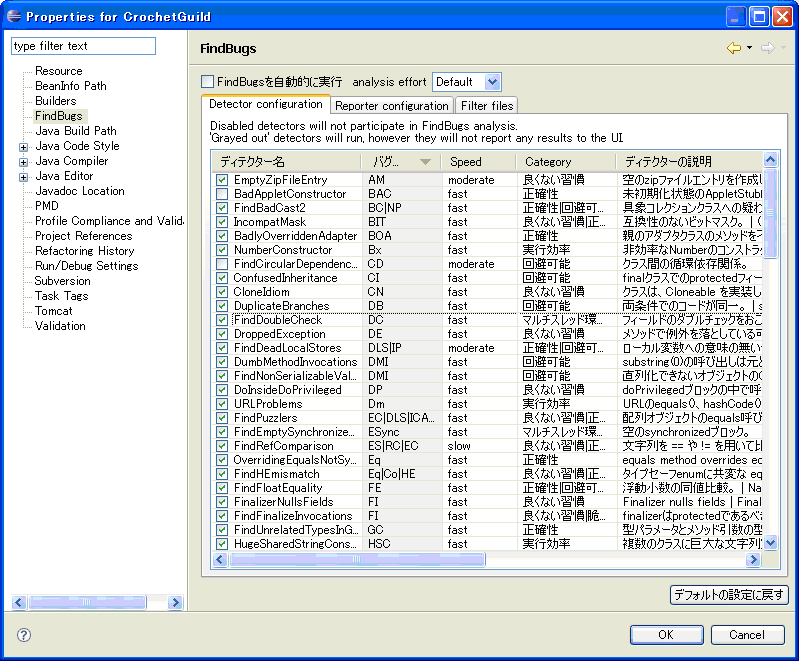
可以自定义FindBugs的运行方式:查看Java工程的属性对话框,选择FindBugs的属性页,可以看到如下的选项:
→ 启用/禁用”自动运行FindBugs”复选框---是否在每次修改时进行FindBugs的检查
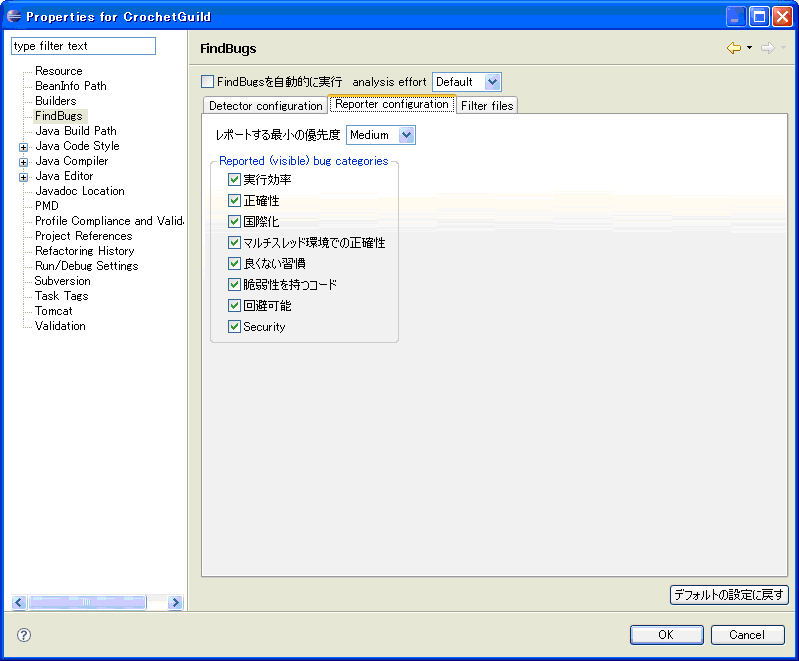
→ 选择最小的警告优先级,并启用bug的分类---这些选项用于决定显示哪些问题,例如,如果选择Medium警告优先级的话,只有Medium和Hign优先级的警告才会被显示,类似的,如果不选中Style复选框的话,那么有关Style类别的警告也不会被显示。
→ 选择检查引擎:对指定的工程启用那些detectors。
具体的设置画面如下:
常见的类型如下:
· 正确性(Correctness):这种归类下的问题在某种情况下会导致bug,比如错误的强制类型转换等。
· 最佳实践反例(Bad practice):这种类别下的代码违反了公认的最佳实践标准,比如某个类实现了equals方法但未实现hashCode方法等。
· 多线程正确性(Multithreaded correctness):关注于同步和多线程问题。
· 性能(Performance):潜在的性能问题。
· 安全(Security):安全相关。
· 高危(Dodgy):FindBugs团队认为该类型下的问题代码导致bug的可能性很高。
在Eclipse中安装FindBugs插件
下载Eclipse plugin 的版本,解压zip文件。
将解压后的文件放到Eclipse的Plugin中。
重新启动Eclipse 。
我使用的是MyEclipse8.5可能路径和大家的不太一样,我是放到了路径Genuitec/MyEclipse 8.5/dropins下面
在Eclipse中使用FindBugs
重新启动eclipse
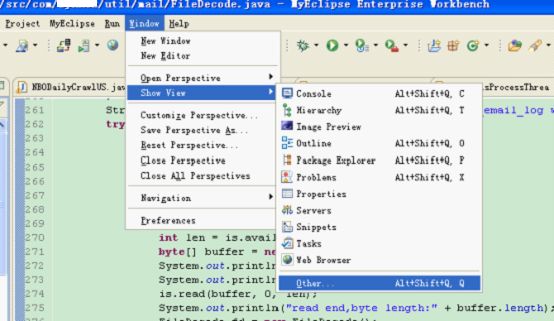
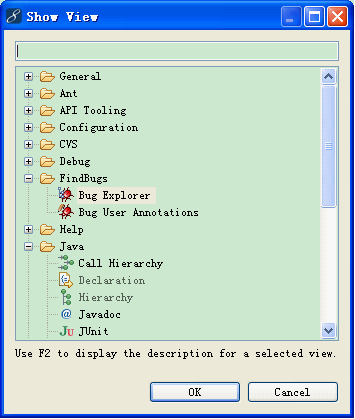
打开FindBugs视图
执行Find Bug 任务
右键单击你要检测的工程、包或文件,-->Find Bugs-->Find Bugs。
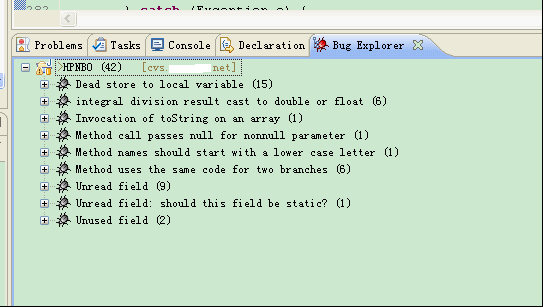
check完成后将在Bug Explorer视图中看到问题列表,该列表以问题类型组织。
展开列表,双击列表中具体的问题就可以定位的具体的代码行。
配置FindBugs
在这里可以对FindBugs规则等进行详细设置。
选择你的项目,右键 => Properties => FindBugs =>
1 Run Automatically开关
设置Eclipse自动编译开关-----即主窗口菜单Project---Build Automatically这个选项勾上就行了.
当此项选中后,FindBugs将会在你修改Java类时自动运行,如你设置了Eclipse自动编译开关后,当你修改完Java文件保存,FindBugs就会运行,并将相应的信息显示出来。
当此项没有选中,你只能每次在需要的时候自己去运行FindBugs来检查你的代码。
2 Detector Configuration选择项
在这里你可以选择所要进行检查的相关的Bug Pattern条目,你可以根据需要选择或去掉相应的 检查条件。
3 Minimum priority to report选择项
这个选择项是让你选择哪个级别的信息进行显示,有Low、Medium、High三个选择项可以选择,很类似于Log4J的级别设置啦。 比如:
你选择了High选择项,那么只有是High级别的提示信息才会被显示。
你选择了Medium选择项,那么只有是Medium和High级别的提示信息才会被显示。
你选择了Low选择项,那么所有级别的提示信息都会被显示。
4 Report bug categories选择项
在这里是一些显示Bug分类的选择:
Malicious code vulnerability关于恶意破坏代码相关方面的
Correctness关于代码正确性相关方面的
Internationalization关于代码国际化相关方面的
Performance关于代码性能相关方面的
Multithreaded correctness关于代码多线程正确性相关方面的
另外FindBugs有UI页面,可以单独运行。也可以通过Ant以及命令行方式运行。
4. 在Ant中使用FindBugs
Ant作为一个优秀的自动化构建软件,大量的应用在Java软件开发中(虽然有被Maven取代的危险)。FindBugs提供了集成在Ant中使用的Ant Task,可以在自动构建与部署的时候运行FindBugs。
将$FINDBUGS_HOME/lib/findbugs-ant.jar拷贝到$ANT_HOME/lib目录下以后,就完成了FindBugs的Ant Task的安装。(强烈建议使用FindBugs附带的jar文件)
为了将FindBugs任务集成到Ant脚本中,需要首先进行一个task的定义,如下面的片段所示:---下面ANT的XML内容介绍
<taskdef name=”findbugs” classname=”edu.umd.cs.findbugs.anttask.FindBugsTask” />
在定义了findbugs task之后,就可以使用了。下面是一个例子:
<property name="findbugs.home" value="/export/home/daveho/work/findbugs" />
<target name="findbugs" depends="jar">
<findbugs home="${findbugs.home}"
output="xml"
outputFile="bcel-fb.xml" >
<auxClasspath path="${basedir}/lib/Regex.jar" />
<sourcePath path="${basedir}/src/java" />
<class location="${basedir}/bin/bcel.jar" />
</findbugs>
</target>
findbugs元素必须有home属性,用于指定FindBugs的安装路径。
这是就会在bcel.jar上执行FindBugs。FindBugs的运行结果会被以xml的格式保存在bcel-fb.xml文件中。一个辅助的jar文件被添加到auxClasspath元素中,因为BCEL库引用了它。
另外一个例子:
从http://findbugs.sourceforge.net/downloads.html下载最新版本的Findbugs,目前的版本是1.3.0, 于2007年11月8日发布。把解压后目录复制到项目的lib目录下,然后就可以和Ant配合使用了。FindBugs工作在j2se1.4.0或以后的版本中,需要至少256MB内存。
在Ant脚本中,首先定义Findbugs的解压目录位置:
<path id="findbugs.path" >
<fileset dir ="${lib.home}/findbugs-1.3.0">
<include name ="**/*.jar"/>
</fileset>
</path>
接着声明Findbugs任务:
<taskdef name="findbugs"
classname="edu.umd.cs.findbugs.anttask.FindBugsTask"
classpathref ="findbugs.path"/>
然后建立Findbugs任务:
<property name ="findbugs.home" value ="${lib.home}/findbugs-1.3.0"/>
<!-- 定义findbugs的home,findbugs的task要使用 -->
<target name ="findbugs">
<findbugs home ="${findbugs.home}" includeFilter="${findbugs_include_filter}"
excludeFilter="${findbugs_exclude_filter}"
jvmargs="-Xmx384m" output ="html"
outputFile ="d:/test.html">
<class location ="${build.home}/WEB-INF/classes/"/>
<!-- 以上定义findbugs查找的类路径 -->
<auxClasspath path="${lib.home}/findbugs-1.3.0/lib/findbugs-ant.jar"/>
<auxClasspath>
<fileset dir="${build.home}/WEB-INF/lib" includes="**/*.jar" />
</auxClasspath>
<!-- 以上定义上述类所依赖的类路径 -->
<sourcePath path ="${src.home}"/>
<!-- 以上定义源代码的路径 -->
</findbugs >
</target >
最后运行ant findbugs即可。
使用过滤器
使用过滤器我们就可以定义使用哪些bug检测器和针对哪些类进行检查,因为一旦项目比较庞大,那查看冗长的bug报告也是十分痛苦的事情。使用过滤器,过滤器用来包含或排除特殊的bug报告。这样做有助于在特定的时间段内,聚焦我们的关注点。过滤器实际是在一个xml文件定义的,xml配置文件的内容如下:
<FindBugsFilter>
<!-- 所有类使用bugcode为HE的检测器 -->
<Match>
<BugCode name ="HE"/>
</Match>
<!-- 该类使用所有的bug检测器 -->
<Match class ="com.foobar.AClass"/>
<!-- 该类使用bugcode为HE的检测器 -->
<Match class ="com.foobar.BClass">
<BugCode name ="HE"/>
</Match>
<!-- 该类的AMethod和BMethod方法使用bugcode为HE的检测器 -->
<Match class ="com.foobar.CClass">
<Or>
<Method name ="AMethod"/>
<Method name ="BMethod"/>
</Or>
<BugCode name ="HE"/>
</Match>
</FindBugsFilter>
Findbugs过滤器的一些元素讲解:
<FindBugsFilter>
<!-- 该类使用所有的bug检测器 -->
<Match>
<Class name="com.foobar.MyClass" />
</Match>
<!-- 该类使用bugcode为HE的检测器 -->
<Match class ="com.foobar.BClass">
<BugCode name ="HE"/>
</Match>
<!-- 该类通过指定缩写名使用一些bug检测器 -->
<Match>
<Class name="com.foobar.MyClass"/ >
<Bug code="DE,UrF,SIC" />
</Match>
<!-- 所有类使用bugcode为HE的检测器 -->
<Match>
<BugCode name ="HE"/>
</Match>
<!-- 所有类使用bugcode为DE,UrF,SIC的检测器 -->
<Match>
<Bug code="DE,UrF,SIC" />
</Match>
<!-- 所有类通过指定检测器种类使用某些检测器 -->
<Match>
<Bug category="PERFORMANCE" />
</Match>
<!-- 该类的指定方法使用bugcode为DC的检测器 -->
<Match>
<Class name="com.foobar.MyClass" />
<Or>
<Method name="frob" params="int,java.lang.String" returns="void" />
<Method name="blat" params="" returns="boolean" />
</Or>
<Bug code="DC" />
</Match>
<!-- 该类的AMethod和BMethod方法使用bugcode为DE,UrF,SIC的检测器 -->
<Match>
<Class name="com.foobar.MyClass" />
<Or>
<Method name ="AMethod"/>
<Method name ="BMethod"/>
</Or>
<BugCode name ="DE,UrF,SIC "/>
</Match>
<!—该类的指定方法使用bug模式为OS_OPEN_STREAM的检测器 -->
<Match>
<Class name="com.foobar.MyClass" />
<Method name="writeDataToFile" />
<Bug pattern="OS_OPEN_STREAM" />
</Match>
<!—该类的某个方法使用优先级为2的bug模式DLS_DEAD_LOCAL_STORE 的检测器-->
<Match>
<Class name="com.foobar.MyClass" />
<Method name="someMethod" />
<Bug pattern="DLS_DEAD_LOCAL_STORE" />
<Priority value="2" />
</Match>
<!—代码的指定部分使用指定bugcode或bug模式的检测器 -->
<!—所有包的信息类使用bugcode为UUF的检测器-->
<Match>
<Class name="~.*/.Messages" />
<Bug code="UUF" />
</Match>
<!—所有内部包使用bugcode为MS的检测器-->
<Match>
<Package name="~.*/.internal" />
<Bug code="MS" />
</Match>
<!—ui包层使用bug模式为SIC_INNER_SHOULD_BE_STATIC_ANON的检测器-->
<Match>
<Package name="~com/.foobar/.fooproject/.ui.*" />
<Bug pattern="SIC_INNER_SHOULD_BE_STATIC_ANON" />
</Match>
<!—带指定标志的成员域或方法使用指定bugcode或bug模式的检测器-->
<!—所有类中的void main(String[])方法使用bug模式为DM_EXIT的检测器-->
<Match>
<Method returns="void" name="main" params="java.lang.String[]" />
<Bug pattern="DM_EXIT" />
</Match>
<!—所有类中的com.foobar.DebugInfo型的域使用bugcode为UuF的检测器-->
<Match>
<Field type="com.foobar.DebugInfo" />
<Bug code="UuF" />
</Match>
</FindBugsFilter>
关于findbugs任务的详细说明,如下:
class
嵌套元素指定要分析的类。这个元素必须指定一个location属性,location属性的名字为archive文件(jar,zip等)、目录或者class文件。可以为一个findbugs元素指定多个class元素。
auxClasspath
可选的嵌套元素,用于指定要分析的类所引用的类,但是并不对引用的类进行分析。
sourcePath
可选的嵌套元素,指定Java源代码的目录。
home
必须的属性,findbugs的安装目录。
quietErrors
可选的布尔型属性。如果是true的话,报告严重的分析错误和丢失的类。默认情况下为false。
reportLevel
可选的属性。指定优先级别。如果是low的话,那么报告所有的bug,如果是medium(缺省值),报告medium和high优先级的bug。
output
可选属性,设置输出格式。
stylesheet
可选属性,指定生成html时使用的样式表。
sort
可选属性,如果输出属性设置为text,该属性指定是否对输出结果根据class进行排序,默认为true。
outputFile
可选属性,指定输出文件。
debug
可选的布尔型属性,是否打印分析过程中的日志。默认值为false。
effort
设置分析工作的等级,可以为min、default和max。
conserveSpace
和min effort一样的功能。
workHard
和max effort一样的功能。
visitors
可选属性,指定逗号分隔的列表,指定要运行的detectors。
omitVisitors
可选属性,忽略detectors。折合visitors属性类似,只是不指定不运行哪些detectors。
excludeFilter
可选属性,指定排除的Filter。
includeFilter
可选属性,指定包含的Filter。
projectFile
可选属性,指定项目的名称。
jvmargs
可选属性,指定JVM变量。
systemProperty
系统属性。
timeout
可选属性,指定超市的时间,默认为600,000毫秒,即10分钟。
failOnError
可选属性,指定是否在运行FindBugs出现异常时停止构建过程,默认为false。
errorProperty
可选属性,如果在运行FindBugs时发生错误,指定属性的值为true。
warningsProperty
可选属性,如果在运行FindBugs时发生警告,指定属性的值为true。
build.xml实例
Findbugs官方提供了Ant的findbugs操作方法,我们可以通过这样一个build.xml文件来使用findbugs。
<project name="项目名" default="all">
<property name="findbugs.home" value="findbugs解压路径" />
<path id="findbugs.path">
<fileset dir="findbugs解压路径">
<include name="**/*.jar" />
</fileset>
</path>
<taskdef name="findbugs"
classname="edu.umd.cs.findbugs.anttask.FindBugsTask"
classpathref="findbugs.path" />
<!-- 定义findbugs的home,findbugs的task要使用 -->
<target name="findbugs">
<findbugs home="${findbugs.home}"
output="xml:withMessages" outputFile="生成的文件">
<!-- 以上定义findbugs查找的类路径 -->
<auxClasspath path="${findbugs.home}/lib/findbugs-ant.jar" />
<auxClasspath>
<fileset dir="lib"
includes="*.jar" />
</auxClasspath>
<sourcePath path="源文件路径" />
<class location="生成类路径" />
</findbugs>
</target>
</project>
比如:我这里有一个我放在博客上的项目的findbugs的ant操作的build文件。
<project name="Calendar" default="all">
<property name="findbugs.home" value="../../findbugs-1.3.8" />
<path id="findbugs.path">
<fileset dir="../../findbugs-1.3.8">
<include name="**/*.jar" />
</fileset>
</path>
<taskdef name="findbugs"
classname="edu.umd.cs.findbugs.anttask.FindBugsTask"
classpathref="findbugs.path" />
<!-- 定义findbugs的home,findbugs的task要使用 -->
<target name="findbugs">
<mkdir dir="target/findbugs"/>
<findbugs home="${findbugs.home}"
output="xml:withMessages" outputFile="target/findbugs/calendar-fb.xml">
<!-- 以上定义findbugs查找的类路径 -->
<auxClasspath path="${findbugs.home}/lib/findbugs-ant.jar" />
<auxClasspath>
<fileset dir="lib"
includes="*.jar" />
</auxClasspath>
<sourcePath path="src" />
<class location="target/classes" />
</findbugs>
</target>
</project>
设置好Ant的环境后,在命令中使用ant -f build.xml,或者在Eclipse直接运行build.xml文件,运行后生成了一个xml文件,如果你想用Html的格式查看findbugs的结果,可以把output属性设为:html。这样就可以通过Html来查看findbugs的结果了。
最简单的例子如下:
<project name="findbugsproject" default="findbugs">
<property name="findbugs.home" value="findbugs-1.3.9" />
<taskdef name="findbugs" classname="edu.umd.cs.findbugs.anttask.FindBugsTask"/>
<target name="findbugs">
<findbugs home="${findbugs.home}" output="html" outputFile="aaa.html" effort="default">
<class location="Client/classes" />
<sourcePath path="Client/src" />
</findbugs>
</target>
</project>
提供的Swing工具
Ant操作是专家级的操作,一般对于Java不是很熟悉的人,写build.xml文件。比起Ant来,使用Findbugs提供的Swing工具会使Findbugs的操作更加简单。运行Findbugs解压包中的bin文件夹下的findbugs.bat文件。
Findbugs的Swing工具初始主界面如下:
findbugs-1.3.9.zip ----WINDOWS下载FindBugs软件,可独立运行.并可在Ant中使用FindBugs,这个下截文件解压后目录中有一个BAT文件,打开后就能看到SWING界面
在分析项目之前,我们必须要新建一个项目来分析,选择文件->新建
显示新建项目的界面如下图:
然后添加要分析的类包和目录(可以选择编译好的类所在的文件夹,也可以选择生成的jar包),再添加辅助类所在的文件夹和源文件所在的文件夹(java文件所在的文件夹)。再点击完成就可以建立一个要分析的项目。
建立项目后,会自动先自动开始解析项目。
解析后界面:
其中左边是缺陷的树结构列表,点击其中一个Bug,可以在右边的界面中,显示Bugs的源文件以及所在的位置。
5. 命令行下使用FindBugs和图形化的FindBugs的使用
此处不介绍这种使用方式,详细内容参考findbugs manual。
6. FindBugs Bug描述
笔者认为其实最重要的还是FindBugs可以帮助我们找出哪些Bugs。
但是FindBugs的Bug描述是在太多,可以参考:
http://findbugs.sourceforge.net/bugDescriptions.html
这个检测器寻找与 equals() 和 hashCode() 的实现相关的几个问题。这两个方法非常重要,因为几乎所有基于集合的类 —— List 、 Map 、 Set 等都调用它们。一般来说,这个检测器寻找两种不同类型的问题 —— 当一个类:
- 重写对象的equals()方法,但是没有重写它的hashCode方法,或者相反的情况时。
- 定义一个 co-variant版本的equals()或compareTo()方法。例如,Bob类定义其equals()方法为布尔equals(Bob),它覆盖了对象中定义的equals()方法。因为 Java 代码在编译时解析重载方法的方式,在运行时使用的几乎总是在对象中定义的这个版本的方法,而不是在Bob中定义的那一个(除非显式将equals()方法的参数强制转换为Bob类型)。因此,当这个类的一个实例放入到类集合中的任何一个中时,使用的是Object.equals()版本的方法,而不是在Bob中定义的版本。在这种情况下,Bob类应当定义一个接受类型为Object的参数的equals()方法。
这个检测器查找代码中忽略了不应该忽略的方法返回值的地方。这种情况的一个常见例子是在调用 String 方法时,如在清单 1 中:
|
1 String aString = "bob";
2 b.replace('b', 'p');
3 if(b.equals("pop"))
|
这个检测器查找两类问题。它查找代码路径将会或者可能造成 null 指针异常的情况,它还查找对 null 的冗余比较的情况。例如,如果两个比较值都为 null ,那么它们就是冗余的并可能表明代码错误。 FindBugs 在可以确定一个值为 null 而另一个值不为 null 时,检测类似的错误,如清单 2 所示:
|
1 Person person = aMap.get("bob");
2 if (person != null) {
3 person.updateAccessTime();
4 }
5 String name = person.getName();
|
这个检测器寻找在构造函数中初始化之前被读取的字段。这个错误通常是 —— 尽管不总是如此 —— 由使用字段名而不是构造函数参数引起的,如清单 3 所示:
清单 3.在构造函数中读取未初始化的字段
|
1 public class Thing {
2 private List actions;
3 public Thing(String startingActions) {
4 StringTokenizer tokenizer = new StringTokenizer(startingActions);
5 while (tokenizer.hasMoreTokens()) {
6 actions.add(tokenizer.nextToken());
7 }
8 }
9 }
|
|
<taskdef name="FindBugs" classname="edu.umd.cs.FindBugs.anttask.FindBugsTask"/>
|
清单 4.创建 FindBugs目录
|
1 <target name="FindBugs" depends="compile">
2 <FindBugs home="${FindBugs.home}" output="xml" outputFile="jedit-output.xml">
3 <class location="c:/apps/JEdit4.1/jedit.jar" />
4 <auxClasspath path="${basedir}/lib/Regex.jar" />
5 <sourcePath path="c:/tempcbg/jedit" />
6 </FindBugs>
7 </target>
|
|
<property name="FindBugs.home" value="C:/apps/FindBugs-0.7.3" />
|
- 匹配一个类的过滤器。可以用这些过滤器忽略在特定类中发现的所有问题。
- 匹配一个类中特定缺陷代码(bugcode)的过滤器。可以用这些过滤器忽略在特定类中发现的一些缺陷。
- 匹配一组缺陷的过滤器。可以用这些过滤器忽略所分析的所有类中的一组缺陷。
- 匹配所分析的一个类中的某些方法的过滤器。可以用这些过滤器忽略在一个类中的一组方法中发现的所有缺陷。
- 匹配在所分析的一个类中的方法中发现的某些缺陷的过滤器。可以用这些过滤器忽略在一组方法中发现的特定缺陷。
- 可以考虑将 FindBugs结果加入到源代码管理(SCM)系统中。一般的经验做法是不将编译工件(artifact)放到SCM 系统中。不过,在这种特定情况下,打破这个规则可能是正确的,因为它使您可以监视代码质量随时间的变化。
- 可以选择将 XML结果转换为可以发送到团队的网站上的 HTML报告。转换可以用 XSL样式表或者脚本实现。有关例子请查看 FindBugs网站或者邮件列表(请参阅参考资料)。
- 像 FindBugs这样的工具通常会成为用于敲打团队或者个人的政治武器。尽量抵制这种做法或者不让它发生——记住,它只是一个工具,它可以帮助改进代码的质量。有了这种思想,在下一部分中,我将展示如何编写自定义缺陷检测器。
- 您可以参阅本文在 developerWorks全球站点上的英文原文.
- 下载最新版本的 FindBugs。
- FindBugs网站提供了完整的缺陷清单及说明。
- 阅读有关Visitor模式的更多信息。
- 这里有关于字节码设计库(Code Engineering Library)的更多信息。
- 可以在论文“Finding Bugs is Easy”及其源代码中找到更多关于 FindBugs的细节。
- PMD是另一个强大的开放源代码静态代码分析工具,它可以让您编写自定义规则。它不像 FindBugs那么强大,因为它分析 Java文件而不是类文件,但是仍然值得了解。
- 两位作者试图描述避免 FindBugs可以检测到的那些问题的一组最佳实践:Joshua Bloch的Effective Java: Programming Language Guide(Addison-Wesley,2001年)和 Peter Haggar的Practical Java: Programming Language Guide(Addison-Wesley,2000年)。
- 在“The future of software development” (developerWorks,2003年 6 月)中,Eric Allen讨论了软件开发中的一些趋势,并预言未来几年它们的方向。请查看 Eric的Diagnosing Java code columns的其他内容以了解常见的缺陷模式。
- Mark Roulo在其文章“Complement testing with code inspections” (developerWorks,2000年 3 月)中讨论了通过代码检查可以检测到的常见错误。其中一些错误也可由 FindBugs检测。
- 在developerWorksJava技术专区找到数百篇 Java技术资料。 .
- 请访问Developer Bookstore,获取技术书籍的完整清单,包括数百本 Java相关主题的书籍。
详解eclipse插件findbugs新规则的开发过程
java应用最常见的也就是NullPointException问题了。平时我们做小的项目出几个NPE没什么太大的影响,打几个错误日志,下次修复掉就行了。但是如果是淘宝、支付宝这样的大型系统,每天用户量很大,可能一个NPE就会影响到很多用户的系统使用。findbugs会容易的找出这些问题。
有的时候findbugs不能满足我们的需求,我们需要在代码扫描阶段就发现更多的问题,那么就需要开发针对自己需求的findbugs规则。比如:生产环境的代码中是不允许有System.out.prinln("xxxxx");这样的信息出现的,必须使用log来记录日志,所以我们就可以专门写一条规则来检测代码里面是否存在System.out,如果存在就给出提示。
同样的,在使用log日志的时候,必须要先判断日志的级别然后再使用log.debug(""),所以我们可以定义一条日志来检测代码中是否存在没有使用if条件判断就直接log.debug(),有的话给出提示。
进入正题,通过找代码中是否存在System.out来讲解findbugs规则的开发过程
效果:
准备工作:
1 findbugs源码的下载下载路径:
http://code.google.com/p/findbugs/source/checkout 通过svn下载,svn命令: Svn checkouthttp://findbugs.googlecode.com/svn/trunk/ findbugs-read-only
2 将源码导入eclipse
在eclipse中选择import --- plug-ins and fragments,选择下载的findbugs源码的路径import as选项卡中选择 projects with source folders
添加plug-ins的时候记得不要选择中间的那个,中间的是test,也可以选择全导入
3 项目环境设置
在edu.umd.cs.findbugs.plugin.eclipse项目中找到plugin.xm用manifest editor打开,在build选项卡中add Library:findbugs-plugin.jar,选中findbugs-plugin.jar,add folder:src
在findbugs项目中找到MANIFEST.MF,在build中add Library:findbugs.jar,选中findbugs-plugin.jar,add folder:src/java,src/java5,src/tools,src/antTask
开发新规则:
1.首先认识几个文件
Findbugs.xml
对于每一个新的检测器,在 FindBugs.xml 文件中增加一个 Detector 元素和一个 BugPattern 元素。 Detector 元素指定用于实现检测器的类以及它是快速还是慢速检测器。其中reports属性是和edu.umd.cs.findbugs.detect中类report的错误相对应的和Bugpattern中的type一致且唯一。
category 属性是枚举类型。
它是以下类型中的一种:
CORRECTNESS :一般正确性问题
MT_CORRECTNESS :多线程正确性问题
MALICIOUS_CODE :如果公开给恶意代码,有可能成为攻击点
PERFORMANCE :性能问题
Message.xml
messages.xml 文件由三个元素组成: Detector 、 BugPattern 和 BugCode 。检测器的 class 属性应当指定检测器的类名。 Details 元素包含检测器的简单 HTML 描述,这里面主要写错误的提示信息。
FindBugs 利用了 Byte Code Engineering Library,称为 BCEL,以实现其检测器。所有字节码扫描检测器都基于 visitor 模式。侧重于两个方法------ visit(Code) 和 sawOpcode(int) 。在 FindBugs 分析类时,它会在分析方法内容时调用 visit(Code) 方法。与此类似,FindBugs 在分析方法正文中的每一个操作码时调用 sawOpcode(int) 方法。
下面我们看一个列子:在企业级开发中,是不允许用System.out来输出信息的,必须要用log日志来打印出信息,所以我们就增加一个findbugs的新规则发现代码中有system.out的时候就给用户提示,一下是开发步骤
先看一段通过javap反编的java代码对比
源码:
Java代码
- public class Test{
- public static void main(String[] args){
- String str="pass";
- if(str.equals("pass")){
- System.out.println("str is pass");
- }
- }
- }
- public class Test{
- public static void main(String[] args){
- String str="pass";
- if(str.equals("pass")){
- System.out.println("str is pass");
- }
- }
- }
反编:
Java代码
- Compiled from "Test.java"
- public class Test extends java.lang.Object{
- public Test();
- Code:
- 0: aload_0
- 1: invokespecial #1; //Method java/lang/Object."<init>":()V
- 4: return
- public static void main(java.lang.String[]);
- Code:
- 0: ldc #2; //String pass
- 2: astore_1
- 3: aload_1
- 4: ldc #2; //String pass
- 6: invokevirtual #3; //Method java/lang/String.equals:(Ljava/lang/Object;)Z
- 9: ifeq 20
- 12: getstatic #4; //Field java/lang/System.out:Ljava/io/PrintStream;
- 15: ldc #5; //String str is pass
- 17: invokevirtual #6; //Method java/io/PrintStream.println:(Ljava/lang/String;)V
- 20: return
- }
通过反编的代码我们可以看到调用system.out.println的时候是通过
12: getstatic #4; //Field java/lang/System.out:Ljava/io/PrintStream;
这句来执行的,所以我们只要找到getstatic指令,并判断方法调用是System.out就可以知道是用了System.out,就可以声明bug并且报告bug
findbugs代码
Java代码
- package edu.umd.cs.findbugs.detect;
- import org.apache.bcel.classfile.Code;
- import edu.umd.cs.findbugs.BugInstance;
- import edu.umd.cs.findbugs.BugReporter;
- import edu.umd.cs.findbugs.bcel.OpcodeStackDetector;
- /**
- * @author bo
- * 这个规则类用于判断System.out和System.error这种情况
- */
- public class ForbiddenSystemClass extends OpcodeStackDetector {
- BugReporter bugReporter;
- public ForbiddenSystemClass(BugReporter bugReporter) {
- this.bugReporter = bugReporter;
- }
- /**
- * visit方法,在每次进入字节码方法的时候调用
- * 在每次进入新方法的时候清空标志位
- */
- @Override
- public void visit(Code obj) {
- super.visit(obj);
- }
- /**
- * 每扫描一条字节码就会进入sawOpcode方法
- *
- * @param seen 字节码的枚举值
- */
- @Override
- public void sawOpcode(int seen) {
- if (seen == GETSTATIC) {
- if (getClassConstantOperand().equals("java/lang/System")
- && (getNameConstantOperand().equals("out") || getNameConstantOperand().equals("error"))) {
- BugInstance bug = new BugInstance(this, "ALP_SYSTEMCLASS", NORMAL_PRIORITY).addClassAndMethod(this)
- .addSourceLine(this, getPC());
- bug.addInt(getPC());
- bugReporter.reportBug(bug);
- }
- }
- }
- }
new BugInstance(this, "ALP_SYSTEMCLASS", NORMAL_PRIORITY)
ALP_SYSTEMCLASS这个和findbugs.xml、message.xml中相对应
findbugs的新规则开发使用了visit模式,我们只需要实现visit方法sawOpcode方法即可,当然实现复杂功能,有不同的父类
在findbugs.xml中把自己的Detector 声明出来
Xml代码
- <Detector class="edu.umd.cs.findbugs.detect.AlipayForbiddenSystemClass"
- speed="fast"
- reports="ALP_SYSTEMCLASS"
- hidden="false" />
- <Detector class="edu.umd.cs.findbugs.detect.AlipayForbiddenSystemClass"
- speed="fast"
- reports="ALP_SYSTEMCLASS"
- hidden="false" />
message.xml
- <Detector class="edu.umd.cs.findbugs.detect.ForbiddenSystemClass">
- <Details>
- <!--[CDATA[
- <p>线上代码不能出现System.out
- <p>请使用log日志形式打印
- ]]>
- </Details>
- </Detector>
- <BugPattern type="ALP_ALIPAY_SYSTEMCLASS">
- <ShortDescription>线上代码不能出现System.out</ShortDescription>
- <LongDescription>{1}线上代码不能出现System.out,请使用log形式输出</LongDescription>
- <Details>
- <![CDATA[
- <p>不能使用System.out和System.err,请使用log</p>
- ]]-->
- </Details>
- </BugPattern>
这里配置错误的显示信息
最终把
java类、xml按照下面这个ant脚本的描述进行打包
- <project name="findbugs-plugin" default="build">
- <property name="FindBugs.home" value="D:/Program Files/eclipse/plugins/edu.umd.cs.findbugs.plugin.eclipse_1.3.8.20090315"></property>这里是你的eclipse中findbugs的路径
- <target name="build">
- <jar destfile="AlipayFindBugsRules.jar">
- <fileset dir="bin"/>
- <fileset dir="src"/>
- <zipfileset dir="etc" includes="*.xml" prefix=""></zipfileset>
- </jar>
- <copy file="FindBugsRules.jar" todir="${FindBugs.home}/plugin" />
- </target>
- </project>
命令行ant就打包了,把打好的jar包放到findbugs插件的plugin目录下,重启eclipse就可以使用新的规则了
其它分析工具
除FingBugs静态分析工具外,还有PMD和Checkstyle,FingBugs、PMD和Checkstyle三个工具各有不同的特点,联合使用有助于减少误报错误,提高报告的准确率。
这三个工具检查的侧重点各有不同:
| 工具 |
目的 |
主要检查内容 |
| FindBugs |
基于Bug Patterns概念,查找java bytecode中的潜在bug。在目前版本中,它不检查java源文件。 |
主要检查bytecode中的bug patterns,也允许用户自定义特定的bug patterns。 |
| PMD |
检查java源文件中的潜在问题。 |
主要包括: - 空try/catch/finally/switch语句块 - 未使用的局部变量、参数和private方法 - 空if/while语句 - 过于复杂的表达式,如不必要的if语句等 - 复杂类 |
| CheckStyle |
检查java源文件是否与代码规范相符 |
主要包括 - Javadoc注释 - 命名规范 - Headers - Imports - Size冲突和度量,如过长的方法 - Whitespace - Modifiers - Blocks - Coding Problems - Class Design - 重复代码 - Miscellaneous Checks - Optional Checks |

