Crazy Tetris 01_基本设置&主菜单场景
从本章开始就主要通过我制作重力版俄罗斯方块(Crazy Tetris)游戏的过程而展开。制作伊始,我先大致地想象了一下整个游戏的流程:
因此,本章就是游戏入口以及开始菜单页面的制作。
游戏的入口主要是在AppDelegate中,这里主要是设置尺寸。考虑到最终是一款手机游戏,因此设计时以手机尺寸为主。这里选用480*720。
设置窗口尺寸:
|
1
2
3
4
5
6
7
|
auto glview = director->getOpenGLView();
if
(!glview) {
glview = GLView::create(
"Crazy Tetris"
);
glview->setFrameSize(480, 720);
director->setOpenGLView(glview);
}
|
设置设计尺寸及屏幕适配策略:
|
1
|
glview->setDesignResolutionSize(480, 720, kResolutionExactFit );
|
设计尺寸之前屏幕适配有说过,设置好了后,游戏制作时的尺寸坐标就以该尺寸为基础就好了,遇到不同尺寸的设备,后根据相应屏幕适配策略进行调整。
setFrameSize是设置游戏窗口视图的大小,设置好这个后,在PC上运行时,窗口大小就是根据这个来的。
然后就是将入口场景从默认的HelloWorld改为自己的入口场景——主菜单场景:
|
1
2
3
4
|
// create a scene. it's an autorelease object
auto scene = MainMenu::createScene();
// run
director->runWithScene(scene);
|
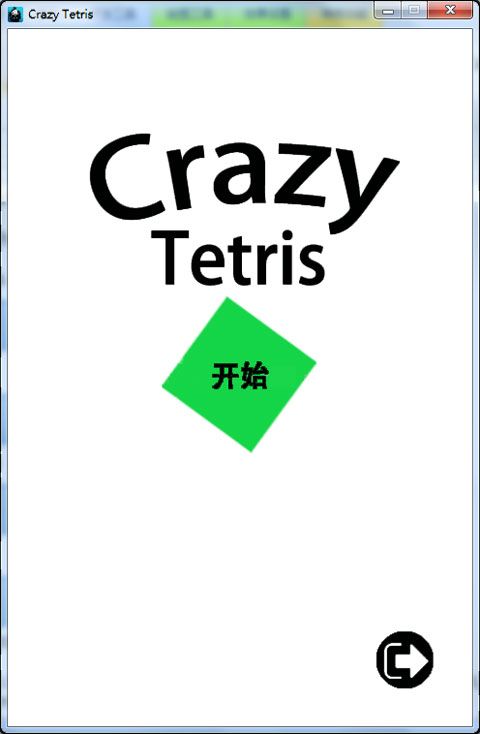
接下来就是主菜单的制作,主菜单很简单,就一张背景,两个按钮——开始游戏和退出游戏。因此这里主要就是添加背景以及菜单及菜单按钮的制作。
必要的函数:
|
1
2
3
4
5
|
//创建场景
static
cocos2d::Scene * createScene();
//初始化
bool
init();
CREATE_FUNC(MainMenu);
|
而添加背景和按钮菜单在init函数中实现就好了:
首先,获取相关坐标信息:
|
1
2
|
Size visibleSize = Director::getInstance()->getVisibleSize();
Vec2 origin = Director::getInstance()->getVisibleOrigin();
|
然后,添加背景图片:
|
1
2
3
|
auto background = Sprite::create(
"Img/background/background.png"
);
background->setPosition(Vec2(visibleSize.width/2 + origin.x, visibleSize.height/2 + origin.y));
this
->addChild(background, 0);
|
这里可以看出,背景也是一张图片,用Sprite将其载入,然后添加到场景中即可。设置位置时设置是设置图片中心所在位置,因此设置屏幕正中。
最后添加按钮:
|
1
2
3
4
5
6
7
8
9
10
11
12
|
auto startItem = MenuItemImage::create(
"Img/button/startgame.png"
,
"Img/button/startgame_selected.png"
,
CC_CALLBACK_1(MainMenu::menuStartCallback,
this
));
startItem->setPosition(Vec2(visibleSize.width/2 + origin.x, visibleSize.height/2 + origin.y));
auto exitItem = MenuItemImage::create(
"Img/button/exit.png"
,
"Img/button/exit_selected.png"
,
CC_CALLBACK_1(MainMenu::menuExitCallback,
this
));
exitItem->setPosition(Vec2(origin.x + visibleSize.width - exitItem->getContentSize().width/2 - 35,
origin.y + exitItem->getContentSize().height/2 + 35 ));
auto menu = Menu::create(startItem, exitItem, NULL);
menu->setPosition(Vec2::ZERO);
this
->addChild(menu, 1);
|
这里是添加图像按钮MenuItemImage,还可以添加纯文字的按钮或其他。
-
MenuItemImage的create方法,这里使用了三个参数,依此的意义是普通状态下的按钮图片,被点击状态下的按钮图片以及该按钮点击时的回调函数。
-
CC_CALLBACK_1是引擎中的宏定义函数,是用来为目标对象绑定回调事件的,他的参数可以有许多,但是前两个是必须的,第一个参数是selector选择器,这里就当是被绑定的回调函数,第二个参数是target,就是绑定的目标对象。
定义好两个按钮后,将这两个按钮添加到菜单Menu中,(因此这两个按钮的坐标位置是Menu中的坐标),最后将Menu添加到场景中即可。
关于设置Menu的位置,可以把Menu想象成一个直角坐标系,设置它的位置就是设置其坐标原点的位置,Menu中的Item的位置就是根据这个直角坐标系来的。
另外就是按钮绑定的回调函数就是自己定义的一个函数,这里我在头文件中声明:
|
1
2
|
void
menuStartCallback(cocos2d::Ref* pSender);
void
menuExitCallback(cocos2d::Ref* pSender);
|
在源文件中定义:
|
1
2
3
4
5
6
7
8
9
10
11
12
13
14
15
16
17
18
19
|
void
MainMenu::menuStartCallback(cocos2d::Ref* pSender)
{
// auto newScene = GameView::createScene();
// Director::getInstance()->replaceScene(TransitionFade::create(1.2, newScene));
}
void
MainMenu::menuExitCallback(cocos2d::Ref* pSender)
{
#if (CC_TARGET_PLATFORM == CC_PLATFORM_WP8) || (CC_TARGET_PLATFORM == CC_PLATFORM_WINRT)
MessageBox(
"You pressed the close button. Windows Store Apps do not implement a close button."
,
"Alert"
);
return
;
#endif
Director::getInstance()->end();
#if (CC_TARGET_PLATFORM == CC_PLATFORM_IOS)
exit
(0);
#endif
}
|
这样,就完成了主菜单界面。
运行效果如下:
Cocos引擎中文官网现面向广大Cocos引擎相关开发者征集优秀教程,欢迎大家投稿!来稿请发送至:[email protected]。
来源网址:http://blog.csdn.net/m294955408/article/details/41513389
