AutoLayout进阶篇
来自Leo的原创博客,转载请著名出处
我的StackOverflow

前言
AutoLayout用来布局已经不是什么新鲜事了,我之前也写过三篇入门的文章
- IB 自动生成
- IB拖拽
- 代码实现
当然,实际开发中,如果是多人协同开发,基本上是弃用Storyboard和XIB文件的。因为这两种文件本质上是XML,多人协同开发一起修改这样的大XML是一件很蛋疼的事情。
所以,大部分时候,Layout约束都是纯代码实现的。
除非某些公司要实现自己的Layout引擎。否则,更多的还是使用第三方库
- Masonry
使用Masonry能够让约束创建变得很容易。但是,为了更好的利用AutoLayout,很多约束相关的基础知识要了解,这样能够帮助你实现更复杂更灵活的布局。
约束优先级
NSLayoutConstraint有个属性是priority,类型是UILayoutPriority,本质上其实是float类型
typealias UILayoutPriority = Float可以去取如下值,当然也可以直接设置float值
enum {
   UILayoutPriorityRequired = 1000,
   UILayoutPriorityDefaultHigh = 750,
   UILayoutPriorityDefaultLow = 250,
   UILayoutPriorityFittingSizeLevel = 50,
};
typedef float UILayoutPriority;
用处:当两个约束发生冲突的时候,会break优先级低的约束
举个例子先,
例如,我希望有这样的一个View
- 水平垂直居中
- 宽度320,高度200
- 距离左右的最小间隔大于等于20(为了适配小屏幕)
这时候,添加的约束如下

然后,我们看看预览

在4s上,预览是不正确的,但是在大屏上,一切正常
如果这时候运行4s模拟器,会发现Log
2016-06-03 23:01:40.339 OCTest[1004:26277] Unable to simultaneously satisfy constraints.
    Probably at least one of the constraints in the following list is one you don't want.
    Try this:
        (1) look at each constraint and try to figure out which you don't expect;
        (2) find the code that added the unwanted constraint or constraints and fix it.
(
    "<NSLayoutConstraint:0x79159c40 H:|-(>=20)-[UIView:0x79159c70] (Names: '|':UIView:0x79158e50 )>",
    "<NSLayoutConstraint:0x79159dc0 UIView:0x79159c70.centerX == UIView:0x79158e50.centerX>",
    "<NSLayoutConstraint:0x79159e50 H:[UIView:0x79159c70(320)]>",
    "<NSLayoutConstraint:0x79144ba0 'UIView-Encapsulated-Layout-Width' H:[UIView:0x79158e50(320)]>"
)

Will attempt to recover by breaking constraint
<NSLayoutConstraint:0x79159e50 H:[UIView:0x79159c70(320)]>

Make a symbolic breakpoint at UIViewAlertForUnsatisfiableConstraints to catch this in the debugger.
The methods in the UIConstraintBasedLayoutDebugging category on UIView listed in <UIKit/UIView.h> may also be helpful.
原因不难发现,
- 4s上屏幕宽度是320,如果要保证View的左右距离边框大于等于20,那么View的宽度小于等于280
- View还有个约束是宽度为320
这就是优先级的作用了,我们设置宽度的优先级更低,这样在有约束和宽度发生冲突的时候,默认break宽度约束
在IB上,可以这么设置
由于默认的priority是1000,这里我们只需要将其设置为999就可以了

然后,预览和运行后都正常了
Tips:在IB上,如果你看到一个约束的是虚线表示的时候,那么这个约束的优先级是小于默认的
Intrinsic Size(内在大小)
我们知道,UILabel和UIButton在设置约束的时候,只需要确定位置就足矣了,而不需要设置大小的约束。因为,UILabel和UIButton有内在大小
内在大小是UIView的一个方法,也就是说,你可以通过继承,为UIView及其子类返回自定义的内在大小
-(CGSize)intrinsicContentSize{
    return [super intrinsicContentSize];
}
一个很典型的例子,假如我只为一个UIView设置水平和垂直居中
这时候,你会发现,约束是红色的,也就是只确定了位置,没确定大小,autolayout无法确认view的状态
这时候,在IB上设置内置大小为300*200,设置内在大小的位置在下图最下一个选项 Intrinsic size
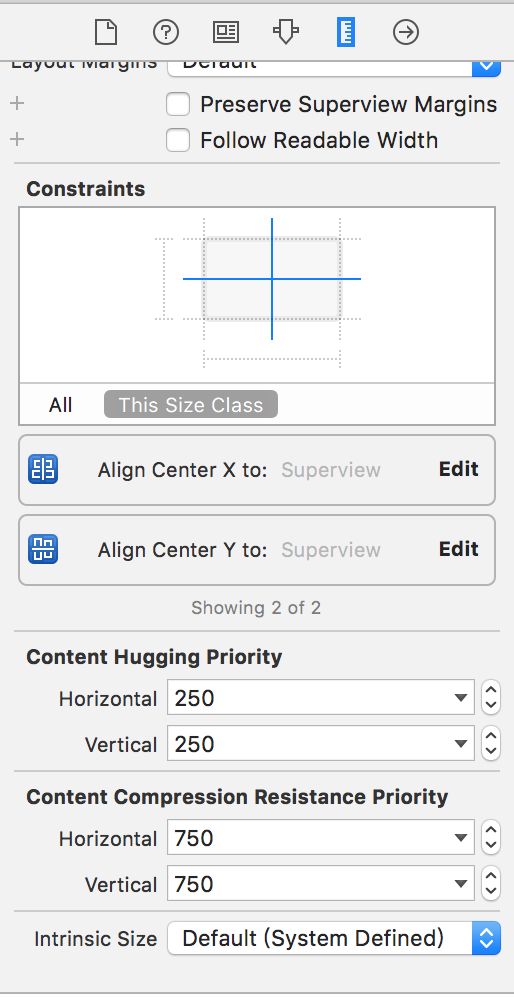
设置完以后,发现IB正常了。
这样设置并不会影响运行时,只会去除IB警告
所以,我们新建一个UIView子类,然后将该视图的类修改
@interface AutoAdjustView : UIView
@end
@implementation AutoAdjustView
-(CGSize)intrinsicContentSize{
    return CGSizeMake(300, 200);
}
@end
在运行发现一切正常。
Intrinsic Size有两个很常见的使用场景
场景一,为UILabe,UIButton等设置额外的Padding
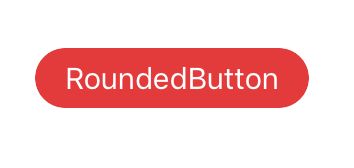
举个例子,一个默认的UIButton,设置文字后的效果是这样子的
当我们写一个子类,重载intrinsicContentSize
@implementation RoundButton

-(CGSize)intrinsicContentSize{
    CGSize size = [super intrinsicContentSize];
    size.width += size.height;
    return size;
}
-(void)layoutSubviews{
    [super layoutSubviews];
    self.layer.cornerRadius = ceil(self.bounds.size.height/2);
    self.layer.masksToBounds = YES;
}
@end
效果是是这样子的,可以看到,我们不管实际宽度多少,都添加了额外的padding。
场景二,让父视图根据子视图来自适应自己的大小(为了方便,我在IB上拖拽了,代码实现类似)
首先,拖拽一个背景色为蓝色的view作为父视图,然后父视图中添加一个label。
父视图的设置
- 水平垂直居中
- Intrinsic Size 为0,0
Label的设置
- 距离top,bottom,leading,trailing,距离为20
这时候,预览如下(仅仅修改label文字)
可以看到,我们并没有设置蓝色视图的高度宽度,它可以自适应内部包含视图。MBProgressHUD的中间区域自适应大小就是这么做的。
Hugging Priority
UIView有一个方法是
setContentHuggingPriority: forAxis:Sets the priority with which a view resists being made larger than its intrinsic size.(当View的大小大于内置大小的时候,抗拒变大的优先级,也就是说,优先级越大,抗拒能力越强)
其中,priority是UILayoutPriority,和上文的一致。Axis是坐标系
typedef NS_ENUM(NSInteger, UILayoutConstraintAxis) {
    UILayoutConstraintAxisHorizontal = 0,
    UILayoutConstraintAxisVertical = 1
};
就是,你可以分别设置水平垂直的优先级。
举个例子
IB拖拽红蓝两个View
蓝色设置如下
- 距离顶部8
- 距离左边20
- 内置大小120*50
蓝色设置如下
- 距离顶部8
- 距离右面20
- 内置大小120*50
这时候4.7英寸屏幕预览如下

接下来,添加两个View的水平间隔为10
可以看到,约束发生冲突了,因为两个view的抗拉伸优先级是一样的。
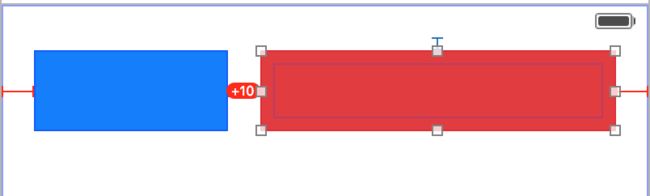
由于默认的优先级值是250,所以,我们选中蓝色View,设置优先级为249的时候,会拉伸蓝色自己,如果是251,则会拉伸红色
Compression Resistance Priority
Sets the priority with which a view resists being made smaller than its intrinsic size.也就是说和上文提到的Hugging Priority类似,只不过这个是抗压缩优先级,这里再举例子了。
- (void)setContentCompressionResistancePriority:(UILayoutPriority)priority forAxis:(UILayoutConstraintAxis)axissystemLayoutSizeFittingSize
很多时候,比如UITableviewCell,比如UICollectionViewCell,我们需要知道当前视图内部子视图的最合适的的高度是多少。很幸运,UIView为我们提供了这个方法
systemLayoutSizeFittingSize
Returns the size of the view that satisfies the constraints it holds.The size of the view that satisfies the constraints it holds.也就是说,根据子视图的约束,按照fittings Size来返回最合适的大小。
其中fittings Size可选值如下
const CGSize UILayoutFittingCompressedSize;//满足约束的最可能小的大小
const CGSize UILayoutFittingExpandedSize;//满足约束的最可能大的大小
以TableViewCell高度计算为例
假如我们有这样的一个Cell
- 子视图就一个Label,上下左右各具contentView距离为8
那么,如何在heightForRowAtIndexPath里返回高度呢?
方法一,根据Model计算
根据boundingRectWithSize: options: attributes: context:来计算高度,最后加上padding。-iOS 7之前常用,很土,但是通用的方法。
方法二,交给UIKit,自己去计算高度
-(CGFloat)tableView:(UITableView *)tableView heightForRowAtIndexPath:(NSIndexPath *)indexPath{
    return UITableViewAutomaticDimension;
}
-(CGFloat)tableView:(UITableView *)tableView estimatedHeightForRowAtIndexPath:(NSIndexPath *)indexPath{
    return UITableViewAutomaticDimension;
}方法三,用systemLayoutSizeFittingSize来计算
这里有个地方要注意,我们只有固定了宽度,才能计算出高度,所以,从下文代码里你能看到,我们添加了一个宽度约束小于等于屏幕宽度
注意:当有accessoryView的时候或者Table不是全屏,cell的宽度并不是屏幕宽度
@interface TableViewController ()

@property (strong,nonatomic)CustomCell * sizeCell;

@end

@implementation TableViewController

- (void)viewDidLoad {
    [super viewDidLoad];
    [self.tableView registerNib:[UINib nibWithNibName:@"CustomCell" bundle:nil] forCellReuseIdentifier:@"cell"];
    self.sizeCell = [[NSBundle mainBundle] loadNibNamed:@"CustomCell" owner:self options:nil].firstObject;

    CGFloat screenWidth = [UIScreen mainScreen].bounds.size.width;
    [self.sizeCell.contentView addConstraint:[NSLayoutConstraint constraintWithItem:self.sizeCell.contentView attribute:NSLayoutAttributeWidth relatedBy:NSLayoutRelationLessThanOrEqual toItem:nil attribute:NSLayoutAttributeWidth multiplier:1.0 constant:screenWidth]];
}

-(NSArray *)cellTexts{
    return @[
             @"dagudhau",
             @"dagudhau",
             @"daguddhaughduahhau",
             @"dagudhauhduahgudahughduahguhagudhauhfuadhgudhauhuadh",
             @"daghduahgudhaguhdauhguhaguhdughauudhau",
@"agudhauhduahgudahughduahguhagudhauhfuadhgudhauhuadhdaghduahgudhaguhdauhguhaguhdughauudhauagudhauhduahgudahughduahguhagudhauhfuadhgudhauhuadhdag",
             @"dagudhau",
             @"dagudhau",

             ];
}
#pragma mark - Table view data source

-(CGFloat)tableView:(UITableView *)tableView heightForRowAtIndexPath:(NSIndexPath *)indexPath{
    self.sizeCell.customLabel.text = [self cellTexts][indexPath.row];
    CGSize fitSize = [self.sizeCell systemLayoutSizeFittingSize:UILayoutFittingCompressedSize];
    return fitSize.height;
}
- (NSInteger)numberOfSectionsInTableView:(UITableView *)tableView {
    return 1;
}

- (NSInteger)tableView:(UITableView *)tableView numberOfRowsInSection:(NSInteger)section {
    return [self cellTexts].count;
}


- (UITableViewCell *)tableView:(UITableView *)tableView cellForRowAtIndexPath:(NSIndexPath *)indexPath {
    CustomCell *cell = [tableView dequeueReusableCellWithIdentifier:@"cell" forIndexPath:indexPath];
    cell.customLabel.text = [self cellTexts][indexPath.row];
    return cell;
}
效果如下
iphone 6

iphone 4s
