如何在SharePoint 2010中搭建Form-Based Authentication?
随着公司发展,越来越多的企业在使用SharePoint时,不仅仅满足于使用Windows AD的认证方式,在同时也配置了基于表单的Form-based认证使用。那我们就来看下在SharePoint环境中如何一步步的完成对Form-based Authentication的配置。
下面以SharePoint2010为例,呈现FBA的配置步骤:
在配置FBA认证时,一般分为下面三个步骤:
- 创建Claims Based Authentication的Web Application;
- 利用asp.net创建数据库,用于存储FBA用户信息;
- 修改Config文件配置FBA;
我们来具体看下每一步都如何设置:
- 创建Claims Based Authentication的Web Application
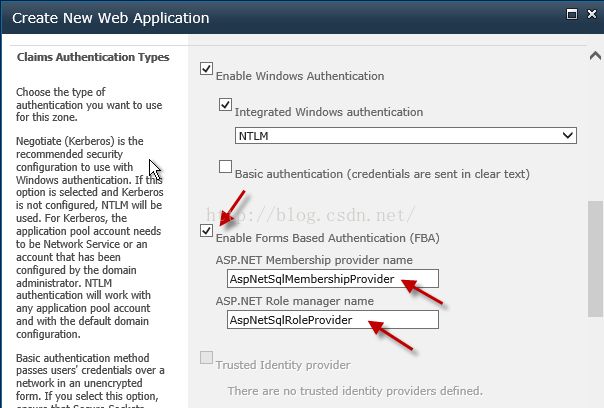
- 登录SharePoint Central Administration-> Application Management-> Manage Web Applications,新建Web Application,此时Authentication对应选择"Claims Based Authentication";
- 在下面的Claims Authentication Types中,勾选"Enable Forms Based Authentication(FBA)",定义ASP.NET Membership provider name和ASP.NET Role manager name。此时可以同时勾选Windows Authentication使用;
Note:此处填写的值和config文件填写的值需要一致。如果此处没有按图中内容填写,请在设置配置文件时候根据此处填写的内容更新配置文件对应的值。
- 点击OK完成Web Application的创建。
- 利用asp.net创建数据库
- 用Administrator方式打开Command Prompt,输入命令切换路径到"c:\Windows\Microsoft.NET\Framework64\v2.0.50727"。
命令:cd c:\Windows\Microsoft.NET\Framework64\v2.0.50727
- 输入aspnet_regsql.exe后回车,此时会弹出SQL Server Setup页面;
- 直接点击下一步直到看到设置Server和Database页面,填写要连接的SQL Server和填写一个存放FBA user的Database,认证可以根据需要选择Windows还是SQL Server sa认证;
Note:此处填写的Server和Database Name要记住,稍后填写配置文件时候要填一样的信息。
- 点击Next直到Finish,完成SQL Server中Database的创建。
- 修改Config文件配置FBA
此处需要修改三处配置文件:Central Administration web config文件、Web Application Web Config文件和Security Token Service webconfig文件。
- 修改Central Administration web config文件
- 打开IIS Manager,找到Central Administration的website,右键点击Explore直接打开website的路径;
- 打开Web.config文件,找到</configSections>字段,在其后添加下面内容,其中data source填写SQL Server的name,Initial Catalog填写#2中用asp.net创建的FBA Database Name;
<connectionStrings>
<clear />
<!-- FBA ClaimsAuth-->
<addname="AspNetSqlFBADBConnStr" connectionString="data source=[Server Name];Integrated Security=SSPI;Initial Catalog=[FBA Database Name]"providerName="System.Data.SqlClient" />
<!-- FBA ClaimsAuth-->
</connectionStrings>
- 找到</system.web>字段,并向前定位下面字段:
<roleManager>
<providers>
</providers>
</roleManager>
<membership>
<providers>
</providers>
</membership>
用下面字段覆盖替换:
<roleManager enabled="true"cacheRolesInCookie="false" cookieName=".ASPXROLES"cookieTimeout="30" cookiePath="/"cookieRequireSSL="false" cookieSlidingExpiration="true"cookieProtection="All"defaultProvider="AspNetWindowsTokenRoleProvider"createPersistentCookie="false" maxCachedResults="25">
<providers>
<clear />
<addconnectionStringName="AspNetSqlFBADBConnStr"applicationName="/" name="AspNetSqlRoleProvider"type="System.Web.Security.SqlRoleProvider, System.Web, Version=2.0.0.0,Culture=neutral, PublicKeyToken=b03f5f7f11d50a3a" />
<addapplicationName="/" name="AspNetWindowsTokenRoleProvider"type="System.Web.Security.WindowsTokenRoleProvider, System.Web,Version=2.0.0.0, Culture=neutral, PublicKeyToken=b03f5f7f11d50a3a" />
</providers>
</roleManager>
<membershipdefaultProvider="AspNetSqlMembershipProvider"userIsOnlineTimeWindow="15" hashAlgorithmType="">
<providers>
<clear />
<addconnectionStringName="AspNetSqlFBADBConnStr"enablePasswordRetrieval="false" enablePasswordReset="true"requiresQuestionAndAnswer="true" passwordAttemptWindow="10"applicationName="/" requiresUniqueEmail="false"passwordFormat="Hashed" maxInvalidPasswordAttempts="5"minRequiredPasswordLength="1"minRequiredNonalphanumericCharacters="0" passwordStrengthRegularExpression=""name="AspNetSqlMembershipProvider"type="System.Web.Security.SqlMembershipProvider, System.Web,Version=2.0.0.0, Culture=neutral, PublicKeyToken=b03f5f7f11d50a3a" />
</providers>
</membership>
- 保存web.config文件,完成Central Administration配置文件编辑。
- 修改Web Application Web Config文件:
- 打开Web.config文件,找到</configSections>字段,在其后添加下面内容,其中data source填写SQL Server的name,Initial Catalog填写#2中用asp.net创建的FBA Database Name;
<connectionStrings>
<clear />
<!-- FBA ClaimsAuth-->
<addname="AspNetSqlFBADBConnStr" connectionString="data source=[Server Name];Integrated Security=SSPI;Initial Catalog=[FBA Database Name]"providerName="System.Data.SqlClient" />
<!-- FBA ClaimsAuth-->
</connectionStrings>
- 搜索</system.web>字段,并向上定位下面内容:
<membershipdefaultProvider="i">
<providers>
<addname="i"type="Microsoft.SharePoint.Administration.Claims.SPClaimsAuthMembershipProvider,Microsoft.SharePoint, Version=14.0.0.0, Culture=neutral,PublicKeyToken=71e9bce111e9429c" />
</providers>
</membership>
<roleManagerdefaultProvider="c" enabled="true"cacheRolesInCookie="false">
<providers>
<addname="c"type="Microsoft.SharePoint.Administration.Claims.SPClaimsAuthRoleProvider,Microsoft.SharePoint, Version=14.0.0.0, Culture=neutral,PublicKeyToken=71e9bce111e9429c" />
</providers>
</roleManager>
并将其替换成下面字段:
<membershipdefaultProvider="i" userIsOnlineTimeWindow="15"hashAlgorithmType="">
<providers>
<clear />
<addconnectionStringName="AspNetSqlFBADBConnStr"enablePasswordRetrieval="false" enablePasswordReset="true"requiresQuestionAndAnswer="true" passwordAttemptWindow="10"applicationName="/" requiresUniqueEmail="false"passwordFormat="Hashed" maxInvalidPasswordAttempts="5"minRequiredPasswordLength="1"minRequiredNonalphanumericCharacters="0" passwordStrengthRegularExpression=""name="AspNetSqlMembershipProvider"type="System.Web.Security.SqlMembershipProvider, System.Web,Version=2.0.0.0, Culture=neutral, PublicKeyToken=b03f5f7f11d50a3a" />
<add name="i"type="Microsoft.SharePoint.Administration.Claims.SPClaimsAuthMembershipProvider,Microsoft.SharePoint, Version=14.0.0.0, Culture=neutral,PublicKeyToken=71e9bce111e9429c" />
</providers>
</membership>
<roleManagerenabled="true" cacheRolesInCookie="false"cookieName=".ASPXROLES" cookieTimeout="30"cookiePath="/" cookieRequireSSL="false" cookieSlidingExpiration="true"cookieProtection="All" defaultProvider="c"createPersistentCookie="false" maxCachedResults="25">
<providers>
<clear />
<addconnectionStringName="AspNetSqlFBADBConnStr"applicationName="/" name="AspNetSqlRoleProvider"type="System.Web.Security.SqlRoleProvider, System.Web, Version=2.0.0.0,Culture=neutral, PublicKeyToken=b03f5f7f11d50a3a" />
<addapplicationName="/" name="AspNetWindowsTokenRoleProvider"type="System.Web.Security.WindowsTokenRoleProvider, System.Web,Version=2.0.0.0, Culture=neutral, PublicKeyToken=b03f5f7f11d50a3a" />
<add name="c"type="Microsoft.SharePoint.Administration.Claims.SPClaimsAuthRoleProvider,Microsoft.SharePoint, Version=14.0.0.0, Culture=neutral,PublicKeyToken=71e9bce111e9429c" />
</providers>
</roleManager>
- 保存web.config文件,完成Web Application配置文件编辑。
- 修改Security Token Service web config文件:
- 打开路径"Program Files\Common Files\Microsoft Shared\Web Server Extensions\14\WebServices\SecurityToken",找到web.config文件并打开;
- 搜索</configuration>字段,并在上方添加下面内容。其中data source填写SQL Server的name,Initial Catalog填写#2中用asp.net创建的FBA Database Name。
<connectionStrings>
<clear />
<!-- FBA Claims Auth-->
<add name="AspNetSqlFBADBConnStr"connectionString="data source=qujing2010-sql\panda;IntegratedSecurity=SSPI;Initial Catalog=FBA_Database"providerName="System.Data.SqlClient" />
<!-- FBA Claims Auth-->
</connectionStrings>
<system.web>
<membership>
<providers>
<add connectionStringName="AspNetSqlFBADBConnStr"enablePasswordRetrieval="false" enablePasswordReset="true"requiresQuestionAndAnswer="true" passwordAttemptWindow="10"applicationName="/" requiresUniqueEmail="false"passwordFormat="Hashed" maxInvalidPasswordAttempts="5"minRequiredPasswordLength="1"minRequiredNonalphanumericCharacters="0"passwordStrengthRegularExpression="" name="AspNetSqlMembershipProvider"type="System.Web.Security.SqlMembershipProvider, System.Web,Version=2.0.0.0, Culture=neutral, PublicKeyToken=b03f5f7f11d50a3a" />
</providers>
</membership>
<roleManager enabled="true">
<providers>
<add connectionStringName="AspNetSqlFBADBConnStr"applicationName="/" name="AspNetSqlRoleProvider"type="System.Web.Security.SqlRoleProvider, System.Web, Version=2.0.0.0,Culture=neutral, PublicKeyToken=b03f5f7f11d50a3a" />
</providers>
</roleManager>
</system.web>
- 保存web.config文件,完成Security Token Service配置文件编辑。
- 添加FBA User到数据库:
- 登录SQL Server,找到之前创建的FBA数据库,点击并右键选择"New Query",执行下面语句:
DECLARE @now datetime SET @now = GETDATE() EXECaspnet_Membership_CreateUser '/', 'User1', '123456', '', '[email protected]','PasswordQuestion?', 'PasswordAnswer', 1, @now, @now, 0, 0, NULL
其中User1是要添加的user name,123456是此user的 password。
此时,在SharePoint中配置FBA就已经完成了,下面我们创建site collection,使用上面添加的user1登录看下效果:
- 在之前创建的 Web Application下新建site collection,打开时会显示下面样式:
- 在网站赋予Form认证的user权限后,可以选择Forms Authentication,输入用户名密码登录;
已上就是SharePoint2010中Form-based Authentication的全部搭建过程和使用效果,希望对大家有帮助,感谢阅读!


