libjson 编译和使用 - 2. 配置使用lib文件
继续上一篇编译后我们这次来讲怎么配置使用刚生产的lib文件。
1. 在之前的libjson所在的解决方案里新建一个控制台应用程序,叫TestLibjson。
2. 右键TestLibjson项目,选择属性。按下图设置导入libjson的头文件。(虽然我们已经编译成lib库文件,但我们还是要在我们的项目里加入头文件。)
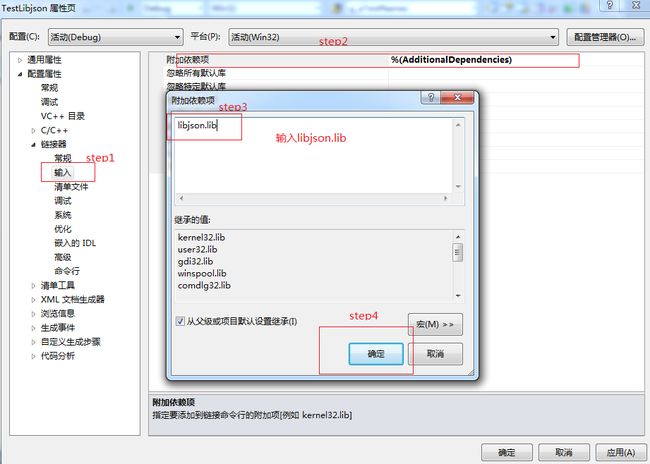
3. 在属性里加入刚刚生产的libjson.lib文件。如下图设置。
好了,配置设置好了,接下来我们写写测试代码
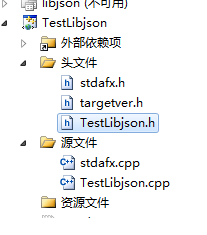
首先新建下列文.h和.cpp文件
在TestLibjson.h文件加入以下代码。
#include "libjson.h"
class TestLibjson
{
public:
	TestLibjson();
	void ParseJSON(JSONNODE *n);
};
在TestLibjson.cpp文件加入代码。
// TestLibjson.cpp : 定义控制台应用程序的入口点。
//

#include "stdafx.h"
#include <stdlib.h>
#include "TestLibjson.h"
#include "libjson.h"

TestLibjson::TestLibjson()//构造函数
{
}

void TestLibjson::ParseJSON(JSONNODE *n){//解析json文件
    if (n == NULL){
        printf("Invalid JSON Node\n");
        return;
    }

    JSONNODE_ITERATOR i = json_begin(n);
    while (i != json_end(n)){
        if (*i == NULL){
            printf("Invalid JSON Node\n");
            return;
        }

        // recursively call ourselves to dig deeper into the tree
        if (json_type(*i) == JSON_ARRAY || json_type(*i) == JSON_NODE){
            ParseJSON(*i);
        }

        // get the node name and value as a string
        json_char *node_name = json_name(*i);

        // find out where to store the values
        if (strcmp(node_name, "RootA") == 0){
            json_char *node_value = json_as_string(*i);
			printf("rootA: %s\n", node_value);
            json_free(node_value);
        }
        else if (strcmp(node_name, "ChildA") == 0){
            json_char *node_value = json_as_string(*i);
			printf("ChildA: %s\n", node_value);
            json_free(node_value);
        }
        else if (strcmp(node_name, "ChildB") == 0)
			printf("childB: %d\n", json_as_int(*i));
        // cleanup and increment the iterator
        json_free(node_name);
        ++i;
    }
	system("pause");
}

int _tmain()//程序入口
{
	char *json = "{\"RootA\":\"Value in parent node\",\"ChildNode\":{\"ChildA\":\"String Value\",\"ChildB\":42}}";
	JSONNODE *n = json_parse(json);
	TestLibjson tl = TestLibjson();
	tl.ParseJSON(n);
	json_delete(n);

	return 0;
}
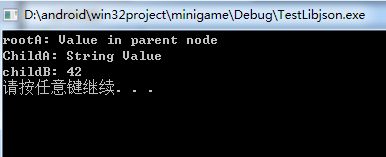
运行结果
注意,这里我们用的的libjson的Debug模式,如果你用的是release模式,那你还需要设置libOption.h文件,把它的#define JSON_DEBUG 注释掉。
下一篇:libjson 编译和使用 - 3. libjson的C接口 API


