java cache 学习记录之二
上一篇自定义了缓存的实现,不用任何第三方的组件来实现某种对象的内存缓存,这一篇结合结合上一篇的例子,简单的实现了spring cache,cache使用了spring缺醒的实现,包括缓存的查询、缓存的清空等。源码下载
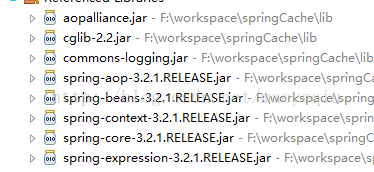
首先,引入spring需要的jar包。如下图所示:
实体类既是上一篇中的user类,服务类:
package com.spricache.service;

import org.springframework.cache.annotation.CacheEvict;
import org.springframework.cache.annotation.Cacheable;

import com.spricache.entity.User;

public class UserService {

	// 使用了一个缓存名叫 userCache ,value是user对象,key是userName
	@Cacheable(value="userCache")
	public User getUserByName(String userName) {
	   // 方法内部实现不考虑缓存逻辑,直接实现业务
	   System.out.println("数据库查询"+userName);
	   return getFromDB(userName);
	}

	// 清空 userCache 缓存  public void updateAccount(Account account)
	//以这里还需要从参数 user 对象中获取 name 的值来作为 key,前面的 # 号代表这是一个 SpEL 表达式,此表达式可以遍历方法的参数对象
	@CacheEvict(value="userCache",key="#user.getUserName()")
	public void updateUser(User user) {
	   updateDB(user);
	}

	// 清空 accountCache 缓存
	@CacheEvict(value="userCache",allEntries=true)
	public void reload() {
	}

	private void updateDB(User user) {
	    System.out.println("更新数据库"+user.getUserName());
    }

	//模拟数据库查询
	private User getFromDB(String acctName) {
	   System.out.println("正在从数据库查询"+acctName);
	   return new User(acctName);
    }

}
@Cacheable(value=”userCache”),这个注释是当调用getUserByName这个方法的时候,从一个名叫 userCache 的缓存中查询,如果没有,则查询数据库,并将执行的结果存入缓存中,否则返回缓存中的对象。“userCache”缓存是在 spring*.xml 中定义的名称。
spring.xml的配置内容
 <beans xmlns="http://www.springframework.org/schema/beans"
 xmlns:xsi="http://www.w3.org/2001/XMLSchema-instance"
   xmlns:cache="http://www.springframework.org/schema/cache"
	xmlns:p="http://www.springframework.org/schema/p"
   xsi:schemaLocation="http://www.springframework.org/schema/beans
   http://www.springframework.org/schema/beans/spring-beans.xsd
     http://www.springframework.org/schema/cache
     http://www.springframework.org/schema/cache/spring-cache.xsd">

   <!--支持缓存的配置项 ,这个配置项缺省使用了一个名字叫 cacheManager 的缓存管理器-->
   <cache:annotation-driven />
   <!--配置service变量 -->
   <bean id="userService" class="com.spricache.service.UserService"/>
   <!-- generic cache manager -->
   <bean id="cacheManager" class="org.springframework.cache.support.SimpleCacheManager">
     <property name="caches">
       <set>
         <bean class="org.springframework.cache.concurrent.ConcurrentMapCacheFactoryBean"  p:name="default" />
         <bean class="org.springframework.cache.concurrent.ConcurrentMapCacheFactoryBean" p:name="userCache" />
       </set>
     </property>
   </bean>
 </beans>
这里的p:name="userCache"既是在服务类的标签@Cacheable(value=”userCache”)中的usercache。这个缓存userCache使用了缺省的内存存储方案 ConcurrentMapCacheFactoryBean,它是基于 java.util.concurrent.ConcurrentHashMap 的一个内存缓存实现方案。
下边是测试类:
package com.spricache.test;

import org.springframework.context.ApplicationContext;
import org.springframework.context.support.ClassPathXmlApplicationContext;

import com.spricache.entity.User;
import com.spricache.service.UserService;

public class Test {
	public static void main(String args[]){
		// 加载 spring 配置文件
	    ApplicationContext context = new ClassPathXmlApplicationContext("com/spricache/config/spring-cache.xml");
	    UserService userService = (UserService) context.getBean("userService");
	    // 第一次查询,应该走数据库
	    System.out.println("第一次查询");
	    userService.getUserByName("helloSpringCache");
	    // 第二次查询,应该不查数据库,直接返回缓存的值
	    System.out.println("第二次查询");
	    userService.getUserByName("helloSpringCache");
	    System.out.println();

	    //更新某个记录的缓存,首先构造两个账号记录,然后记录到缓存中
	    System.out.println("开始测试清空缓存");
	    User user1 = userService.getUserByName("cache1");
	    User user2 = userService.getUserByName("cache2");
	    //开始更新其中一个
	    user1.setId(1212);
	    userService.updateUser(user1);
	    // 因为被更新了,所以会查询数据库
	    userService.getUserByName("cache1");
	    // 没有更新过,应该走缓存
	    userService.getUserByName("cache1");
	    // 再次查询,应该走缓存
	    userService.getUserByName("cache1");
	    // 更新所有缓存
	    userService.reload();
	    // 应该会查询数据库
	    userService.getUserByName("cache2");
	    // 应该会查询数据库
	    userService.getUserByName("cache1");
	    // 应该走缓存
	    userService.getUserByName("cache2");
	    // 应该走缓存
	    userService.getUserByName("cache1");
	}
}
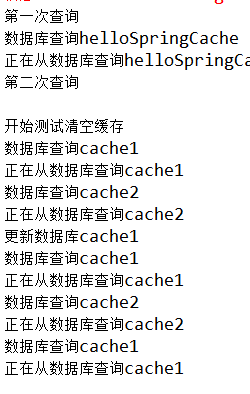
运行结果:

