Android学习笔记7——常用控件
1.TextView
2.EditView
3.Button
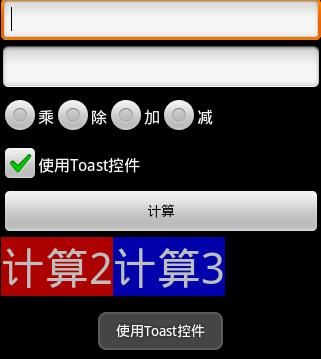
4.RadioButton
5.Checkbox
6.Toast
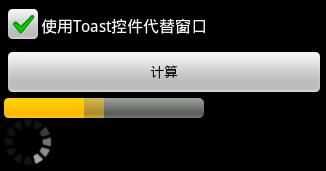
7.ProgressBar
8.ListView
4.RadioButton
需结合布局文件里需结合RadioGroup使用
<textarea cols="88" rows="12" name="code" class="java:collapse"> RGrp_Methods = (RadioGroup)findViewById(R.id.RGrp_Methods); RBtn_Multiply = (RadioButton)findViewById(R.id.RBtn_Multiply); RBtn_Divide = (RadioButton)findViewById(R.id.RBtn_Divide); RBtn_Add = (RadioButton)findViewById(R.id.RBtn_Add); RBtn_Minus = (RadioButton)findViewById(R.id.RBtn_Minus); RGrp_Methods.setOnCheckedChangeListener(new RadioGroup.OnCheckedChangeListener() { @Override public void onCheckedChanged(RadioGroup group, int checkedId) { // TODO Auto-generated method stub } });</textarea>
复写listener的函数跟Button的稍许不同,跟设置的连在一起,跟checkbox类似
5.Checkbox
<textarea cols="89" rows="15" name="code" class="java:collapse"> ToastOrIntent = (CheckBox)findViewById(R.id.ToastOrIntent); ToastOrIntent.setOnCheckedChangeListener(new CompoundButton.OnCheckedChangeListener() { @Override public void onCheckedChanged(CompoundButton buttonView, boolean isChecked) { // TODO Auto-generated method stub System.out.println("CheckBox -> ToastOrIntent"); Toast.makeText(hello.this, R.string.str_UseToast, Toast.LENGTH_SHORT).show(); } });</textarea>
复写listener的函数跟Button的稍许不同,跟设置的连在一起,跟RadioButton类似
同时注意的是,checkbox集成了CompoundButton的listener,它自己没有listener
6.Toast
弹出的msgbox,一回会消失
<textarea cols="82" rows="1" name="code" class="java:nogutter:collapse">Toast.makeText(hello.this, R.string.str_UseToast, Toast.LENGTH_SHORT).show();</textarea>
7.ProgressBar
有两种,一种横的,一种圆的
横的可以显示进度,圆的一直在转
8.ListView
1)新建一个Arraylist,然后插到Adapter里面
关键是ArrayList的理解,
结构
ArrayList
HashMap
String,String(键值对)
2)需要两个xml,一个是listActivity,一个是list里面的textView布局
<textarea cols="50" rows="15" name="code" class="java:collapse"> setContentView(R.layout.listact); ArrayList<HashMap<String,String>> list = new ArrayList<HashMap<String,String>>(); HashMap<String,String> map1 =new HashMap<String,String>(); HashMap<String,String> map2 =new HashMap<String,String>(); HashMap<String,String> map3 =new HashMap<String,String>(); map1.put("user_name", "胡锦涛"); map1.put("user_num", "13456789012"); map2.put("user_name", "奥巴马"); map2.put("user_num", "14567890123"); map3.put("user_name", "我"); map3.put("user_num", "15678901234"); list.add(map1); list.add(map2); list.add(map3); SimpleAdapter listAdapter = new SimpleAdapter(this, list, R.layout.listuser, new String[]{"user_name", "user_num"}, new int[]{R.id.user_name, R.id.user_num}); setListAdapter(listAdapter);</textarea>
listAct.java
<textarea cols="50" rows="15" name="code" class="java:collapse"><?xml version="1.0" encoding="utf-8"?> <LinearLayout xmlns:android="http://schemas.android.com/apk/res/android" android:orientation="vertical" android:layout_width="fill_parent" android:layout_height="fill_parent" > <LinearLayout android:id="@+id/ListLinearLayout" android:orientation="vertical" android:layout_width="fill_parent" android:layout_height="fill_parent" > <ListView android:id="@id/android:list" android:orientation="vertical" android:layout_height="wrap_content" android:layout_width="fill_parent" android:scrollbars="vertical" android:drawSelectorOnTop = "false" > </ListView> </LinearLayout> </LinearLayout></textarea>
listact.xml(注意要用小写,听说,否则R.java不能生成)
<textarea cols="50" rows="15" name="code" class="java:collapse"><?xml version="1.0" encoding="utf-8"?> <LinearLayout xmlns:android="http://schemas.android.com/apk/res/android" android:layout_width="fill_parent" android:layout_height="fill_parent" android:orientation="horizontal"> <TextView android:id="@+id/user_name" android:layout_width="180dip" android:layout_height="30dip" android:textSize="10pt" android:singleLine="true" /> <TextView android:id="@+id/user_num" android:layout_width="fill_parent" android:layout_height="wrap_content" android:textSize="10pt" /> </LinearLayout></textarea>
listuser.xml(是list里面的textview布局)
效果图(点击瞬间)