Improve the Recipe App With a Better Detail View Controller
Several weeks ago, we showed you how to use Segue in Storyboard to pass data between different view controllers. We’ve built a simple app to display a list of recipes. When user taps on any of the recipes, the app navigates to a detailed view and brings up the recipe name. This is very simple app. But if you understand how it works, this is the foundation to help you advance into a full-fledge iOS developer.
After publishing the tutorial, I got lots of requests to improve the detail view. The original detail view is primitive with the recipe name only. How can we improve it and display more information such as the preparation time, ingredient and the dish photo? In this tutorial, we’ll work on it together and make a better app. Before we move on, however, make sure you check out the below tutorial:
- Intro to Object Oriented Programming (OOP)
You have to understand the basic OOP concept before you can work on this tutorial. If you haven’t done so, take some time and read through the article. You can’t become a full-fledged iOS developer without learning objects and classes.
The Final Deliverable
To give you an idea about the improvement, let’s first take a look at the final deliverable. As you can see from the sample screenshot, the revamped Recipe app shows user detailed information about a recipe.
Recipe app with improved detail view
Revisit the Segue Data Passing
Storyboard Segue Identifier
In the Segue tutorial, we explained how to make use of Segue to pass the recipe name from the list view to the detail view. Here is the code:
|
1
2 3 4 5 6 7 |
-
(
void
)prepareForSegue
:
(UIStoryboardSegue
*
)segue sender
:
(
id
)sender
{
if ( [segue.identifier isEqualToString : @ "showRecipeDetail" ] ) { NSIndexPath *indexPath = [self.tableView indexPathForSelectedRow ]; RecipeDetailViewController *destViewController = segue.destinationViewController; destViewController.recipeName = [recipes objectAtIndex :indexPath.row ]; } } |
We simply set the property (i.e. recipeName) in the RecipeDetailViewController to pass the recipe name. Obviously, you can add other properties in the detail view controller to pass other recipe-related values. However, this is not the best practice. If you’ve read the OOP tutorial, you know it’s better to create a Recipe class and group all the properties within the class.
Let’s Get Started
First, download this Xcode project. You’ll use this project as a baseline to build the app.
Creating a Recipe Class
We’ll first create the Recipe Class. Right click on RecipeBook folder and select “New File…”. Choose the “Objective-C class” template (under Cocoa Touch) and click “Next”. Name the class as “Recipe” and as a subclass of “NSObject”. Click “Next” and save the file in your Xcode project folder.
Create the Recipe Class with NSObject as subclass
Once completed, Xcode will create the Recipe.h and Recipe.m files. In the header file, add the properties of the Recipe class:
|
1
2 3 4 5 6 7 8 |
@interface Recipe
:
NSObject
@property (nonatomic, strong ) NSString *name; // name of recipe @property (nonatomic, strong ) NSString *prepTime; // preparation time @property (nonatomic, strong ) NSString *imageFile; // image filename of recipe @property (nonatomic, strong ) NSArray *ingredients; // ingredients @end |
In the implementation file (i.e. Recipe.m), we add the @synthesis directive. The @synthesize directive tells the compiler to generate the setters and getters for accessing the properties we define in the header.
|
1
2 3 4 5 6 7 8 |
@implementation Recipe
@synthesize name; @synthesize prepTime; @synthesize imageFile; @synthesize ingredients; @end |
Now we’ve created a Recipe class with various properties including recipe name, preparation time, image and ingredients. Later we’ll make use of it to instantiate different recipe objects and pass it to the detail view controller.
Populate the Recipe Data
To keep thing simple, we’ll populate the recipe data right in the “RecipeBookViewController”. In real app, this kind of data are usually stored in property list file or database.
In the “viewDidLoad” method of “RecipeBookViewController.m”, we initialize the Recipe objects (with different preparation time, ingredients, etc) and put them into the “recipes” array.
|
1
2 3 4 5 6 7 8 9 10 11 12 13 14 15 16 17 18 19 20 21 22 23 24 25 26 27 28 29 30 31 32 33 34 35 36 37 38 39 40 41 42 43 44 45 46 47 48 49 50 51 52 53 54 55 56 57 58 59 60 61 62 63 64 65 66 67 68 69 70 71 72 73 74 75 76 77 78 79 80 81 82 83 84 85 86 87 88 89 90 91 92 93 94 95 96 97 98 99 100 101 102 103 104 |
-
(
void
)viewDidLoad
{ [super viewDidLoad ]; // Initialize table data Recipe *recipe1 = [Recipe new ]; recipe1.name = @ "Egg Benedict"; recipe1.prepTime = @ "30 min"; recipe1.imageFile = @ "egg_benedict.jpg"; recipe1.ingredients = [ NSArray arrayWithObjects : @ "2 fresh English muffins", @ "4 eggs", @ "4 rashers of back bacon", @ "2 egg yolks", @ "1 tbsp of lemon juice", @ "125 g of butter", @ "salt and pepper", nil ]; Recipe *recipe2 = [Recipe new ]; recipe2.name = @ "Mushroom Risotto"; recipe2.prepTime = @ "30 min"; recipe2.imageFile = @ "mushroom_risotto.jpg"; recipe2.ingredients = [ NSArray arrayWithObjects : @ "1 tbsp dried porcini mushrooms", @ "2 tbsp olive oil", @ "1 onion, chopped", @ "2 garlic cloves", @ "350g/12oz arborio rice", @ "1.2 litres/2 pints hot vegetable stock", @ "salt and pepper", @ "25g/1oz butter", nil ]; Recipe *recipe3 = [Recipe new ]; recipe3.name = @ "Full Breakfast"; recipe3.prepTime = @ "20 min"; recipe3.imageFile = @ "full_breakfast.jpg"; recipe3.ingredients = [ NSArray arrayWithObjects : @ "2 sausages", @ "100 grams of mushrooms", @ "2 rashers of bacon", @ "2 eggs", @ "150 grams of baked beans", @ "Vegetable oil", nil ]; Recipe *recipe4 = [Recipe new ]; recipe4.name = @ "Hamburger"; recipe4.prepTime = @ "30 min"; recipe4.imageFile = @ "hamburger.jpg"; recipe4.ingredients = [ NSArray arrayWithObjects : @ "400g of ground beef", @ "1/4 onion (minced)", @ "1 tbsp butter", @ "hamburger bun", @ "1 teaspoon dry mustard", @ "Salt and pepper", nil ]; Recipe *recipe5 = [Recipe new ]; recipe5.name = @ "Ham and Egg Sandwich"; recipe5.prepTime = @ "10 min"; recipe5.imageFile = @ "ham_and_egg_sandwich.jpg"; recipe5.ingredients = [ NSArray arrayWithObjects : @ "1 unsliced loaf (1 pound) French bread", @ "4 tablespoons butter", @ "2 tablespoons mayonnaise", @ "8 thin slices deli ham", @ "1 large tomato, sliced", @ "1 small onion", @ "8 eggs", @ "8 slices cheddar cheese", nil ]; Recipe *recipe6 = [Recipe new ]; recipe6.name = @ "Creme Brelee"; recipe6.prepTime = @ "1 hour"; recipe6.imageFile = @ "creme_brelee.jpg"; recipe6.ingredients = [ NSArray arrayWithObjects : @ "1 quart heavy cream", @ "1 vanilla bean, split and scraped", @ "1 cup vanilla sugar", @ "6 large egg yolks", @ "2 quarts hot water", nil ]; Recipe *recipe7 = [Recipe new ]; recipe7.name = @ "White Chocolate Donut"; recipe7.prepTime = @ "45 min"; recipe7.imageFile = @ "white_chocolate_donut.jpg"; recipe7.ingredients = [ NSArray arrayWithObjects : @ "3 1/4 cups flour", @ "2 teaspoons baking powder", @ "1/4 teaspoon salt", @ "2 beaten eggs", @ "2/3 cup sugar", @ "2 ounces melted white chocolate", @ "1/2 cup milk", nil ]; Recipe *recipe8 = [Recipe new ]; recipe8.name = @ "White Chocolate Mocha"; recipe8.prepTime = @ "5 min"; recipe8.imageFile = @ "starbucks_coffee.jpg"; recipe8.ingredients = [ NSArray arrayWithObjects : @ "2/3 cup whole milk", @ "6 tablespoons white chocolate chips", @ "coffee", @ "whipped cream", nil ]; Recipe *recipe9 = [Recipe new ]; recipe9.name = @ "Vegetable Curry"; recipe9.prepTime = @ "30 min"; recipe9.imageFile = @ "vegetable_curry.jpg"; recipe9.ingredients = [ NSArray arrayWithObjects : @ "1 tablespoon olive oil", @ "1 onion, chopped", @ "2 cloves garlic", @ "2 1/2 tablespoons curry powder", @ "2 quarts hot water", nil ]; Recipe *recipe10 = [Recipe new ]; recipe10.name = @ "Instant Noodle with Egg"; recipe10.prepTime = @ "8 min"; recipe10.imageFile = @ "instant_noodle_with_egg.jpg"; recipe10.ingredients = [ NSArray arrayWithObjects : @ "1 pack of Instant Noodle", @ "2 eggs", nil ]; Recipe *recipe11 = [Recipe new ]; recipe11.name = @ "Noodle with BBQ Pork"; recipe11.prepTime = @ "20 min"; recipe11.imageFile = @ "noodle_with_bbq_pork.jpg"; recipe11.ingredients = [ NSArray arrayWithObjects : @ "1 pack of Instant Noodle", @ "BBQ pork", @ "Salt and Pepper", nil ]; Recipe *recipe12 = [Recipe new ]; recipe12.name = @ "Japanese Noodle with Pork"; recipe12.prepTime = @ "20 min"; recipe12.imageFile = @ "japanese_noodle_with_pork.jpg"; recipe12.ingredients = [ NSArray arrayWithObjects : @ "1 pack of Japanese Noodle", @ "2 green onions", @ "2 garlic cloves, minced", @ "4 boneless pork loin chops", nil ]; Recipe *recipe13 = [Recipe new ]; recipe13.name = @ "Green Tea"; recipe13.prepTime = @ "5 min"; recipe13.imageFile = @ "green_tea.jpg"; recipe13.ingredients = [ NSArray arrayWithObjects : @ "Green tea", nil ]; Recipe *recipe14 = [Recipe new ]; recipe14.name = @ "Thai Shrimp Cake"; recipe14.prepTime = @ "1.5 hours"; recipe14.imageFile = @ "thai_shrimp_cake.jpg"; recipe14.ingredients = [ NSArray arrayWithObjects : @ "8 oz (250g) peeled and deveined raw shrimp", @ "2 tablespoons red curry paste", @ "1 large egg", @ "2 teaspoon fish sauce", @ "1 tablespoon sugar", @ "2 tablespoons coconut milk", @ "2 tablespoons roughly chopped Thai basil leaves", nil ]; Recipe *recipe15 = [Recipe new ]; recipe15.name = @ "Angry Birds Cake"; recipe15.prepTime = @ "4 hours"; recipe15.imageFile = @ "angry_birds_cake.jpg"; recipe15.ingredients = [ NSArray arrayWithObjects : @ "12 tablespoons (1 1/2 sticks) unsalted butter", @ "2 1/2 cups all-purpose flour", @ "1 tablespoon baking powder", @ "1 teaspoon salt", @ "1 3/4 cups sugar", @ "2 large eggs, plus 3 large egg yolks", @ "1 cup of milk", nil ]; Recipe *recipe16 = [Recipe new ]; recipe16.name = @ "Ham and Cheese Panini"; recipe16.prepTime = @ "10 min"; recipe16.imageFile = @ "ham_and_cheese_panini.jpg"; recipe16.ingredients = [ NSArray arrayWithObjects : @ "2 tablespoons unsalted butter", @ "4 cups thinly sliced shallots", @ "2 teaspoons fresh thyme", @ "1/4 cup grainy Dijon mustard", @ "8 slices rustic white bread", @ "8 slices Gruyere cheese", @ "8 ounces sliced cooked ham", nil ]; recipes = [ NSArray arrayWithObjects :recipe1, recipe2, recipe3, recipe4, recipe5, recipe6, recipe7, recipe8, recipe9, recipe10, recipe11, recipe12, recipe13, recipe14, recipe15, recipe16, nil ]; } |
Redesign the Detail View Controller
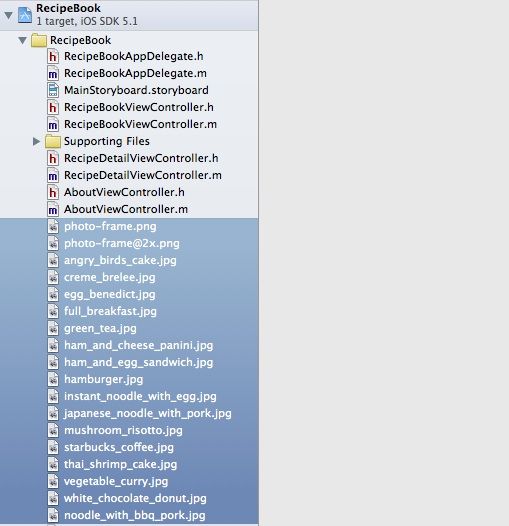
Originally, the detail view controller only displays the name of recipe. We’re going to revamp it to show users more information about a recipe. First, download this image pack and add all the images to the projects.
What’s @2x image?
Since the release of iPhone 4 with Retina display, your app should prepare to support different screen resolutions (i.e. 320×480 for older generation of iPhone and 640×960 for iPhone 4 or later). Apple has made it fairly easy for iOS developers to support multiple resolutions. Applications should include two separate files for each image resource. One file provides a standard-resolution version of a given image, and the second provides a high-resolution version of the same image. The naming conventions for each pair of image files is as follows:
Standard: <ImageName>.<filename_extension>
High resolution: <ImageName>@2x.<filename_extension>
The UIImage class handles all of the work needed to load high-resolution images into your application. When you load an image with UIImage, it automatically determine the screen resolution and loads the corresponding image file. For instance,
UIImage* anImage = [UIImage imageNamed:@"photo-frame"];
The above code will load “[email protected]” on device with high resolution. While on the standard screen resolution, it loads up the “photo-frame.png”.
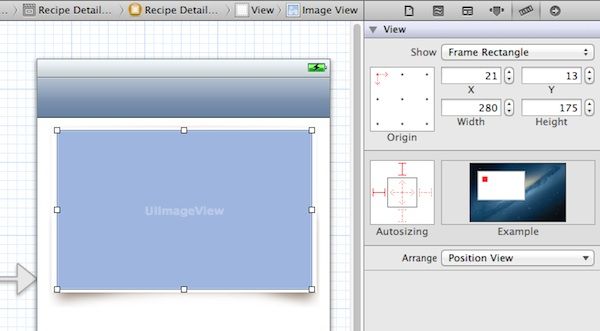
Select the Storyboard and locate the “Recipe Detail View Controller”. First and foremost, delete the “Label” component and add an image view to the detail view. Set the width and height of the image view to 297 and 199 respectively.
Detail View - Add Image View
Select the attribute inspector and set the image to “photo-frame.jpg”. As you set the image, it’ll be automatically loaded and displayed in the Storyboard. This image is used to display a photo frame for the recipe photo.
Detail View - Photo Frame
Next, we add another image view that serves as a placeholder of the recipe photo. Drag the image view from the Object Library and place it over the photo frame like the screen shown below.
Now, add a label and change the text to “Ingredients”. In the attribute inspector, you can change the font size and type by altering the “Font” option. Just use the default system font or pick the one you like. Next, add another label for preparation time. Lastly, drag the Text View object to the view. The Text View is an UI element for displaying multiple lines of text. We’ll use it to display the list of ingredient. Below is the screenshot for your reference:
Detail View - Label and Text View
Establish the Connection Between Variables and UI Elements
With the redesigned interface, we’ll establish the connection between our code and the UI elements. In the Storyboard, select the “Recipe Detail View Controller” and switch to the Assistant Editor.
Show Assistant Editor and Hide Utility Area
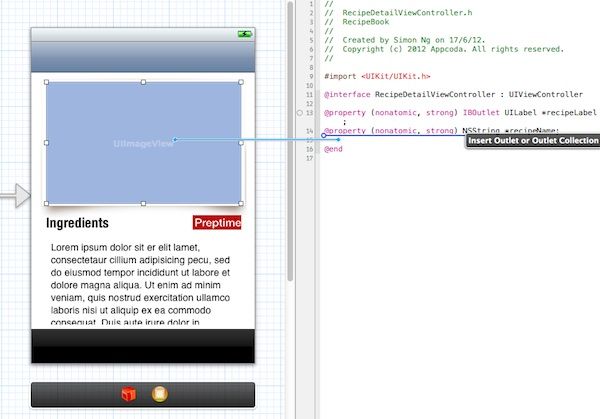
Press and hold the control key, click the image view and drag it towards the “RecipeDetailViewController.h”. As you place the pointer between the “@interface” and “@end” keywords, you should see a prompt that allows you to insert an outlet. Name the outlet variable as “recipePhoto”.
Repeat the same step for the “PrepTime” label and Text View. Name the outlet of PrepTime label as “prepTimeLabel” and that of text view as “ingredientTextView”. Lastly, add a property for recipe. This property allows other controllers to pass the recipe details. After all the changes, the RecipeDetailViewController.h should like this:
|
1
2 3 4 5 6 7 8 9 10 11 12 |
#import <UIKit/UIKit.h>
#import "Recipe.h" @interface RecipeDetailViewController : UIViewController @property (weak, nonatomic ) IBOutlet UIImageView *recipePhoto; @property (weak, nonatomic ) IBOutlet UILabel *prepTimeLabel; @property (weak, nonatomic ) IBOutlet UITextView *ingredientTextView; @property (nonatomic, strong ) Recipe *recipe; @end |
In the viewDidLoad method of the RecipeDetailViewController.m, change it to the following code:
|
1
2 3 4 5 6 7 8 9 10 11 12 13 14 15 |
-
(
void
)viewDidLoad
{ [super viewDidLoad ]; self.title = recipe.name; self.prepTimeLabel.text = recipe.prepTime; self.recipePhoto.image = [UIImage imageNamed :recipe.imageFile ]; NSMutableString *ingredientText = [ NSMutableString string ]; for ( NSString * ingredient in recipe.ingredients ) { [ingredientText appendFormat : @ "%@\n", ingredient ]; } self.ingredientTextView.text = ingredientText; } |
Here, we add code to setup the Recipe Detail View. Line 5 of the code alters the title of navigation bar to the name of recipe. Line 6 and 7 configure the preparation time label and set the recipe photo.
Line 9 to 13 turns the ingredients array into multiple lines of text for the ingredient text view. The “\n” character is an escape character to say “Put a carriage return here”. In other words, it’s a new line indicator.
Passing Recipe to Detail View Controller
As we’ve learnt in the Segue tutorial before, Segues manages the transition between view controllers. When a segue is triggered, before the visual transition occurs, the storyboard runtime invokes prepareForSegue:sender: method of the current view controller. By implementing this method, we can pass any needed data to the view controller that is about to be displayed. Here, we’ll pass the selected recipe object to the detail view controller.
In the prepareForSegue method of RecipeBookViewController.m, change the code to:
|
1
2 3 4 5 6 7 |
-
(
void
)prepareForSegue
:
(UIStoryboardSegue
*
)segue sender
:
(
id
)sender
{
if ( [segue.identifier isEqualToString : @ "showRecipeDetail" ] ) { NSIndexPath *indexPath = [self.tableView indexPathForSelectedRow ]; RecipeDetailViewController *destViewController = segue.destinationViewController; destViewController.recipe = [recipes objectAtIndex :indexPath.row ]; } } |
Line 5 of the above code determines the selected recipe (base on the indexPath) and passes it to the Recipe Detail View Controller (i.e. the destViewController variable).
Run the App
You’ve made it! The final step is to execute the app and see how it works. If your app can run properly, it should give you a much polished Recipe Details.
Recipe app with improved detail view
What’s Next?
I hope you enjoy the tutorial and love the app you just built. It’s not a complex app but it covers some of the most common UI elements such as navigation controller and tab bar controller. Don’t wait for the next tutorial to show you what to do next. I encourage you to tweak the app and make it even better. Say, use a table view (instead of text view) to list out all ingredients or add a new tab item. As I said before, you can’t become a good programmer by just reading a book or this tutorial. You have to explore, make mistake and most importantly code! So base on what you’ve learnt, tweak the app and turn it into your own.
As always, leave us comment to share your thought.
Update: You can download the source code of the Xcode project from here.
转载:http://www.appcoda.com/improve-detail-view-controller-storyboard-segue/


