02 Android 自定义对话框
在做自己的一个小应用时,需要用到一个自定义的对话框,对话框会加载一个自己的layout文件,并且可以任意的添加元素。在网上找了一下,资源不少,但觉得还是应该自己把AlterDialog类继承一下,形成一个自己实现自定义对话框的框架。这样更清晰,主要是方便自己以后开发的使用。
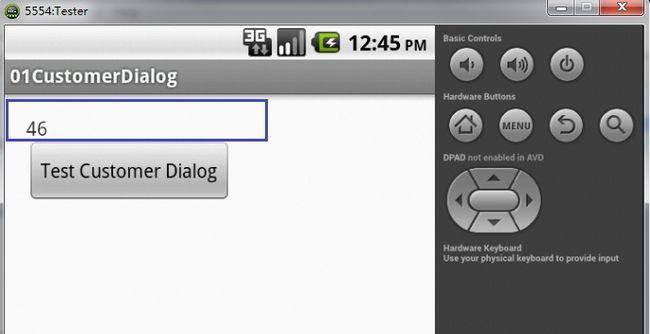
目标程序的运行方式:
1) 主程序:点击按钮
2) 自定义对话框弹出
3) 返回了结果
布局文件
清楚了目标,下面是定义的xml 布局文件。只是个测试程序,布局都很简单。
1) 主程序的布局文件
main_activity.xml
<RelativeLayout xmlns:android="http://schemas.android.com/apk/res/android"
    xmlns:tools="http://schemas.android.com/tools"
    android:layout_width="match_parent"
    android:layout_height="match_parent"
    android:paddingBottom="@dimen/activity_vertical_margin"
    android:paddingLeft="@dimen/activity_horizontal_margin"
    android:paddingRight="@dimen/activity_horizontal_margin"
    android:paddingTop="@dimen/activity_vertical_margin"
    tools:context=".MainActivity" >

    <TextView
        android:id="@+id/textView1"
        android:layout_width="wrap_content"
        android:layout_height="wrap_content"
        android:text="返回值 " />

    <Button
        android:id="@+id/btnTest"
        android:layout_width="wrap_content"
        android:layout_height="wrap_content"
        android:layout_alignParentLeft="true"
        android:layout_below="@+id/textView1"
        android:text="Test Customer Dialog" />

</RelativeLayout>
2) 自定义对话框的布局文件
customer_layout.xml
<?xml version="1.0" encoding="utf-8"?>
<LinearLayout xmlns:android="http://schemas.android.com/apk/res/android"
    android:layout_width="wrap_content"
    android:layout_height="wrap_content"
    android:orientation="vertical"
    android:id="@+id/mirror_size_dialog">


    <TextView
        android:id="@+id/id_ViewSize"
        android:layout_width="fill_parent"
        android:layout_height="wrap_content"
        android:textColor ="@color/White"
        android:text="当前值" />

    <SeekBar
        android:id="@+id/id_Size"
        android:layout_width="fill_parent"
        android:layout_height="wrap_content"
        android:max="100"
        android:progress="50"
        android:secondaryProgress="100" >
    </SeekBar>

</LinearLayout>
主要的框架程序
这个程序主要的目标就是简单清晰,方便以后可以直接进行丰富。
MainActivity.java
package com.example.customerdialog;

import android.os.Bundle;
import android.app.Activity;
import android.view.Menu;
import android.view.View;
import android.widget.Button;
import android.widget.TextView;

public class MainActivity extends Activity {

    private TextView m_txtviewRetValue;
    private Button m_btnDlgTest;


    @Override
    protected void onCreate(Bundle savedInstanceState) {
        super.onCreate(savedInstanceState);
        setContentView(R.layout.activity_main);

        m_txtviewRetValue = (TextView) findViewById(R.id.textView1);
        m_btnDlgTest = (Button) findViewById(R.id.btnTest);

        m_btnDlgTest.setOnClickListener(new Button.OnClickListener(){//创建监听
            public void onClick(View v) {
                customer_dialog dlg = new   customer_dialog(MainActivity.this, 20);
                dlg.show();
            }
        });
    }

    public void setRetValue(String string)
    {
    	m_txtviewRetValue.setText("" + string);
    }

    @Override
    public boolean onCreateOptionsMenu(Menu menu) {
        // Inflate the menu; this adds items to the action bar if it is present.
        getMenuInflater().inflate(R.menu.main, menu);
        return true;
    }

}
customer_dialog.java
自定一对话框类中的几个要点
1) 构造函数中可以传人几个参数,来满足对话框进行初始化的需要。
2) 使用AlterDialog.Builder 来创建我们需要的对话框
3) 设置对话框的layout文件,并取得对话框中的控件对象。
4) 对话框的操作按钮添加listener
5) 为其他控件添加处理
package com.example.customerdialog;

import android.app.AlertDialog;
import android.content.Context;
import android.content.DialogInterface;
import android.view.LayoutInflater;
import android.view.View;
import android.widget.SeekBar;
import android.widget.SeekBar.OnSeekBarChangeListener;
import android.widget.TextView;


public class customer_dialog extends AlertDialog
{
    private SeekBar m_seekBarCurrentSize;
    private TextView m_txtviewCurrentSize;
    private AlertDialog.Builder m_DlgBuilder;
    private DialogInterface.OnClickListener m_btnOkListener;
    private int m_nSize = 30;
    private MainActivity m_mActivy;

    protected customer_dialog(Context context, int nSize)
    {
        super(context);
        m_mActivy = (MainActivity)context;

        m_DlgBuilder = new AlertDialog.Builder(context);

        // here setting the customer layout
        LayoutInflater inflater = getLayoutInflater();
        final View SizeView = inflater.inflate(R.layout.customer_layout, null);

        // find the component ID in the new layout
        m_seekBarCurrentSize = (SeekBar) SizeView.findViewById(R.id.id_Size);
        m_txtviewCurrentSize = (TextView) SizeView.findViewById(R.id.id_ViewSize);

        m_nSize = nSize;
        m_txtviewCurrentSize.setText("当前值: " + m_nSize);

        m_seekBarCurrentSize.setProgress(m_nSize);
        m_seekBarCurrentSize.setOnSeekBarChangeListener(new OnSeekBarChangeListener()
        {
            public void onProgressChanged(SeekBar arg0,
                                          int progress,
                                          boolean fromUser)
            {
                m_txtviewCurrentSize.setText("当前值: " + progress);
                m_nSize = progress;
            }

            @Override
            public void onStartTrackingTouch(SeekBar seekBar)
            {
                // TODO Auto-generated method stub
            }

            @Override
            public void onStopTrackingTouch(SeekBar seekBar)
            {
                // TODO Auto-generated method stub
            }
        });

        m_DlgBuilder.setTitle("自定义对话框");
        m_DlgBuilder.setView(SizeView);
        m_btnOkListener = new DialogInterface.OnClickListener()
        {
            public void onClick(DialogInterface dialog, int whichButton)
            {
                m_mActivy.setRetValue(Integer.toString(m_nSize));
            }
        };
        m_DlgBuilder.setPositiveButton("确定", m_btnOkListener);
    }

    public void show()
    {
        m_DlgBuilder.create().show();
    }


    protected void onCreate(android.os.Bundle savedInstanceState)
    {
        super.onCreate(savedInstanceState);
    }
}
Ok, 下次可以直接使用自己画的对话框了。
一些资源:
http://www.cnblogs.com/Gaojiecai/archive/2011/12/10/2283156.html

