中断处理
本文导读:中断处理是驱动程序开发中的重点,本文结合内核源码分析了中断上部分和下部分的实现机制
Keywords:软中断, tasklet,工作队列 by huangjl
中断处理程序是在内核空间执行的例程,而它所运行的环境称为中断上下文,是内核管理硬件的驱动程序的组成部分。应当明确,中断处理程序不在进程上下文中,不能调度,故一旦阻塞,将会导致某个进程僵死,另外,如果进程间同步没有处理好同样会导致在中断处理程序中僵死,例如无法成功获取某个自旋锁,一直在那打转。
1. 中断的上半部分
中断的注册:
#include <linux/interrupt.h>
intrequest_irq(unsigned intirq, irqreturn_t (*handler)(), unsigned long flags, const char *dev_name, void *dev_id);
irq:中断线号
handler:中断处理程序
flags:表明此中断线的属性。常用SA_SHIRQ表示中断共享
dev_id:传递给中断处理程序的参数
中断的释放:
voidfree_irq(unsigned intirq, void *dev_id); // 该参数与前面一致
中断处理程序:
Static irqreturn_tintr_handler(intirq, void *dev_id, structpt_regs *regs);
关于中断,申请了一条中断线成功后,该中断线就被禁止其他使用(除了中断共享),由于是本中断申请了中断号,故不存在本中断处理程序重入的问题。换句话说,第一次申请成功后,第二次绝对会失败。【关于中断处理程序返回值:内核版本v2.6之前只需要返回void就行了,但现在可返回值,这点与以前有所区别】
中断控制:
| 函数 |
说明 |
| void local_irq_disable(void); |
禁止本地中断 |
| void local_irq_enable(void); |
使能本地中断 |
| void local_irq_save(unsigned long flags); |
保存中断状态,禁止本地中断 |
| void local_irq_restore(unsigned long flags); |
恢复中断状态,恢复本地中断 |
| void disable_irq(intirq); |
禁止某条中断线 |
| void disable_irq_nosync(intirq); |
|
| void enable_irq(intirq); |
使能某条中断线 |
2. 中断下半部分
在第一部分说到了中断处理的上半部分只能通过注册中断处理程序来完成,通常情况下,为了提高系统响应能力,将繁重的工作交到下半部分执行
2.1软中断
/*******************/include/linux/interrupt.h************************/
enum
{
HI_SOFTIRQ=0,
TIMER_SOFTIRQ,
NET_TX_SOFTIRQ,
NET_RX_SOFTIRQ,
BLOCK_SOFTIRQ,
BLOCK_IOPOLL_SOFTIRQ,
TASKLET_SOFTIRQ,
SCHED_SOFTIRQ,
HRTIMER_SOFTIRQ,
RCU_SOFTIRQ, /* Preferable RCU should always be the last softirq */
NR_SOFTIRQS
};
extern char *softirq_to_name[NR_SOFTIRQS];
structsoftirq_action
{
void (*action)(structsoftirq_action *);
};
asmlinkage void do_softirq(void);
asmlinkage void __do_softirq(void);
extern void open_softirq(int nr, void (*action)(structsoftirq_action *));
extern void softirq_init(void);
/*******************/include/linux/interrupt.h************************/
Interrupt.c中申明的:
staticstructsoftirq_actionsoftirq_vec[NR_SOFTIRQS] __cacheline_aligned_in_smp;
内核共有10项软中断向量,
由于添加属于自己的软中断需要修改响应内核代码,该中断下半部分处理方式现在只在网络和SISC两个子系统中使用,一般情况下,我们不需要直接使用软中断,除非那些对响应速度非常高并且执行非常频繁的关键代码段。关于软中断只需要了解下就可以了,详情查看Linux内核设计与实现相关章节。
2.2 tasklet
由于tasklet的实现依赖于软中断,其实它就是软中断,tasklet由两类软中断代表:HI_SOFTIRQ,TASKLET_SOFTIRQ
/*******************/include/linux/interrupt.h************************/
structtasklet_struct
{
structtasklet_struct *next;
unsigned long state;
atomic_t count;
void (*func)(unsigned long);
unsigned long data;
};
/*******************/include/linux/interrupt.h************************/
通过代码注释,同一个tasklet与通常的软中断区别在于它只能同时运行在一个CPU上
,与其他底半部处理机制不同在于:不同的tasklet可能运行在不同CPU上。
Tasklet的两种状态:
enum
{
TASKLET_STATE_SCHED, /* Tasklet is scheduled for execution */
TASKLET_STATE_RUN /* Tasklet is running (SMP only) */
};
Tasklet调度:
static inline void tasklet_schedule(structtasklet_struct *t);
static inline void tasklet_hi_schedule(structtasklet_struct *t);
两个函数只是优先级不同: TASKLET_SOFTIRQ,HI_SOFTIRQ.先看看tasklet_schedule的实现:
static inline void tasklet_schedule(structtasklet_struct *t)
{
if (!test_and_set_bit(TASKLET_STATE_SCHED, &t->state))
__tasklet_schedule(t);
}
void __tasklet_schedule(structtasklet_struct *t)
{
unsigned long flags;
local_irq_save(flags);
t->next = NULL;
*__get_cpu_var(tasklet_vec).tail = t;
__get_cpu_var(tasklet_vec).tail = &(t->next);
raise_softirq_irqoff(TASKLET_SOFTIRQ);
local_irq_restore(flags);
}
该调度函数其实只做两件事:将t加入tasklet_vec队尾并唤醒tasklet软中断[注:系统中有两个调度链表,头部分别是tasklet_vec和tasklet_hi_vec,区别还是在于优先级的不同]
#define DECLARE_TASKLET(name, func, data) \
structtasklet_struct name = { NULL, 0, ATOMIC_INIT(0), func, data }
#define DECLARE_TASKLET_DISABLED(name, func, data) \
structtasklet_struct name = { NULL, 0, ATOMIC_INIT(1), func, data }
申明tasklet,注意在自己程序中使用宏的技巧,通常这样初始化很简洁,速度很快。
注明:tasklet和软中断都处于中断上下文中,故绝对不能睡眠。关于tasklet的使用,详见相关手册
2.3 工作队列(work queue)
2.3.1工作队列的实现
软中断和tasklet在中断上下文实现,而工作队列却将底半部工作交由内核线程处理,(CPU核都有一个内核线程,这些线程通常命名为events/0,event/1类似的形式)因此,它处于进程上下文中,因此可以阻塞。因此,如果中断程序需要处理 例如I/O,申请大量内存这样的事情,那么workqueue是唯一选择,在进程上下文中可充分享受调度的优势,可睡眠,适合用在事情不是那么紧急的场合。【events/n】
/*****************workqueue.c******************************/
/*
* The externally visible workqueue abstractionis an array of
* per-CPU workqueues:
*/
structworkqueue_struct {
struct cpu_workqueue_struct*cpu_wq;
struct list_head list;
const char *name;
int singlethread;
int freezeable; /* Freeze threadsduring suspend */
int rt;
#ifdefCONFIG_LOCKDEP
struct lockdep_maplockdep_map;
#endif
};
工作者线程的数据结构表示,由注释可知,外部可见的工作队列是CPU工作队列数组,下面来看看CPU工作队列结构:
structcpu_workqueue_struct {
spinlock_t lock;
struct list_head worklist;
wait_queue_head_t more_work;
struct work_struct*current_work;
struct workqueue_struct *wq;
struct task_struct *thread;
}____cacheline_aligned;
既然是为每个CPU分配了工作队列,队列中必须有需要完成的任务,这个任务在cpu_workqueue_struct中表示为work_struct,具体结构如下:
structwork_struct {
atomic_long_t data;
#defineWORK_STRUCT_PENDING 0 /*T if work item pending execution */
#defineWORK_STRUCT_STATIC 1 /* staticinitializer (debugobjects) */
#defineWORK_STRUCT_FLAG_MASK (3UL)
#defineWORK_STRUCT_WQ_DATA_MASK (~WORK_STRUCT_FLAG_MASK)
struct list_head entry;
work_func_t func;
#ifdefCONFIG_LOCKDEP
struct lockdep_maplockdep_map;
#endif
};
从该结构中主要表示该工作的状态,以及运行时候的回调函数.每个CPU上都有这样的工作链表,当工作者从等待队列中唤醒时,它会执行这个链表中的所有回调函数,然后继续睡眠,所有的工作者线程都会执行worker_thread函数。函数具体实现如下:
staticint worker_thread(void *__cwq)
{
struct cpu_workqueue_struct*cwq = __cwq;
DEFINE_WAIT(wait);
if(cwq->wq->freezeable)
set_freezable();
for (;;) {
prepare_to_wait(&cwq->more_work,&wait, TASK_INTERRUPTIBLE);
if(!freezing(current) &&
!kthread_should_stop() &&
list_empty(&cwq->worklist))
schedule();
finish_wait(&cwq->more_work,&wait);
try_to_freeze();
if(kthread_should_stop())
break;
run_workqueue(cwq);
}
return 0;
}
这个函数做了如下的事情
(1)定义一个等待队列,并将工作添加到等待队列中,并将当前的自己设置成休眠状态
(2)如果链表中为空,调度后继续睡眠,如果有对象进入链表,则从等待队列中脱离,并将自己设置成可执行状态.
(3)运行cpu_workqueue_struct结构中任务的所有函数
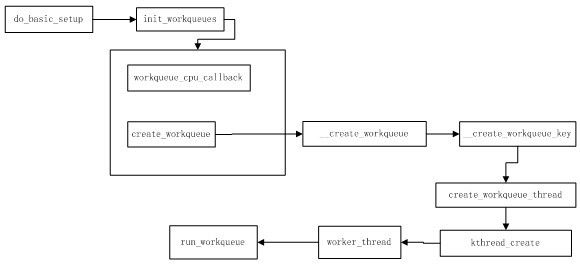
说了一大堆东西,现在是该从全局的角度来看看到底发生了什么,现在从系统的角度从头开始来看,关于子系统的初始化过程参见我的另一个文档(USB子系统的实现)
![]()
系统在初始化子系统的时候就初始化工作队列(在main.c文件中)整个过程如下:
从分析这个过程可知,每个CPU都创建了属于自己的工作队列线程,而每个工作队列线程由worker_thread函数来执行,对于单CPU来说,cpu_workqueue_struct直接将wq指针直接指向workqueue_struct, workqueue_struct的cpu_wq指针直接指向cpu_workqueue_struct,图中指出了工作队列的实现路线,在最终的run_workqueue函数里,调用了所要完成任务的函数指针来完成剩余的工作,以上讨论了工作队列的现实,关于具体的源码请参见源码.现在只有一个问题还没有解决,工作是怎么加入CPU工作队列的. 工作是与具体函数相关联的.而这个函数则是驱动程序定义了,所以还是先来看看工作队列是怎么使用的.
下面来结合工作队列的接口使用来讲述,可能会更加清楚一些.,前面已经描述过, 工作者线程分为两类:1.默认处理器工作线程(events)。2. 自创工作线程.
2.3.2工作队列的使用
1.首先看看默认工作线程用法:
DECLARE_WORK(name, void (*function)(void*), void *data);
INIT_WORK(struct work_struct *work, void(*function)(void *), void *data);
int schedule_work(struct work_struct*work);
int schedule_delayed_work(structwork_struct *work, unsigned long delay);
void flush_scheduled_work(void);
从这几个函数来说,创建一个work_struct结构后,这个结构与函数指针相关联,之后可充分利用调度的优势,即函数schedule_work函数来使我们的函数来执行.整个函数相当简单
2.自创工作线程的使用方法
struct workqueue_struct*create_workqueue(const char *name);
struct workqueue_struct*create_singlethread_workqueue(const char *name);
void destroy_workqueue(structworkqueue_struct *queue);
int queue_work(struct workqueue_struct*queue, struct work_struct *work);
int queue_delayed_work(structworkqueue_struct *queue, struct work_struct *work, unsigned long delay);
该函数接口与前面差别不大,值得一提的是,使用函数create_workqueue来创建工作线程的时候,有多少个处理器就会创建多少个,如果你有四个处理器,那么就会创建四个,工作队列就是这样实现的,可参见内核源码,如果确实需要性能上的提高,最后使用默认工作线程, 这也是很多书籍推荐使用默认线程原因.
默认工作线程schedule_work调用了queue_work,只是struct workqueue_struct *queue参数传入了(keventd_wq = create_workqueue("events"))keventd_wq.
方法2中创建工作队列,也是调用默认工作线程所使用的函数,queue_work将工作与工作队列相关联并进行调度,具体使用不再详述.
前面留下一个问题:工作是怎么加入CPU关联的工作队列的?
queue_work函数中有个函数insert_work(cwq, work, &cwq->worklist);而这个work是我们用相关接口定义的,这样,work就加入了cwq->worklist链表中.好了,工作队列的讨论就此结束了.只要静心的去分析,一切都不是很难.,上面的中断知识对驱动开发就足够了,中断的讨论就告一段落了
Writed by huangjl
2012.1.25
http://blog.csdn.net/huangjl2012/article/details/7256121
