IOS开发基础知识--碎片50
1:Masonry 2个或2个以上的控件等间隔排序
/**
 *  多个控件固定间隔的等间隔排列,变化的是控件的长度或者宽度值
 *
 *  @param axisType        轴线方向
 *  @param fixedSpacing    间隔大小
 *  @param leadSpacing     头部间隔
 *  @param tailSpacing     尾部间隔
 */
- (void)mas_distributeViewsAlongAxis:(MASAxisType)axisType
                    withFixedSpacing:(CGFloat)fixedSpacing l
                          eadSpacing:(CGFloat)leadSpacing
                         tailSpacing:(CGFloat)tailSpacing;

/**
 *  多个固定大小的控件的等间隔排列,变化的是间隔的空隙
 *
 *  @param axisType        轴线方向
 *  @param fixedItemLength 每个控件的固定长度或者宽度值
 *  @param leadSpacing     头部间隔
 *  @param tailSpacing     尾部间隔
 */
- (void)mas_distributeViewsAlongAxis:(MASAxisType)axisType
                 withFixedItemLength:(CGFloat)fixedItemLength
                         leadSpacing:(CGFloat)leadSpacing
                         tailSpacing:(CGFloat)tailSpacing;
使用方法很简单,因为它是NSArray的类扩展:
//  创建水平排列图标 arr中放置了2个或连个以上的初始化后的控件
//  alongAxis 轴线方向   固定间隔     头部间隔      尾部间隔
[arr mas_distributeViewsAlongAxis:MASAxisTypeHorizontal withFixedSpacing:20 leadSpacing:5 tailSpacing:5];
[arr makeConstraints:^(MASConstraintMaker *make) {
       make.top.equalTo(@60);
       make.height.equalTo(@60);
}];
实例:
       NSMutableArray *mutableArr = [[NSMutableArray alloc] initWithCapacity:6];
        for (int i=0; i<3; i++) {
            UIButton *button = [[UIButton alloc] init];
            [button setTitle:strArr[i] forState:UIControlStateNormal];
            [button setTitleColor:[UIColor blackColor] forState:UIControlStateNormal];
            button.layer.borderColor = [UIColor blackColor].CGColor;
            [button addTarget:self action:@selector(show:) forControlEvents:UIControlEventTouchUpInside];
            button.layer.borderWidth = 2;
            [self addSubview:button];
            [mutableArr addObject:button];
        }

                [mutableArr mas_distributeViewsAlongAxis:MASAxisTypeHorizontal withFixedSpacing:20 leadSpacing:20 tailSpacing:20];
                [mutableArr mas_makeConstraints:^(MASConstraintMaker *make) {
                    make.top.equalTo(@120);
                    make.height.equalTo(@75);
                }];
2:YYLabel的简单使用
NSString *title = @"不得不说 YYKit第三方框架确实很牛,YYLabel在富文本显示和操作方面相当强大,尤其是其异步渲染,让界面要多流畅有多流畅,这里我们介绍下简单的使用";

    //YYLabel 富文本
    YYLabel  *titleLabel = [YYLabel new];

    //异步渲染 当一个label显示巨量文字的时候就能明显感觉到此功能的强大
    titleLabel.displaysAsynchronously = YES;
    [self.view addSubView:titleLabel];

    titleLable.numOfLines = 0;
    YYTextContainer  *titleContarer = [YYTextContainer new];

     //限制宽度
    detailContarer.size             = CGSizeMake(100,CGFLOAT_MAX);
    NSMutableAttributedString  *titleAttr = [self getAttr:title];
    YYTextLayout *titleLayout = [YYTextLayout layoutWithContainer:titleContarer text:titleAttr];

    CGFloat titleLabelHeight = titleLayout.textBoundingSize.height;
    titleLabel.frame = CGRectMake(50,50,100,titleLabelHeight);
- (NSMutableAttributedString*)getAttr:(NSString*)attributedString {
        NSMutableAttributedString * resultAttr = [[NSMutableAttributedString alloc] initWithString:attributedString];

        //对齐方式 这里是 两边对齐
        resultAttr.yy_alignment = NSTextAlignmentJustified;
        //设置行间距
        resultAttr.yy_lineSpacing = 5;
        //设置字体大小
        resultAttr.yy_font = [UIFont systemFontOfSize:CONTENT_FONT_SIZE];
        //可以设置某段字体的大小
        //[resultAttr yy_setFont:[UIFont boldSystemFontOfSize:CONTENT_FONT_SIZE] range:NSMakeRange(0, 3)];
        //设置字间距
        //resultAttr.yy_kern = [NSNumber numberWithFloat:1.0];

        return resultAttr;

}
3:appStore版本号检测及更新实例
//1一定要先配置自己项目在商店的APPID,配置完最好在真机上运行才能看到完全效果哦!
#define STOREAPPID @"1104867082"

@interface ViewController ()
@end

@implementation ViewController

 *  天朝专用检测app更新
 */
-(void)hsUpdateApp
{
    //2先获取当前工程项目版本号
    NSDictionary *infoDic=[[NSBundle mainBundle] infoDictionary];
    NSLog(@"%@",infoDic);
    NSString *currentVersion=infoDic[@"CFBundleShortVersionString"];

    //3从网络获取appStore版本号
    NSError *error;
    NSData *response = [NSURLConnection sendSynchronousRequest:[NSURLRequest requestWithURL:[NSURL URLWithString:[NSString stringWithFormat:@"http://itunes.apple.com/cn/lookup?id=%@",STOREAPPID]]] returningResponse:nil error:nil];
    if (response == nil) {
        NSLog(@"你没有连接网络哦");
        return;
    }
    NSDictionary *appInfoDic = [NSJSONSerialization JSONObjectWithData:response options:NSJSONReadingMutableLeaves error:&error];
    if (error) {
        NSLog(@"hsUpdateAppError:%@",error);
        return;
    }
//    NSLog(@"%@",appInfoDic);
    NSArray *array = appInfoDic[@"results"];

    if (array.count < 1) {
        NSLog(@"此APPID为未上架的APP或者查询不到");
        return;
    }

    NSDictionary *dic = array[0];
    NSString *appStoreVersion = dic[@"version"];
    //打印版本号
    NSLog(@"当前版本号:%@\n商店版本号:%@",currentVersion,appStoreVersion);
    //设置版本号
    currentVersion = [currentVersion stringByReplacingOccurrencesOfString:@"." withString:@""];
    if (currentVersion.length==2) {
        currentVersion  = [currentVersion stringByAppendingString:@"0"];
    }else if (currentVersion.length==1){
        currentVersion  = [currentVersion stringByAppendingString:@"00"];
    }
    appStoreVersion = [appStoreVersion stringByReplacingOccurrencesOfString:@"." withString:@""];
    if (appStoreVersion.length==2) {
        appStoreVersion  = [appStoreVersion stringByAppendingString:@"0"];
    }else if (appStoreVersion.length==1){
        appStoreVersion  = [appStoreVersion stringByAppendingString:@"00"];
    }

    //4当前版本号小于商店版本号,就更新
    if([currentVersion floatValue] < [appStoreVersion floatValue])
    {
        UIAlertController *alercConteoller = [UIAlertController alertControllerWithTitle:@"版本有更新" message:[NSString stringWithFormat:@"检测到新版本(%@),是否更新?",dic[@"version"]] preferredStyle:UIAlertControllerStyleAlert];
        UIAlertAction *actionYes = [UIAlertAction actionWithTitle:@"更新" style:UIAlertActionStyleDefault handler:^(UIAlertAction * _Nonnull action) {
            //此处加入应用在app store的地址,方便用户去更新,一种实现方式如下
            NSURL *url = [NSURL URLWithString:[NSString stringWithFormat:@"https://itunes.apple.com/us/app/id%@?ls=1&mt=8", STOREAPPID]];
            [[UIApplication sharedApplication] openURL:url];
        }];
        UIAlertAction *actionNo = [UIAlertAction actionWithTitle:@"取消" style:UIAlertActionStyleCancel handler:^(UIAlertAction * _Nonnull action) {

        }];
        [alercConteoller addAction:actionYes];
        [alercConteoller addAction:actionNo];
        [self presentViewController:alercConteoller animated:YES completion:nil];
    }else{
        NSLog(@"版本号好像比商店大噢!检测到不需要更新");
    }

}
4:TCP协议中的三次握手和四次挥手(图解)
注意:左右两竖线是两端不同的状态,中间是传递
三次握手连接:
首先Client端发送连接请求报文,Server段接受连接后回复ACK报文,并为这次连接分配资源。Client端接收到ACK报文后也向Server段发生ACK报文,并分配资源,这样TCP连接就建立了。
四次握手断开:
假设Client端发起中断连接请求,也就是发送FIN报文。Server端接到FIN报文后,意思是说"我Client端没有数据要发给你了",但是如果你还有数据没有发送完成,则不必急着关闭Socket,可以继续发送数据。所以你先发送ACK,"告诉Client端,你的请求我收到了,但是我还没准备好,请继续你等我的消息"。这个时候Client端就进入FIN_WAIT状态,继续等待Server端的FIN报文。当Server端确定数据已发送完成,则向Client端发送FIN报文,"告诉Client端,好了,我这边数据发完了,准备好关闭连接了"。Client端收到FIN报文后,"就知道可以关闭连接了,但是他还是不相信网络,怕Server端不知道要关闭,所以发送ACK后进入TIME_WAIT状态,如果Server端没有收到ACK则可以重传。“,Server端收到ACK后,"就知道可以断开连接了"。Client端等待了2MSL后依然没有收到回复,则证明Server端已正常关闭,那好,我Client端也可以关闭连接了。Ok,TCP连接就这样关闭了!
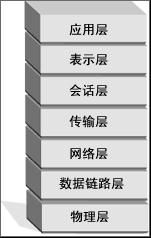
1.物理层:主要定义物理设备标准,如网线的接口类型、光纤的接口类型、各种传输介质的传输速率等。它的主要作用是传输比特流(就是由1、0转化为电流强弱来进行传输,到达目的地后在转化为1、0,也就是我们常说的数模转换与模数转换)。这一层的数据叫做比特。
2.数据链路层:定义了如何让格式化数据以进行传输,以及如何让控制对物理介质的访问。这一层通常还提供错误检测和纠正,以确保数据的可靠传输。
3.网络层:在位于不同地理位置的网络中的两个主机系统之间提供连接和路径选择。Internet的发展使得从世界各站点访问信息的用户数大大增加,而网络层正是管理这种连接的层。
4.传输层:定义了一些传输数据的协议和端口号(WWW端口80等),如:TCP(传输控制协议,传输效率低,可靠性强,用于传输可靠性要求高,数据量大的数据),UDP(用户数据报协议,与TCP特性恰恰相反,用于传输可靠性要求不高,数据量小的数据,如QQ聊天数据就是通过这种方式传输的)。 主要是将从下层接收的数据进行分段和传输,到达目的地址后再进行重组。常常把这一层数据叫做段。
5.会话层:通过传输层(端口号:传输端口与接收端口)建立数据传输的通路。主要在你的系统之间发起会话或者接受会话请求(设备之间需要互相认识可以是IP也可以是MAC或者是主机名)
6.表示层:可确保一个系统的应用层所发送的信息可以被另一个系统的应用层读取。例如,PC程序与另一台计算机进行通信,其中一台计算机使用扩展二一十进制交换码(EBCDIC),而另一台则使用美国信息交换标准码(ASCII)来表示相同的字符。如有必要,表示层会通过使用一种通格式来实现多种数据格式之间的转换。
7.应用层: 是最靠近用户的OSI层。这一层为用户的应用程序(例如电子邮件、文件传输和终端仿真)提供网络服务。
5:关于QBImagePickerController选择单张
- (void)qb_imagePickerController:(QBImagePickerController *)imagePickerController didSelectAsset:(ALAsset *)asset{
    NSMutableArray *selectedAssetURLs = [NSMutableArray new];
    NSMutableArray *projectBLSImageInfo = [NSMutableArray new];


    NSURL *assetURL = [asset valueForProperty:ALAssetPropertyAssetURL];
    [selectedAssetURLs addObject:assetURL];

    BLSImageInfo *tweetImg = [BLSImageInfo tweetImageWithAssetURL:assetURL];
    [projectBLSImageInfo addObject:tweetImg];

    dispatch_async(dispatch_get_global_queue(DISPATCH_QUEUE_PRIORITY_DEFAULT, 0), ^{
        self.curProjectImage.selectedAssetURLs = selectedAssetURLs;
        self.curProjectImage.projectImages=projectBLSImageInfo;

    [self dismissViewControllerAnimated:YES completion:nil];
}
- (void)qb_imagePickerControllerDidCancel:(QBImagePickerController *)imagePickerController{
    [self dismissViewControllerAnimated:YES completion:nil];
}
单张执行 qb_imagePickerController:(QBImagePickerController *)imagePickerController didSelectAsset:(ALAsset *)asset
如果是多张则是执行:qb_imagePickerController:(QBImagePickerController *)imagePickerController didSelectAssets:(NSArray *)assets
- (void)qb_imagePickerController:(QBImagePickerController *)imagePickerController didSelectAssets:(NSArray *)assets{
    NSMutableArray *selectedAssetURLs = [NSMutableArray new];
    NSMutableArray *projectBLSImageInfo = [NSMutableArray new];
    [imagePickerController.selectedAssetURLs enumerateObjectsUsingBlock:^(id obj, NSUInteger idx, BOOL *stop) {
        [selectedAssetURLs addObject:obj];
        BLSImageInfo *tweetImg = [BLSImageInfo tweetImageWithAssetURL:obj];
        [projectBLSImageInfo addObject:tweetImg];
    }];
    dispatch_async(dispatch_get_global_queue(DISPATCH_QUEUE_PRIORITY_DEFAULT, 0), ^{
        self.curProjectImage.selectedAssetURLs = selectedAssetURLs;
        self.curProjectImage.projectImages=projectBLSImageInfo;
        dispatch_after(dispatch_time(DISPATCH_TIME_NOW, (int64_t)(1.0 * NSEC_PER_SEC)), dispatch_get_main_queue(), ^{
            [self.myTableView reloadRowsAtIndexPaths:[NSArray arrayWithObject:[NSIndexPath indexPathForRow:0 inSection:1]] withRowAnimation:UITableViewRowAnimationFade];
        });
    });
    [self dismissViewControllerAnimated:YES completion:nil];
}
- (void)qb_imagePickerControllerDidCancel:(QBImagePickerController *)imagePickerController{
    [self dismissViewControllerAnimated:YES completion:nil];
}
还要结合相应的属性进行:
        QBImagePickerController *imagePickerController = [[QBImagePickerController alloc] init];
        [imagePickerController.selectedAssetURLs removeAllObjects];
        [imagePickerController.selectedAssetURLs addObjectsFromArray:self.curProjectImage.selectedAssetURLs];
        imagePickerController.filterType = QBImagePickerControllerFilterTypePhotos;
        imagePickerController.delegate = self;
        imagePickerController.allowsMultipleSelection = YES;
        UINavigationController *navigationController = [[UINavigationController alloc] initWithRootViewController:imagePickerController];
        [self presentViewController:navigationController animated:YES completion:NULL];
