Andriod自定义View之(下拉刷新)
学习自定义View已经有一段时间了,现在都有个毛病了,看了其它应用一些效果,然后就在那研究半天,这个东西我能实现吗?我能! 哈哈哈,以前我都是看到自定义控件望尘莫及的,现在都能有点自信的说我能了,不错!只要坚持并不断总结,一定会有收获的,废话不说了,今天也算是前面学习自定义View的一个总结,一步一步的实现一个下拉刷新View。
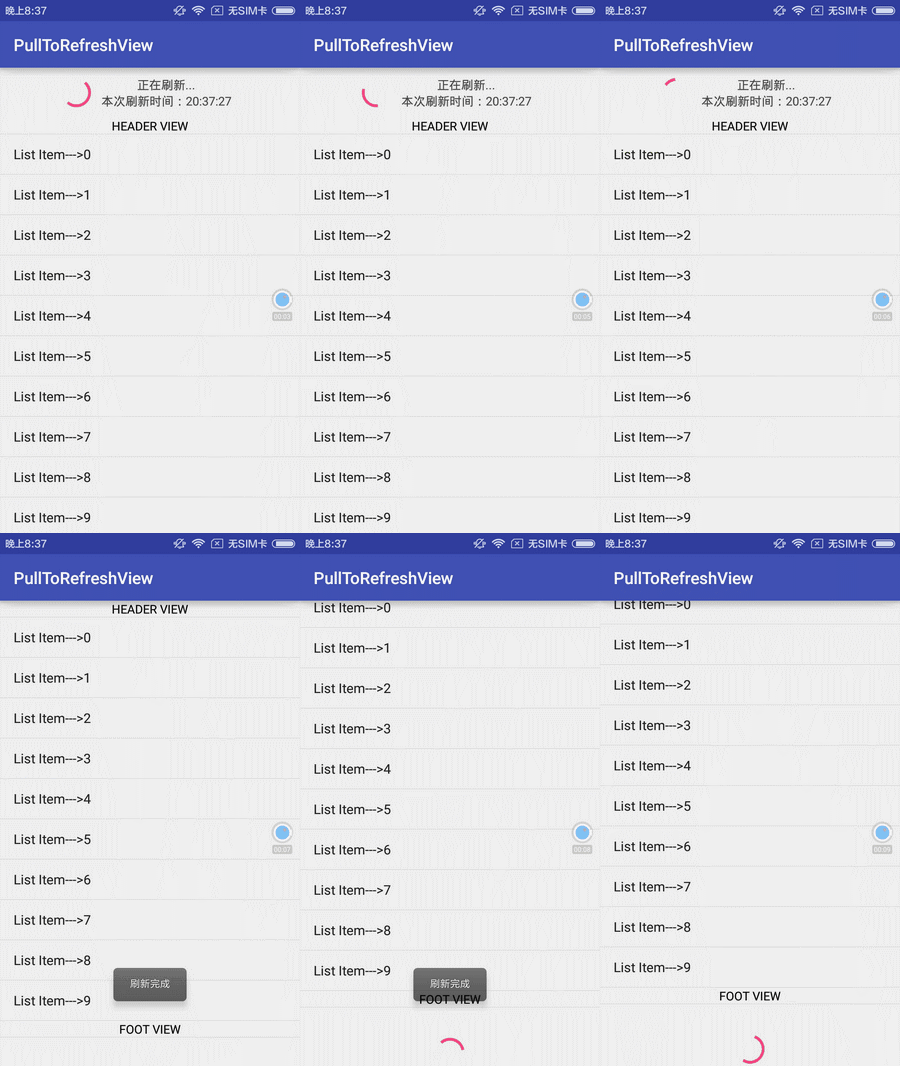
滑动到顶部的时候弹出下拉刷新,滑动到底部自动弹出进度条加载更多,也可以手动上拉加载更多
当然如果只用ListView的话也可以直接拿代码用:https://github.com/913453448/PullToRefreshView
先看下效果:

实现思路:
1、还是自定一个View继承LineaLayout,orientation为Vertical
2、定义一个HeaderView放在LinearLayout的顶部,ListView放中间,自定义一个FooterView放在最底下。
3、通过改变HeaderVeiw的topMargin来实现刷新控件的显示与隐藏。
可能我这样说有一点抽象了,下面我通过改变布局文件来演示下显示的过程:
首先我们定义一个Layout文件
test.layout:
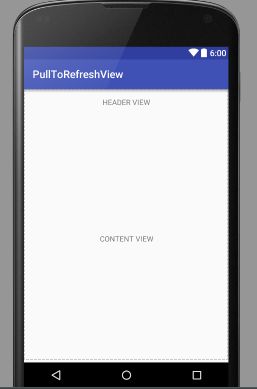
1、把HeaderView的topMargin设置0,这个时候我们的HeaderView是显示出来的,也就是下拉刷新中。
<LinearLayout xmlns:android="http://schemas.android.com/apk/res/android" android:layout_width=match_parent android:layout_height=match_parent android:orientation=vertical>
    <TextView  android:layout_marginTop=0dp android:layout_gravity=center android:gravity=center android:layout_width=wrap_content android:layout_height=50dp android:text=HEADER VIEW />
    <TextView  android:layout_gravity=center android:gravity=center android:layout_width=match_parent android:layout_height=match_parent android:text=CONTENT VIEW />
    <TextView  android:layout_gravity=center android:gravity=center android:layout_width=match_parent android:layout_height=50dp android:text=FOOTER VIEW />
</LinearLayout>2、我们把HeaderView的topMargin设置成-50dp,这时HeaderView隐藏了,也就是正常状态。
<LinearLayout xmlns:android="http://schemas.android.com/apk/res/android" android:layout_width=match_parent android:layout_height=match_parent android:orientation=vertical>
    <TextView  android:layout_marginTop=-50dp android:layout_gravity=center android:gravity=center android:layout_width=wrap_content android:layout_height=50dp android:text=HEADER VIEW />
    <TextView  android:layout_gravity=center android:gravity=center android:layout_width=match_parent android:layout_height=match_parent android:text=CONTENT VIEW />
    <TextView  android:layout_gravity=center android:gravity=center android:layout_width=match_parent android:layout_height=50dp android:text=FOOTER VIEW />
</LinearLayout>
效果图:
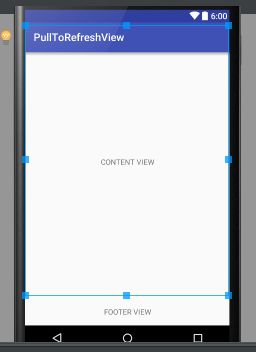
3、我们再把HeaderView的topMargin改为-100dp,这时footerView可见了,也就是上拉加载中。
<LinearLayout xmlns:android="http://schemas.android.com/apk/res/android" android:layout_width=match_parent android:layout_height=match_parent android:orientation=vertical>
    <TextView  android:layout_marginTop=-100dp android:layout_gravity=center android:gravity=center android:layout_width=wrap_content android:layout_height=50dp android:text=HEADER VIEW />
    <TextView  android:layout_gravity=center android:gravity=center android:layout_width=match_parent android:layout_height=match_parent android:text=CONTENT VIEW />
    <TextView  android:layout_gravity=center android:gravity=center android:layout_width=match_parent android:layout_height=50dp android:text=FOOTER VIEW />
</LinearLayout>
好啦! 演示完毕了,看完整个过程是不是有点思路了呢,其实看起来还挺容易的对吧,呵呵,不过实现起来还不是那么容易的咯,既然是学习嘛,下面我们来一步一步实现……
第一步:创建一个叫PullRefreshView的类继承LinearLayout,然后覆盖三个构造方法,不要再问为什么要覆盖三个构造方法了,因为父类实现了这几个构造方法,身为子类要显示的用super()来调用父类的构造方法,带一个参数的构造方法会在比如我们直接new一个组件的时候用到,带两个参数的,如果我们写在了布局文件中系统new的时候会调用,带三个参数的构造方法,当我们new一个View的时候需要指定默认style的时候调用,待会的demo也会用到带三个参数的构造方法。
public class PullRefreshView extends LinearLayout{
    /**上下文*/
    private Context mContext;
    public PullRefreshView(Context context) {
        this(context, null);
    }

    public PullRefreshView(Context context, AttributeSet attrs) {
        this(context, attrs, 0);
    }

    public PullRefreshView(Context context, AttributeSet attrs, int defStyleAttr) {
        super(context, attrs, defStyleAttr);
        //设置LinearLayout默认方向为垂直方向
        this.setOrientation(LinearLayout.VERTICAL);
        this.mContext=context;
}第二步:我们要往主布局LinearLayout中添加一个HeaderView了,在添加之前我们先定一个自己的PullHeaderView,画的有点丑
大概的样子:
照样是自定义View的步骤:
1、自定义一个View继承LinearLayout,覆盖三个构造方法,然后初始化View(也就是添加布局)
/** * Author:Yqy * Date:2016-08-23 * Desc:下拉刷新HeaderView * Company:cisetech */
public class PullHeaderView extends LinearLayout {
    private Context mContext;
    /** * 主View */
    private LinearLayout headerView;
    /** * 箭头图标View */
    private ImageView arrowImageView;
    /** * 进度图标View */
    private ProgressBar headerProgressBar;
    /** * 箭头图标 */
    private Bitmap arrowBitmap;
    /** * 文本提示的View */
    private TextView tipsTextView;
    /** * 提示刷新时间的View */
    private TextView headerTimeView;
    /** * 当前控件的状态 */
    private int mState = -1;
    /** * 箭头向上时候的动画 */
    private Animation mRotateUpAnim;
    /** * 箭头向下时候的动画 */
    private Animation mRotateDownAnim;
    /** * 动画持续的时间 */
    private final int ROTATE_ANIM_DURATION = 180;
    /** * 提示下拉刷新 */
    public final static int STATE_NORMAL = 0;
    /** * 提示松开刷新 */
    public final static int STATE_READY = 1;
    /** * 提示正在刷新 */
    public final static int STATE_REFRESHING = 2;
    /** * 上一次刷新的时间 */
    private String lastRefreshTime;
    /** * Header的高度 */
    private int headerHeight;

    public PullHeaderView(Context context) {
        this(context, null);
    }

    public PullHeaderView(Context context, AttributeSet attrs) {
        this(context, attrs, 0);
    }

    public PullHeaderView(Context context, AttributeSet attrs, int defStyleAttr) {
        super(context, attrs, defStyleAttr);
        this.mContext = context;
        initView();
    }

    /** * 初始化控件 */
    private void initView() {
        /** * 创建一个整体的刷新栏布局,然后放在this中, * 也就是我们画图中的第二层,方向为水平 * setOrientation(LinearLayout.HORIZONTAL); */
        headerView = new LinearLayout(mContext);
        headerView.setOrientation(LinearLayout.HORIZONTAL);
        headerView.setGravity(Gravity.CENTER);
        headerView.setPadding(0, Utils.dp2px(mContext, 10), 0, Utils.dp2px(mContext, 10));//设置padding
        /** * 创建一个FramLayout, * 因为进度条跟箭头是放在一起的 */
        FrameLayout headImage = new FrameLayout(mContext);
        arrowBitmap = Utils.getBitmapFromSrc(mContext,R.mipmap.arrow);
        arrowImageView=new ImageView(mContext);
        arrowImageView.setImageBitmap(arrowBitmap);
        /** * 创建一个进度条,默认Style为 * android.R.attr.progressBarStyleSmall * 默认是不显示的 */
        headerProgressBar = new ProgressBar(mContext, null, android.R.attr.progressBarStyleSmall);
        headerProgressBar.setVisibility(View.GONE);
        /** * 然后把箭头跟进度条放入FramLayout中 * 大小为40dp */
        LinearLayout.LayoutParams imgLp = new LinearLayout.LayoutParams(-2, -2);
        imgLp.gravity = Gravity.CENTER;
        imgLp.width = Utils.dp2px(mContext, 40);
        imgLp.height = Utils.dp2px(mContext, 40);
        headImage.addView(arrowImageView, imgLp);
        headImage.addView(headerProgressBar, imgLp);
        /** * 添加提示文字跟刷新时间 * 放入headTextLayout(LinearLayout中) * 方向为LinearLayout.VERTICAL */
        LinearLayout headTextLayout = new LinearLayout(mContext);
        headTextLayout.setOrientation(LinearLayout.VERTICAL);
        headTextLayout.setGravity(Gravity.CENTER);
        tipsTextView = new TextView(mContext);
        tipsTextView.setTextColor(Color.DKGRAY);
        tipsTextView.setTextSize(TypedValue.COMPLEX_UNIT_SP, 14.5f);
        headerTimeView = new TextView(mContext);
        headerTimeView.setTextColor(Color.DKGRAY);
        headerTimeView.setTextSize(TypedValue.COMPLEX_UNIT_SP, 14.5f);
        LinearLayout.LayoutParams textLp = new LinearLayout.LayoutParams(-2, -2);
        headTextLayout.addView(tipsTextView, textLp);
        headTextLayout.addView(headerTimeView, textLp);

        /** * 创建一个叫headerLayout(LinearLayout) * 把headImage跟headTextLayout包裹起来 */
        LinearLayout.LayoutParams headLp = new LinearLayout.LayoutParams(LayoutParams.WRAP_CONTENT, ViewGroup.LayoutParams.WRAP_CONTENT);
        headLp.gravity = Gravity.CENTER;
        headLp.rightMargin = Utils.dp2px(mContext, 10);
        LinearLayout headerLayout = new LinearLayout(mContext);
        headerLayout.setOrientation(LinearLayout.HORIZONTAL);
        headerLayout.setGravity(Gravity.CENTER);
        headerLayout.addView(headImage, headLp);
        headerLayout.addView(headTextLayout, headLp);
        /** * 把创建一个叫headerLayout放入到headerView中 */
        LinearLayout.LayoutParams lp = new LinearLayout.LayoutParams(LayoutParams.FILL_PARENT, LayoutParams.WRAP_CONTENT);
        lp.gravity = Gravity.BOTTOM;
        headerView.addView(headerLayout, lp);
        /** * 最后把headerView主布局添加到PullHeaderView中 */
        this.addView(headerView, lp);
        //获取控件的高度,获取之前先measure一下,不然拿不到宽高
        Utils.measureView(this);
        headerHeight = this.getMeasuredHeight();
        /** * 初始化箭头朝上的动画 */
        mRotateUpAnim = new RotateAnimation(0.0f, -180f, Animation.RELATIVE_TO_SELF,
                0.5f, Animation.RELATIVE_TO_SELF, 0.5f);
        mRotateUpAnim.setDuration(ROTATE_ANIM_DURATION);
        mRotateUpAnim.setFillAfter(true);
        /** * 初始化箭头朝下的动画 */
        mRotateDownAnim= new RotateAnimation(-180f,0.0f, Animation.RELATIVE_TO_SELF,
                0.5f, Animation.RELATIVE_TO_SELF, 0.5f);
        mRotateDownAnim.setDuration(ROTATE_ANIM_DURATION);
        mRotateDownAnim.setFillAfter(true);

    }
}第二步:定义setState方法,因为下拉刷新有几个状态,我们需要根据PullRefreshView传入的状态进行HeaderView的显示状态,状态跟HeaderView显示的状态为:
/**
* 提示下拉刷新
*/
public final static int STATE_NORMAL = 0;
/**
* 提示松开刷新
*/
public final static int STATE_READY = 1;
/**
* 提示正在刷新
*/
public final static int STATE_REFRESHING = 2;
/** * 设置当前HeaderView的状态 * @param state */
    public void setState(int state){
        //当前状态跟设置的状态一致的时候
        if(state==mState){
            return ;
        }
        //为刷新中的时候,箭头隐藏,进度条显示
        if(state==STATE_REFRESHING){
            arrowImageView.clearAnimation();
            arrowImageView.setVisibility(View.GONE);
            headerProgressBar.setVisibility(View.VISIBLE);
        }else{
            arrowImageView.setVisibility(View.VISIBLE);
            headerProgressBar.setVisibility(View.GONE);
        }
        switch (state){
            //当为下拉刷新的时候,箭头朝下
            case STATE_NORMAL:
                if(mState==STATE_READY){//如果前面状态是箭头朝上
                    arrowImageView.startAnimation(mRotateDownAnim);
                }
                if(mState==STATE_REFRESHING){
                    arrowImageView.clearAnimation();
                }
                tipsTextView.setText("下拉刷新");
                if(TextUtils.isEmpty(lastRefreshTime)){
                    lastRefreshTime=Utils.getCurrentDate();
                    headerTimeView.setText("刷新时间: "+lastRefreshTime);
                }else{
                    headerTimeView.setText("上次刷新时间:" +lastRefreshTime);
                }
                break;
            case STATE_READY:
                if (mState != STATE_READY) {
                    arrowImageView.clearAnimation();
                    arrowImageView.startAnimation(mRotateUpAnim);
                    tipsTextView.setText("该放手啦!");
                    headerTimeView.setText("上次刷新时间:" + lastRefreshTime);
                }
                break;
            case STATE_REFRESHING:
                lastRefreshTime=Utils.getCurrentDate();
                tipsTextView.setText("正在刷新...");
                headerTimeView.setText("本次刷新时间:" + lastRefreshTime);
                break;
            default:
        }
        mState=state;
    }
整个HeaderView的内容还是比较多的,但是只要思路不要乱就可以了,代码多一点也无所谓啦,可以写完后再去优化一下代码的,自我感觉有些地方写的还是有点臃肿了。
第三步:照样来定义一个FooterView,因为FooterView的布局很简单,就一个ProgressBar,我就不一一描述了,直接贴代码了
/** * Author:Yqy * Date:2016-08-23 * Desc:上拉加载footView * Company:cisetech */
public class PullFootView extends LinearLayout {
    private Context mContext;
    private LinearLayout footView;
    private ProgressBar mProgressBar;
    private int footHeight;
    public PullFootView(Context context) {
        this(context,null);
    }

    public PullFootView(Context context, AttributeSet attrs) {
        this(context, attrs, 0);
    }

    public PullFootView(Context context, AttributeSet attrs, int defStyleAttr) {
        super(context, attrs, defStyleAttr);
        initView(context);
    }

    /** * 初始化 * @param context */
    private void initView(Context context) {
        this.mContext=context;
        this.setOrientation(LinearLayout.HORIZONTAL);
        footView=new LinearLayout(mContext);
        mProgressBar=new ProgressBar(mContext,null,android.R.attr.progressBarStyleSmall);
        LinearLayout.LayoutParams progressLp=new LinearLayout.LayoutParams(-2,-2);
        progressLp.gravity= Gravity.CENTER;
        progressLp.width= Utils.dp2px(mContext,40);
        progressLp.height=Utils.dp2px(mContext,40);
        footView.addView(mProgressBar,progressLp);
        LinearLayout.LayoutParams footLp=new LinearLayout.LayoutParams(-2,-2);
        footLp.gravity=Gravity.CENTER;
        footView.setGravity(Gravity.CENTER);
        this.addView(footView,footLp);
        Utils.measureView(this);
        footHeight=this.getMeasuredHeight();
    }

    /** * 获取footview的高度 * @return */
    public int getFootViewHeight() {
        return footHeight;
    }
    private int mSate;
    public void setState(int state) {
        if(mSate==state){
            return;
        }
        if(state==PullHeaderView.STATE_REFRESHING||state==PullHeaderView.STATE_READY){
            this.setVisibility(View.VISIBLE);
        }else{
            this.setVisibility(View.GONE);
        }
        mSate=state;
    }
}
第四步:写完了HeaderView跟FooterView,我们要添加到PullRefreshView中去了
1、先添加HeaderView,因为我们的HeaderView是放在最上面的,接下来添加的是我们的ContentView(当然,布局中已经添加进来了),最后当加载完布局文件后我们添加FooterView,跟我一开始演示的那个一样的顺序了。
我们在构造方法中调用addHeaderView方法:
public PullRefreshView(Context context, AttributeSet attrs, int defStyleAttr) {
        super(context, attrs, defStyleAttr);
        this.setOrientation(LinearLayout.VERTICAL);
        this.mContext=context;
        /** * 添加头部刷新view */
        addHeaderView();
    }
 /** * 添加头部刷新View */
    private void addHeaderView() {
        mHeaderView=new PullHeaderView(mContext);
        mHeaderViewHeight=mHeaderView.getHeaderHeight();
        mHeaderView.setGravity(Gravity.BOTTOM);

        LayoutParams params = new LayoutParams(LayoutParams.MATCH_PARENT, mHeaderViewHeight);
        // 设置topMargin的值为负的header View高度,隐藏在最上方
        params.topMargin = -mHeaderViewHeight;
        addView(mHeaderView, params);
    }
2、当布局文件加载完毕的时候,这个时候PullRefreshView中已经有两个布局了,依次是HeaderView、ContentView、然后该添加我们的FooterView了。
 /** * 当加载完布局后,获取ListView */
    @Override
    protected void onFinishInflate() {
        super.onFinishInflate();
        //添加footView,
        addFootView();
        //获取AdapterView
        initContentAdapterView();
    }

    /** * 添加FootView */
    private void addFootView() {
        mFootView=new PullFootView(mContext);
        mFootViewHeight=mFootView.getFootViewHeight();
        LayoutParams params = new LayoutParams(LayoutParams.MATCH_PARENT, mFootViewHeight);
        mFootView.setGravity(Gravity.CENTER_HORIZONTAL);
        addView(mFootView, params);
    }
前面都是比较简单的步骤,现在到了下拉刷新组件关键的几步了
第五步:重写onIntercepterTouchEvent方法,拦截事件,这里先拿ListView来说了。
当ListView滑动到顶部的时候:
也就是ListView的getFirstVisiblePosition()为0,然后第一个child的top为0
当ListView滑动到底部的时候:
最后一个child的bottom=PullRefreshView的高度并且getLastVisiblePosition()==mAdapterView.getCount()-1
当前最后一个child为所有child中最后一个child。
当满足滑动到底部或者顶部其中一个条件的时候,这个时候需要拦截事件交给父控件处理了,并且判断是上拉还是下拉,然后在父控件的onTouchEvent方法中去处理滑动了。
 /**xx * 处理事件拦截 */
    @Override
    public boolean onInterceptTouchEvent(MotionEvent ev) {
        int x= (int) ev.getX();
        int y= (int) ev.getY();
        int action=ev.getAction();
        switch (action){
            case MotionEvent.ACTION_DOWN://记录按下时候的位置
                mLastMotionX=x;
                mLastMotionY=y;
                break;
            case MotionEvent.ACTION_MOVE:
                //duraY>0是向下滑动,<0是向上滑动
                int duraX=x-mLastMotionX;
                int duraY=y-mLastMotionY;
                //解决错误滑动操作
                if(Math.abs(duraX)<Math.abs(duraY)&&Math.abs(duraY)>10){
                    if(isRefreshScroll(duraY)){//判断是否滑动到底部或者顶部
                        return true;
                    }
                }
                break;
            case MotionEvent.ACTION_CANCEL:
            case MotionEvent.ACTION_UP:
                isAllowFootRefreshing=true;
                break;
        }
        return super.onInterceptTouchEvent(ev);
    }

    /** * 判断是否需要拦截事件,也就是是否滑动到底部或者顶部 * @param duraY * @return boolean */
    private boolean isRefreshScroll(int duraY) {
        //如果正在加载或者正在刷新的时候,直接不拦截事件
        if(mPullRefreshing||mPullLoading){
            return false;
        }
        if(mAdapterView!=null){
            if(duraY>0){//向下滑动
                if(!mEnablePullRefresh){
                    return false;//如果禁止了下拉刷新那么不拦截
                }
                View child=mAdapterView.getChildAt(0);
                if(child==null){
                    return false;
                }
                int top=child.getTop();
                int padding=mAdapterView.getPaddingTop();
                //判断是否滑动到了顶部
                if(mAdapterView.getFirstVisiblePosition()==0&&Math.abs(top - padding)<=11){
                    mPullState=PULL_DOWN_STATE;
                    return true;
                }
            }else if(duraY<0){//上拉的时候
                isAllowFootRefreshing=false;
                View child = mAdapterView.getChildAt(mAdapterView.getChildCount() - 1);
                if(child!=null&&child.getBottom()<=getMeasuredHeight()&&mAdapterView.getLastVisiblePosition()==mAdapterView.getCount()-1){
                    mPullState=PULL_UP_STATE;
                    return true;
                }
            }
        }
        return false;
    }
第六步:当父类拦截到事件自己处理的时候,这个时候说明需要根据滑动的状态和距离对HeaderView和FooterView进行操作了。
我们onTouchEvent方法中不处理ACTION_DOWN的操作,
因为前面onInterceopterTouchEvent方法中记录了是下拉还是上拉状态了,所以当ACTION为ACTION_MOVE移动的时候,根据记录的状态处理上拉和下拉
 case MotionEvent.ACTION_MOVE:
                int duraY=y-mLastMotionY;
                if(mPullState==PULL_DOWN_STATE){
                    //执行下拉操作
                    headerPrepareToRefresh(duraY);
                }else if(mPullState==PULL_UP_STATE){
                    //执行上拉
                    footPrepareToRefresh(duraY);
                }
                mLastMotionY=y;
                break;
/** * 执行下拉操作 * @param duraY */
private void headerPrepareToRefresh(int duraY) {
if(mPullRefreshing||mPullLoading){
return ;
}
/** * 根据滑动的距离计算出HeaderView的topMargin */
int newTopMargin=updateHeaderViewTopMargin(duraY);
/** * 当HeaderView新的topMargin>=0的时候,也就是我们上面演示的marginTop=-50dp * 的时候,也就是HeaderView全部显示出来 * HeaderView此时显示“松手刷新” * * 反之如果还有一截在没有显示出来就显示 * “下拉刷新”状态 */
if(newTopMargin>=0&&mHeaderView.getState()!=PullHeaderView.STATE_REFRESHING){
mHeaderView.setState(PullHeaderView.STATE_READY);
}else if(newTopMargin<0&&newTopMargin>-mHeaderViewHeight){
mHeaderView.setState(PullHeaderView.STATE_NORMAL);
}
}当手指抬起或者cancel的时候判断是否需要下拉刷新了:
 case MotionEvent.ACTION_UP:
                int topMargin=((LayoutParams)mHeaderView.getLayoutParams()).topMargin;
                if(mPullState==PULL_DOWN_STATE){
                    if(topMargin>0){
                        //提示正在刷新中,
                        headerRefresh();
                    }else{
                        //从新隐藏headerView
                        setHeaderTopMargin(-mHeaderViewHeight);
                    }
                }else if(mPullState==PULL_UP_STATE){
                    //上拉加载中
                    isAllowFootRefreshing=true;
                   if(topMargin<=-(mHeaderViewHeight+mFootViewHeight)){
                        footRefreshing();
                    }else{
                        //从新隐藏footView
                        setHeaderTopMargin(-mHeaderViewHeight);
                    }
                }
                break;
/** * 下拉刷新中 */
private void headerRefresh() {
mPullRefreshing=true;
mHeaderView.setState(PullHeaderView.STATE_REFRESHING);
setHeaderTopMargin(0);
if(onHeaderRefreshListener!=null){
onHeaderRefreshListener.onHeaderRefresh(this);
}
}footerview的判断逻辑跟HeaderView也差不多,我就不多解释了,直接贴代码了
提示一下:footerView全部显示出来也就是当HeaderView的topMargin为-(footerView的高度+HeaderView的高度)
case MotionEvent.ACTION_MOVE:
                int duraY=y-mLastMotionY;
                if(mPullState==PULL_DOWN_STATE){
                    //执行下拉操作
                    headerPrepareToRefresh(duraY);
                }else if(mPullState==PULL_UP_STATE){
                    //执行上拉
                    footPrepareToRefresh(duraY);
                }
                mLastMotionY=y;
                break;
/** * 执行上拉加载操作 * @param duraY */
    private void footPrepareToRefresh(int duraY) {
        if(mPullRefreshing||mPullLoading){
            return ;
        }
        int newTopMargin=updateHeaderViewTopMargin(duraY);
        mFootView.setState(PullHeaderView.STATE_READY);
    }
当手抬起或Cancle的时候,判断是否需要上拉加载
case MotionEvent.ACTION_UP:
                int topMargin=((LayoutParams)mHeaderView.getLayoutParams()).topMargin;
                if(mPullState==PULL_DOWN_STATE){
                    if(topMargin>0){
                        //提示正在刷新中,
                        headerRefresh();
                    }else{
                        //从新隐藏headerView
                        setHeaderTopMargin(-mHeaderViewHeight);
                    }
                }else if(mPullState==PULL_UP_STATE){
                    //上拉加载中
                    isAllowFootRefreshing=true;
                   if(topMargin<=-(mHeaderViewHeight+mFootViewHeight)){
                        footRefreshing();
                    }else{
                        //从新隐藏footView
                        setHeaderTopMargin(-mHeaderViewHeight);
                    }
                }
                break;
/** * 底部加载中.. */
private void footRefreshing() {
if(mPullLoading||mPullRefreshing){
return;
}
mPullLoading=true;
isAllowFootRefreshing=false;
mFootView.setState(PullHeaderView.STATE_REFRESHING);
setHeaderTopMargin(-(mFootViewHeight + mHeaderViewHeight));
if(onfootRefreshListener!=null){
onfootRefreshListener.onFootRefresh(this);
}
}最后一步了:完成刷新时候操作,也就是给HeaderView的topMargin改为-HeaderView的高度,这样就只有一个ListView显示了,然后恢复所有的状态,定义下拉刷新跟上拉加载的监听器
/** * 刷新完成,隐藏刷新view */
    public void refreshComplete(){
        mPullLoading=false;//是否上拉加载中置为false
        mPullRefreshing=false;//是否下拉加载置为false
        /** * HeaderView的状态置为初始状态 */
        mHeaderView.setState(PullHeaderView.STATE_NORMAL);
        /** * 隐藏HeaderView跟FooterView, * 不明白的可以看我一开始演示的那几个过程 */
        setHeaderTopMargin(-mHeaderViewHeight);
        mFootView.setState(PullHeaderView.STATE_NORMAL);
    }
/** * 下拉刷新监听 */
public interface IOnHeaderRefreshListener{
void onHeaderRefresh(PullRefreshView view);
}
/** * 加载更多监听接口 */
public interface IOnfootRefreshListener{
void onFootRefresh(PullRefreshView view);
}
/** * 设置下拉刷新监听器 * @param onHeaderRefreshListener */
public void setHeaderRefreshListener(IOnHeaderRefreshListener onHeaderRefreshListener){
this.onHeaderRefreshListener=onHeaderRefreshListener;
}
/** * 设置加载更多监听 * @param onfootRefreshListener */
public void setOnfootRefreshListener(IOnfootRefreshListener onfootRefreshListener) {
this.onfootRefreshListener = onfootRefreshListener;
}实现ListView滑动到底部的时候自动上拉加载更多数据
思路:监听ListView的滑动过程,然后判断是否自由滑动到最底部了,自由滑动到最底部的时候就自动加载更多。
/** * 获取AdapterView */
    private void initContentAdapterView() {
        int count=getChildCount();
        if(count<2){
            throw new IllegalArgumentException("this layout must contain 2 child views,and AdapterView or ScrollView must in the second position!");
        }
        View view=null;
        for (int i = 0; i < count; i++) {
            view=getChildAt(i);
            if(view instanceof AdapterView<?>){
                mAdapterView= (AdapterView<?>) view;
                /** * 只针对ListView做上拉加载操作 */
                ListView lv= (ListView) mAdapterView;
                /** * 设置ListView的滚动监听 */
                lv.setOnScrollListener(this);
            }else if(view instanceof ScrollView){
                mScrollerView = (ScrollView) view;
            }
        }
        if (mAdapterView == null && mScrollerView == null) {
            throw new IllegalArgumentException("must contain a AdapterView or ScrollView in this layout!");
        }
    }
判断是否是自由滑动,是的话就判断是否到达了底部,到了就自动加载更多
/** * ListView滑动的状态,当为SCROLL_STATE_FLING的时候滑动到底部就自动加载更多 */
    private int mScrollState;
    @Override
    public void onScrollStateChanged(AbsListView view, int scrollState) {
        mScrollState=scrollState;
    }
    @Override
    public void onScroll(AbsListView view, int firstVisibleItem, int visibleItemCount, int totalItemCount) {
        if(mAdapterView!=null&&mAdapterView.getCount()>0){
            View child = mAdapterView.getChildAt(mAdapterView.getChildCount() - 1);
            if(child!=null&&child.getBottom()<=getMeasuredHeight()&&mAdapterView.getLastVisiblePosition()==mAdapterView.getCount()-1){
                if(mScrollState== AbsListView.OnScrollListener.SCROLL_STATE_FLING){
                    footRefreshing();
                }
            }
        }
    }
好啦!!整个PullRefreshView就实现了,肯定还有不少bug,关键是知道原理,然后多巧几遍,我相信会有收获的,感兴趣的可以自己实现下PullRefreshScrollView或者各种View,只需要将下面方法写活就可以了。
/** * 获取AdapterView */
    private void initContentAdapterView() {
        int count=getChildCount();
        if(count<2){
            throw new IllegalArgumentException("this layout must contain 2 child views,and AdapterView or ScrollView must in the second position!");
        }
        View view=null;
        for (int i = 0; i < count; i++) {
            view=getChildAt(i);
            if(view instanceof AdapterView<?>){
                mAdapterView= (AdapterView<?>) view;
                /** * 只针对ListView做上拉加载操作 */
                ListView lv= (ListView) mAdapterView;
                /** * 设置ListView的滚动监听 */
                lv.setOnScrollListener(this);
            }else if(view instanceof ScrollView){
                mScrollerView = (ScrollView) view;
            }
        }
        if (mAdapterView == null && mScrollerView == null) {
            throw new IllegalArgumentException("must contain a AdapterView or ScrollView in this layout!");
        }
    }
好啦!!!结束啦,,3Q!

