Android学习二之Activity(一)
前一篇文章因为是晚上写的,最后写的不完善
今天把自己学习Activity的过程和经验记录一下,希望能帮助到有心看这篇文章的朋友。本人水平低陋,还望指教
首先看代码:
package com.zph;

import android.app.Activity;
import android.os.Bundle;

public class FirstActivity extends Activity {
    /** Called when the activity is first created. */
    @Override
    public void onCreate(Bundle savedInstanceState) {
        super.onCreate(savedInstanceState);
        setContentView(R.layout.main);

    }
}
要想创建一个Activity,必须覆写onCreate()方法,在Android编程我发现一个现象:凡是覆写的方法,在方法体中的第一行代码一定是super.xxx()。一定先要调用父类里的相应方法做必要的事情,再根据需求写其他代码。
第二行:setContentView(R.layout.main);
设置布局,到哪去找呢?打开Eclipse左边的视图:
在res目录下的layout文件夹下有一个main.xml
代开R.java
在R.java里有一个值public static final int main=0x7f030000 对应main.xml文件,在 setContentView(R.layout.main)查找到了main.xml,然后读取其中的布局配置
这个程序就不演示了
言归正传,什么是Activity?
这里我没翻译,Google翻译的是活动,但感觉不太好,干脆就不翻译了,我也没听说过谁翻译过他
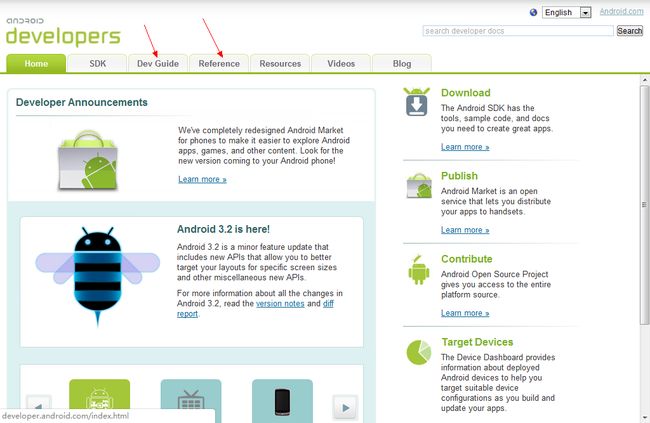
打开android的开发文档,两种方法:1,android的安装路径下有个doc文件夹,打开找到index.html
2,http://developer.android.com/index.html
先大致浏览一下:
我们主要用到的是 Dev Guide 和 Reference
Reference是API
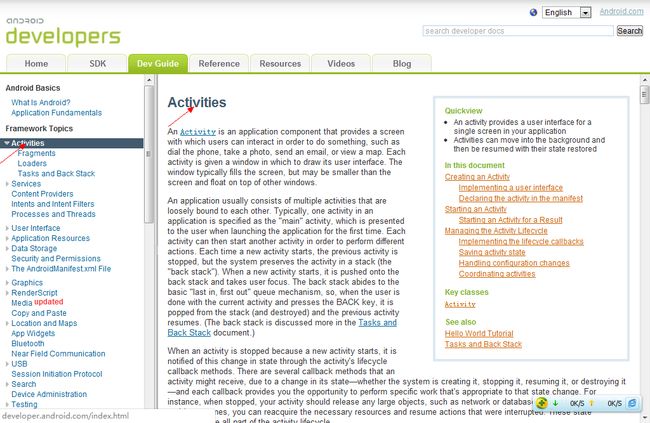
Dev Guide是开发向导,打开
找到Activities,第一句:
An Activity is an application component that provides a screen
with which users can interact in order to do something,
such as dial the phone, take a photo, send an email,
 or view a map. Each activity is given a window in which to draw its user interface.
 The window typically fills the screen, but may be smaller than the screen and float on top of other windows.
简单的说就是一个Activity就是一个屏幕,用户可以点击、触摸。一个应用程序可能不止一个Activity。Activity的尺寸也不一定就是和手机屏幕的尺寸一样大,有可能要小。很简单的一个例子:我们在用手机的时候突然来了个电话,显示来电的那个Activity就没有全部覆盖屏幕。
接着往下看:
Creating an Activity

To create an activity, you must create a subclass of Activity (or an existing subclass of it).
In your subclass, you need to implement callback methods that the system calls
 when the activity transitions between various states of its lifecycle,
 such as when the activity is being created, stopped, resumed, or destroyed.
 The two most important callback methods are:

onCreate()
You must implement this method. The system calls this when creating your activity.
Within your implementation, you should initialize the essential components of your activity.
 Most importantly, this is where you must call setContentView() to define the layout for the activity's user interface.
onPause()
The system calls this method as the first indication that
 the user is leaving your activity (though it does not always mean the activity is being destroyed).
 This is usually where you should commit any changes that
should be persisted beyond the current user session (because the user might not come back).
There are several other lifecycle callback methods that
 you should use in order to provide a fluid user experience between activities and handle unexpected interuptions that cause
your activity to be stopped and even destroyed. All of the lifecycle callback methods are discussed later,
 in the section about Managing the Activity Lifecycle.
这里介绍了要创建一个自己的Activity首先要extends继承Activity,在子类中需要实现系统的回调方法,每个方法代表每种状态。比如说先前的onCreate()方法表示创建时的方法,onStart()表示开始时方法,onPause()表示暂停时的方法,onStop()表示停止时的方法等等,文档后面会详细说明,在方法体中我们可以根据需要做某些事情,比如说在onPause()方法中我们需要保存一些重要的数据以防丢失,在下次onResume()或onStart()是可以恢复。
之前的例子我们只是覆写了onCreate()方法,也可以加上其他的方法,但onCreate()是必须的,否则没法创建
接下来:
Implementing a user interface

The user interface for an activity is provided by a hierarchy of views—objects derived from the View class.
 Each view controls a particular rectangular space within the activity's window and can respond to user interaction.
 For example, a view might be a button that initiates an action when the user touches it.

Android provides a number of ready-made views that you can use to design and organize your layout.
 "Widgets" are views that provide a visual (and interactive) elements for the screen,
such as a button, text field, checkbox, or just an image.
"Layouts" are views derived from ViewGroup that provide a unique layout model for its child views, such as a linear layout,
 a grid layout, or relative layout. You can also subclass the View and ViewGroup classes (or existing subclasses)
to create your own widgets and layouts and apply them to your activity layout.

The most common way to define a layout using views is with an XML layout file saved in your application resources.
 This way, you can maintain the design of your user interface separately from the source code that defines the activity's behavior.
You can set the layout as the UI for your activity with setContentView(), passing the resource ID for the layout.
However, you can also create new Views in your activity code and build a view hierarchy by inserting new Views into a ViewGroup,
 then use that layout by passing the root ViewGroup to setContentView().
展现用户界面,用户界面就有很多,文档里称之为:widgets,Google翻译过来叫“部件”,像按钮、文本框、复选框、下拉菜单等等。打开main.xml文件,里面都是配置,我们的widgets都配置在里面,然后让android自己去解析这个配置,从而显示出来。这样做的好处不言而喻,简化的MVC模式(个人理解)。
总之以后这些布局、控件都写到配置文件里,有几个Activity就写几个布局文件。
接下来需要打开AndroidManifest.xml
读xml文件应该是一层一层读,
<?xml version="1.0" encoding="utf-8"?>
这个xml的头,不管他。
后面的直接从文档里拿过来:
<manifest ... >
  <application ... >
      <activity android:name=".ExampleActivity" />
      ...
  </application ... >
  ...
</manifest >
这就是他的基本结构,后面的一些元素也都都往里面塞就可以了,比如说:
<intent-filter>加到activity标签里就可以了:
<activity android:name=".ExampleActivity" android:icon="@drawable/app_icon">
    <intent-filter>
        <action android:name="android.intent.action.MAIN" />
        <category android:name="android.intent.category.LAUNCHER" />
    </intent-filter>
</activity>
对于标签的含义,有一种方法,在Eclipse中有有个代码提示的功能(快捷键:Alt+/),把鼠标放在相应的位置上按下快捷键会提示,这个快捷键也是自动代码补全的快捷键。还有一种方法,看文档,文档里都写着呢。
接下来的内容牵扯到后面的一些概念,这里先讲一下,是Intent,意图。意图这个概念简单讲就是告诉程序我要干什么。意图分为:explicit intent(显式意图) 和 implicit intent(隐式意图),我们直接看代码:
Intent intent = new Intent(this, SignInActivity.class);
startActivity(intent);
这就是一个显式意图的调用
这里首先New 了一个Intent,参数是this:调用者本身,SingInActivity.class:将要开始的一个Activity类,然后调用startActivity(intent)开始这个调用的开始
显式意图简单的说就是我明确知道我要开始的Activity是谁!
自然隐式调用不知我要开始的Activity是哪个,看代码:
Intent intent = new Intent(Intent.ACTION_SEND);
intent.putExtra(Intent.EXTRA_EMAIL, recipientArray);
startActivity(intent);
很明显,隐式意图只需要告诉Android我要干嘛就可以了,在这里是告诉android我要发Email,当然还有很多其他的Intent,像打电话、发短信、web搜索等等.
简单写了一下intent之后我都要晕了,都要忘了今天是学习Activity的。还是看上面的代码的,我们创建了一个Intent,
然后要执行,调用的方法是:startActivity(intent),看名字就知道,开始一个Activity,说明我们的Activity还可以这样创建。
要结束一个Activity,方法是:finish(),但文档里明确说了,除非有必要,不要自己去调用finish()方法,这个必要是什么呢:
 Calling these methods could adversely affect the expected user experience and should only be used when
 you absolutely do not want the user to return to this instance of the activity.
大多数情况,我们不用关闭Activity,系统会根据需要结束一些Activity。
看到这里我自己觉得有一些乱了,前面东西比较杂,这里扯一下那里扯一下的。但是看完Activity的生命周期,相信前面的很多东西都能理解,或者理解更深。
Activity Lifecycle
看到这些先不要急,喝杯水,这些内容很重要。
一个Activity开始的时候首先调用onCreate()方法,在这个方法里我们需要把程序的准备工作都做好,比如说创建视图,绑定数据等等,这个方法传入一个Bundle 对象,这个对象包含有Activity以前的状态(前提是这个状态被捕获了)。
onCreate()后开始onStart(),文档里对onStart()方法没有过多描述:
Called just before the activity becomes visible to the user.
Followed by onResume() if the activity comes to the foreground, or onStop() if it becomes hidden.
我个人觉得就是直接开始这个Activity,而且这个时候是Activity对用户来说是可见的。
如果这个Activity是没有被隐藏,调用的方法是:onResume(),这个方法是用户可以捕捉到焦点时调用,而且此时这个Activity处在栈顶。
如果这个Activity被隐藏了,可能是一个优先级更高的程序启动了,总之就是隐藏了,这个时候调用onStop()。但我觉得onStart()和onResume()这两个方法相隔的时间应该很短,所以多数情况下onStart()之后就直接是onResume()了。
onResume()之后就是onPause()
onPause()顾名思义,就是暂停了,原因是系统要恢复或启动另一个Activity,这个方法执行的时间会尽可能的短,以便另一个Activity能尽早启动,但是这个方法很重要,前面也提到过,在这个方法里我们需要保存些重要的数据,停止动画,这个方法会占用CPU(因为要做很多事),但是另一个启动的Activity并没有把全部的屏幕覆盖,也就是说用户还能看到我们这个暂停的画面。
看图可以知道:onPause()后有三个去向:
1,被系统杀死了,这就是我们为什么要保存数据,为什么会被系统杀死呢?可能是这个Activity太占资源了导致资源不足,还有就是没电了
2,返回到onStart(),又重新开始了这个Activity,而且这个Activity能显示在屏幕上
3.,onStop(),停止了,原因在于这个Activity不可见,通俗的讲就是看不到了。另一个Activity把屏幕都覆盖了,文档里是这么说的:
Called when the activity is no longer visible to the user. This may happen because it is being destroyed,
or because another activity (either an existing one or a new one) has been resumed and is covering it.
onStop()也有三个去处:
1,被系统杀死了
2,onRestart()重新开始了,原因在于这个Activity又是可见的
3,到onDestory()方法以待被销毁 ,为什么会被销毁呢?原因在于这个Activity已经完成了他的工作,要结束了,整个Activity生命周期要结束了。
整个Activity Lifecycle就是这样的
这里还有一点要说明:在onPause()方法上先前说要保存一些数据,不是所有的都要我们自己手动保存,有很大一部分是系统帮我们保存的。在文档里是这么说的:
However, even if you do nothing and do not implement onSaveInstanceState(),
some of the activity state is restored by the Activity class's default implementation of onSaveInstanceState().
 Specifically, the default implementation calls onSaveInstanceState() for every View in the layout,
 which allows each view to provide information about itself that should be saved.
Almost every widget in the Android framework implements this method as appropriate,
such that any visible changes to the UI are automatically saved and restored when your activity is recreated.
 For example, the EditText widget saves any text entered by the user and the CheckBox widget saves whether it's checked or not.
The only work required by you is to provide a unique ID (with the android:id attribute) for each widget you want to save its state.
 If a widget does not have an ID, then it cannot save its state.
简单的说是:凡是保存的,都是有ID的。这也说明在写这些布局、控件的时候尽量加上ID
文档还有两张图:
右图把Activity状态恢复的流程写的很清楚,前提是有一个onSaveInstanceState()方法,有些时候需要自己覆写onSaveInstanceState()方法,个人觉得不管父类有没有覆写,子类都要覆写一下。还有就是文档中十分强调了:持久化的数据不要放在onSaveInstanceState()方法里,这个方法适合放UI的状态信息,持久化的数据保存工作应该放在onPause()方法中:
Note: Because onSaveInstanceState() is not guaranteed to be called,
 you should use it only to record the transient state of the activity (the state of the UI)—you should never use it to store persistent data.
 Instead, you should use onPause() to store persistent data (such as data that should be saved to a database) when the user leaves the activity.
参考文献:http://developer.android.com/guide/topics/fundamentals/activities.html


