SpringBoot专题
目录
一、Spring boot的简介
二、Spring Boot的特性
三、spring Boot的四大核心
四、spring boot的开发环境
五、第一个Spring boot程序以及程序解析
六、spring boot的核心配置文件
七、Spring boot自定义配置
八、Spring boot配置下的springmvc
九、Spring boot 集成jsp
十、Spring boot集成mybatis
十一、Spring boot 的事务配置
一、Spring boot的简介
1.springboot是spring的一个全新的框架,它用来简化spring应用程序的创建和开发过程,也可以说springboot能简化我们之前采用spring+springmvc+mybatis框架进行开发的过程。
2.在以往我们采用spring+springmvc+mybatis框架进行开发的时候,搭建和整合三大框架,我们需要做很多工作,比如配置web.xml、配置spring、配置mybatis,并将他们整合在一起等,而springboot框架对此开发过程进行了革命性的颠覆,抛弃了繁琐的xml配置过程,采用了大量的默认配置简化我们的开发过程。
3.所以采用spring boot可以快速的的创建基于spring的应用程序,他让编码更简单、配置更简单、部署简单、监控简单。
4.springboot在国内关注趋势图:http://t.cn/ROQLquP
二、Spring Boot的特性
1.能够快速的创建基于spring的应用程序
2.能够直接使用Java main方法启动内置的Tom act,Jetty服务器运行spring boot程序,不需要部署war包文件
3.提供约定的starter POM来简化MAVEN配置,让maven更简单
4.根据项目的maven依赖配置,spring boot自动配置spring、springmvc等
5.基本可以完全不用xml配置文件,采用注解配置。
三、spring Boot的四大核心
1.自动配置:针对很多的spring应用程序和常见的应用功能,spring boot能自动提供相关配置
2.起步依赖:告诉springboot需要什么功能,它就能引入需要的依赖库
3.Actuator:能够深入的运行spring boot应用程序,一探spring boot程序的内部信息
4.命令行界面:spring boot可选的特性
四、spring boot的开发环境
1.推荐使用spring boot最新版本,目前spring boot最新正式版为2.1.6.RELEASE;
2.如果使用eclipse,推荐安装spring Tool Suite(STS)插件;
3.如果使用IDE旗舰版,自带了spring boot插件;
4.推荐使用Maven3.0+,
5.推荐使用Java8;
五、第一个Spring boot程序以及程序解析
快速开发一个spring boot应用程序步骤如下:
1.创建一个spring boot项目;
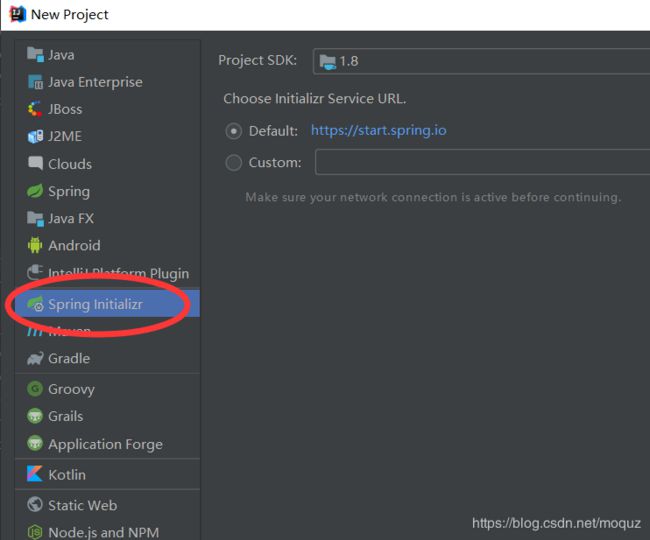
(1)创建方式一:使用eclipse 的spring Tool Suite(STS)插件/或者IDEA自带的插件创建;
使用插件构建项目如下,一路next即可(注意:第一次构建spring boot项目时耗时长,等它加载完即可使用项目)
(2)创建方式二:直接使用maven方式创建项目
2.加入spring boot的父级和起步依赖;
(1)继承spring boot的父级
        org.springframework.boot
        spring-boot-starter-parent
        2.1.6.RELEASE
(2)spring boot的起步依赖
            org.springframework.boot
            spring-boot-starter-web
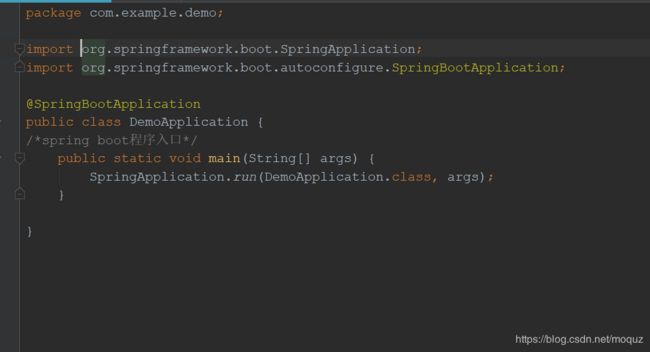
3.创建spring boot的入口main方法;
4.创建一个springmvc的Controller;
@Controller
public class HelloController {

    @RequestMapping("/boot/hello")
    public @ResponseBody String hello(){
        return "spring boot hello";
    }

}
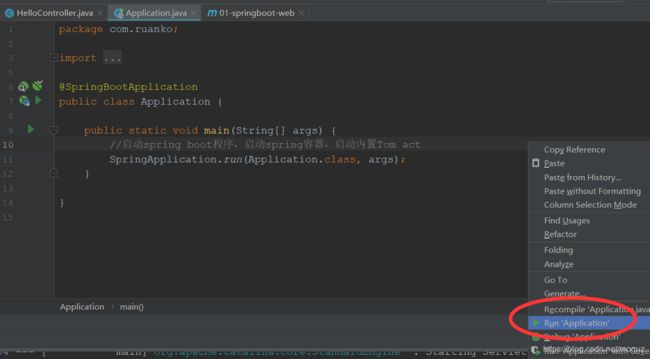
5.运行spring boot的入口main方法;
在浏览器上输入controller配置的地址:http://localhost:8080/boot/hello,会输出字符串"spring boot hello"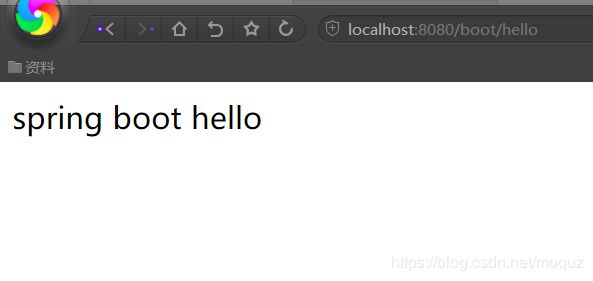
6.第一个spring boot程序应用解析
- spring boot父级依赖spring-boot-starter-parent配置之后,当前项目就是spring boot项目
- spring-boot-starter-parent是一个特殊的依赖,它用来提供相关Maven默认依赖,使用它过后,常用的jar包依赖就可以省去version配置。
- @spring bootApplication注解是spring boot的核心注解,主要作用是开启spring自动配置。
- @Controller及@ResponseBody依然是我们之前的springMvc,因为spring boot里面依然是使用spring+springmvc+mybatis等框架。
- 如果不想使用某个默认的依赖版本,可以通过pom.xml文件的属性配置覆盖各个依赖项,比如覆盖spring版本:
5.0.0.RELEASE
至此,第一个spring boot程序开发完成。
六、spring boot的核心配置文件
spring boot的核心配置文件用于配置spring boot程序,有两种格式的配置文件:
1、.properties文件:键值对的properties属性文件配置方式
2、.yml文件:
- yml是一种yaml文件格式的配置文件,主要采用空格、换行等格式排版进行配置;
- yaml是一种直观的能够被计算机识别的数据序列化格式,容易被人们阅读,yaml类似于xml,但是语法比xml简洁许多;
- 值与前面冒号配置项必须有一个空格;
- yml后缀也可以使用yaml后缀;
配置示例----properties
#配置端口
server.port=8080
#配置应用访问路径
server.servlet.context-path=/01-springboot-web
5.多环境配置
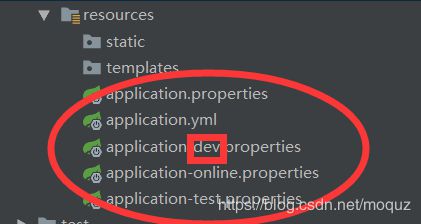
实际开发过程中可分为多个环境(开发环境,测试环境,上线环境),在工程中会看到好几个环境配置,如:
一般情况下只需在application.properties这个文件下激活我们所需的环境(使用spring.profiles.active进行激活)如
#激活使用哪一个配置文件
spring.profiles.active=test
七、Spring boot自定义配置
- 注解@Value 在配置文件自定义配置如下:
#激活使用哪一个配置文件
spring.profiles.active=online

#自定义配置
boot.name=学链
boot.location=光谷时间广场
在控制层controller的写法如下:
/*
* 读取自定义配置文件*/
@Controller
public class ConfigController {
    @Value("${boot.name}")
    private String name;

    @Value("${boot.location}")
    private String location;
    @RequestMapping("/config")
    public @ResponseBody String config(){
        return name+"----"+location;
    }
}
运行程序即可
- 注解@ConfigurationProperties
八、Spring boot配置下的springmvc
spring boot下的springmvc和之前的springmvc使用是完全一样
- @Controller 即为springmvc注解,处理http请求
- @RestController (spring4后新增的注解,使用@Controller和@ResponseBody的组合注解,用于返回字符串或json数据)
@RestController//RestController=@Controller+@ResponseBody
public class MvcController {
    @RequestMapping("/boot/clean_user")
    public Object getUser(){
        Result result=new Result();
        result.setMsg("fail");
        result.setState(500);
        result.setData("not root");
        return result;
    }
}
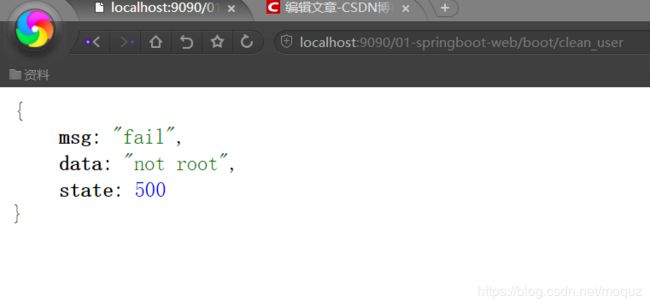
返回结果为:{msg:"fail",data:"not root",state:500}
- @GetMapping(RequestMpping和Get请求方法的组合)
 /*
    * 只支持get请求,等价与@RequestMapping(value = "/boot/clean_user",method = RequestMethod.GET)*/
    @GetMapping("/boot/clean_user1")
    public Object getUser1(){
        Result result1=new Result();
        result1.setMsg("fail");
        result1.setState(404);
        result1.setData("not root");
        return result1;
    }
返回结果为:{msg:"fail",data:"not root",state:404}
- @PostMapping(RequestMapping和Post请求方法的组合)
- @PullMapping(RequestMapping和Pull请求方法的组合)
- @DeleteMapping(RequestMapping和delete方法的组合)
九、Spring boot 集成jsp
在spring boot中使用jsp,按照如下步骤:
- 在pom.xml配置文件中加入依赖项
org.apache.tomcat.embed tomcat-embed-jasper javax.servlet javax.servlet-api javax.servlet.jsp javax.servlet.jsp-api 2.3.1 javax.servlet jstl - 在applicaton.propertion文件配置springmvc视图展示为jsp:
spring.mvc.view.prefix=/ spring.mvc.view.suffix=.jsp - 在src/main下创建一个webapp目录,然后在该目录下新建jsp页面
- 在控制层里返回jsp,代码如下:
@Controller
public class JSPController {
    @GetMapping("/boot/index")
    public String index(Model model){
        model.addAttribute("msg","spring boot集成jsp");
        return "index";
    }
}
jsp里代码直接在页面返回msg:${msg},但是在idea里运行程序会出现错误,究其原因是没有进行编译,找不到jsp页面编译的路径,解决办法在pom.xml配置中build下添加如下编译:
                src/main/java

                    **/*.xml


                src/main/resources

                    **/*.*


                src/main/webapp
                META-INF/resources

                    **/*.*
然后运行其主程序就可以编译成功。
十、Spring boot集成mybatis
spring boot集成mybatis步骤如下:
1.在pom文件加入下面依赖:
    org.mybatis.spring.boot
    mybatis-spring-boot-starter


    mysql
    mysql-connector-java
    5.1.37
2.在spring boot核心配置文件application.properties中配置myabtis的Mapper.xml所在的位置:mybatis.mapper.locations=classpath:com/ruanko/mapper/*.xml
3.在spring boot核心配置文件application.properties配置数据源:
spring.datasource.url=jdbc:mysql://127.0.0.1:3306/student?useUnicode=true&characterEncoding=utf-8
spring.datasource.driver-class-name=com.mysql.jdbc.Driver
spring.datasource.password=root
spring.datasource.username=root
4.在myabtis的mapper接口中添加注解@Mapper或者在运行主类中添加@MapperScan("com.ruanko.mapper")注解包扫描
5.使用mybatis的逆向工程自动生成代码,配置generator.xml,配置文件如下:
在pom文件中配置生成插件的代码:
                org.mybatis.generator
                mybatis-generator-maven-plugin
                1.3.6


                    generator.xml
                    true
                    true
完成以上步骤只需在maven插件中双击mybatis-generator:generate,如图所示: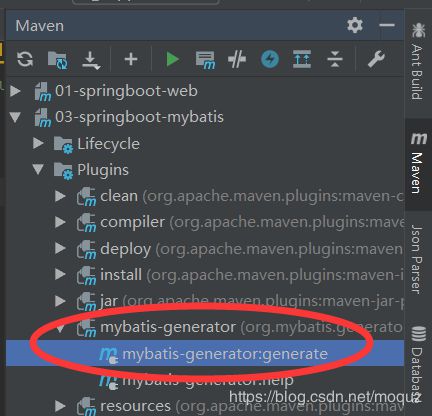
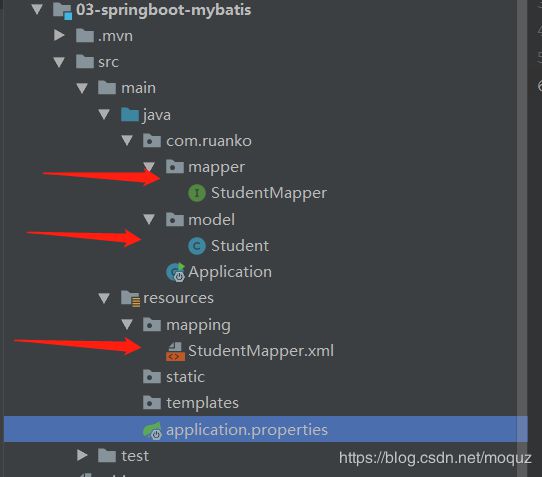
生成代码结构如下:
控制层代码MybatisController.java:
@RestController
public class MybatisController {
    @Autowired
    private MybatisService mybatisService;
    @GetMapping("/boot/student")
    public Object student(){
        return mybatisService.studentAll();
    }
}
mapper层,StudentMapper.java
@Mapper
public interface StudentMapper {
    int deleteByPrimaryKey(Integer id);

    int insert(Student record);

    int insertSelective(Student record);

    Student selectByPrimaryKey(Integer id);

    int updateByPrimaryKeySelective(Student record);

    int updateByPrimaryKey(Student record);
    List selectStudent();
}
StudentMapper.xml:
id, name, age, score
delete from test
where id = #{id,jdbcType=INTEGER}
insert into test (id, name, age,
score)
values (#{id,jdbcType=INTEGER}, #{name,jdbcType=VARCHAR}, #{age,jdbcType=INTEGER},
#{score,jdbcType=DOUBLE})
insert into test
id,
name,
age,
score,
#{id,jdbcType=INTEGER},
#{name,jdbcType=VARCHAR},
#{age,jdbcType=INTEGER},
#{score,jdbcType=DOUBLE},
update test
name = #{name,jdbcType=VARCHAR},
age = #{age,jdbcType=INTEGER},
score = #{score,jdbcType=DOUBLE},
where id = #{id,jdbcType=INTEGER}
update test
set name = #{name,jdbcType=VARCHAR},
age = #{age,jdbcType=INTEGER},
score = #{score,jdbcType=DOUBLE}
where id = #{id,jdbcType=INTEGER}
model层,Student.java:
public class Student {
    private Integer id;

    private String name;

    private Integer age;

    private Double score;

    public Integer getId() {
        return id;
    }

    public void setId(Integer id) {
        this.id = id;
    }

    public String getName() {
        return name;
    }

    public void setName(String name) {
        this.name = name == null ? null : name.trim();
    }

    public Integer getAge() {
        return age;
    }

    public void setAge(Integer age) {
        this.age = age;
    }

    public Double getScore() {
        return score;
    }

    public void setScore(Double score) {
        this.score = score;
    }
}
service层接口,MybatisService.java:
public interface MybatisService {
    public List studentAll();
}
service层接口的实现,MybatisServiceImpl.java(在注入service层注入StudentMapper时会出错,只需把错误改成warning即可)
@Service
public class MybatisServiceImpl implements MybatisService {

    @Autowired
    private StudentMapper studentMapper;
    @Override
    public List studentAll() {
        return studentMapper.selectStudent();
    }
}
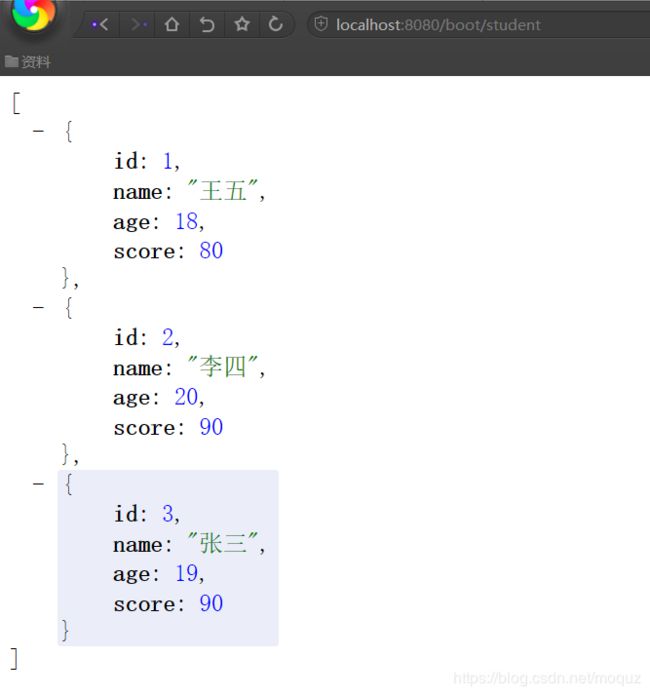
运行主程序Application.java,在浏览器中输入local host:8080/boot/student,其结果如下:
注意:在运行时需在pom.xml中的build加入以下代码,避免出现找不到StudentMapper.selectStudent


                src/main/java

                    **/*.xml


                src/main/resources

                    **/*.*


                src/main/webapp
                META-INF/resources

                    **/*.*
以上为spring boot配置mybatis的过程
十一、Spring boot 的事务配置
spring boot使用事务非常简单
- 在入口类中使用注解@EnableTransactionManagement开启事务支持;
- 在访问数据库service上添加注解@Transactional即可;
@SpringBootApplication
@EnableTransactionManagement//开启事务支持
public class Application {

    public static void main(String[] args) {
        SpringApplication.run(Application.class, args);
    }

}
@Transactional @Override public int updata() { Student student=new Student(); student.setId(1); student.setName("王五+updata"); int updata=studentMapper.updateByPrimaryKeySelective(student); System.out.println("更新的结果"+updata); //运行时出现异常,出现异常会有回滚 int a=10/0; return updata; } }
