springboot学习笔记一
官网学习https://shiro.apache.org/
框架简介
shiro是用于认证、授权、加密、会话管理、与web集成、缓存。
authentication:身份验证
authortization:授权
session manager:会话管理
crytography;加密
web support:web支持
caching:缓存
Concurrency:shiro 支持多线程应用的并发验证,即如在一个线程中开启另一个线程,能把权限自动传播过去;
Testing:提供测试支持;
Run As:允许一个用户假装为另一个用户(如果他们允许)的身份进行访问;
Remember Me:记住我,这个是非常常见的功能,即一次登录后,下次再来的话不用登录了
helloworld例子
方法一 新建项目
- 新建maven项目
- 在pom.xml添加依赖
主要要是添加boot 的父项目与springboot的web项目的jar - 编写主程序
导入的项目已经编写好了,这里介绍一下就可以了
package com.example.demo;

import org.springframework.boot.SpringApplication;
import org.springframework.boot.autoconfigure.SpringBootApplication;

/* *@SpringBootApplication来标注一个主程序类,说明这是一个springboot应用 */

@SpringBootApplication
public class DemoApplication {

    public static void main(String[] args) {
        //启动springboot应用
        SpringApplication.run(DemoApplication.class, args);
    }
}
编写例子
package com.example.controller;

import org.springframework.stereotype.Controller;
import org.springframework.web.bind.annotation.RequestMapping;

/* * @Controller表示可以处理请求 * */

@Controller

public class helloworldController {
    @RequestMapping("/hello")
    public String hello(){

        return "hello spring boot";
    }
}
直接启动主程序,应用就可以启动直接在浏览器地址栏输入http://localhost:8080/hello就可以访问不要写项目名称
这是一个简单的demo,使用了springboot之后不需要进行其他配置,比如之前用springMvc时扫描包,视图解析器,前端配置都不需要配置。还有就是项目部署的时候,不需要像之前一样打成war放在tomcat服务器,只需要创建一个可执行的jar包就可以直接运行,具体做法就是添加一个插件
<build>
        <plugins>
            <plugin>
                <groupId>org.springframework.bootgroupId>
                <artifactId>spring-boot-maven-pluginartifactId>
            plugin>
        plugins>
    build>
打包的具体方法参考https://blog.csdn.net/qq_19260029/article/details/77966154
方法二 直接导入
可以在eclipse新建一个maven工程,然后导入与springboot相关的jar。但是
有简单的方法就是进入springboot的官网直接下载demo,导入eclipse。
如果出现pom.xml首行报错的现象,即出现org.apache.maven.archiver.MavenArchiver.getManifest(org.apache.maven.project.MavenProject, org.apache.maven.archiver.MavenArchiveConfiguration)
说明缺少配置,具体的解决方法是
help-》install new software

点击add在表格添加
name为 MavenArchiver
Location为 https://otto.takari.io/content/sites/m2e.extras/m2eclipse-mavenarchiver/0.17.2/N/LATEST/
点击ok;然后耐心等待一会儿。加载完成后,eclipse需要重启
如果还是不能解决,可以直接在pom.xml文件添加
    <build>
        <plugins>
            <plugin>
                <groupId>org.springframework.bootgroupId>
                <artifactId>spring-boot-maven-pluginartifactId>
            plugin>
        plugins>
    build>
然后选择maven-》update project
这种新建项目的方式使得我们不需要自己去pom.xml写依赖,不需要自己书写主函数,只要直接写业务就可以了。
该springboot项目下面的resources文件夹下面有三个文件夹
1、static文件夹:主要存放静态资源。js,css,images。类似webcontent
2、templates:文件夹存放所有的模版页面,springboot内嵌tomcat,不支持jsp;可以使用引擎模版(freemarker、thymeleaf);
3、application.proerties:springboot应用 的默认配置文件
例如可以打开application.properties文件,修改端口号

修改配置也是简单的,例子就是将端口8080修改为8081.
方法三 在eclipse里面用项目向导创建springboot项目
打开eclipse,file-》new-》spring-》spring started project
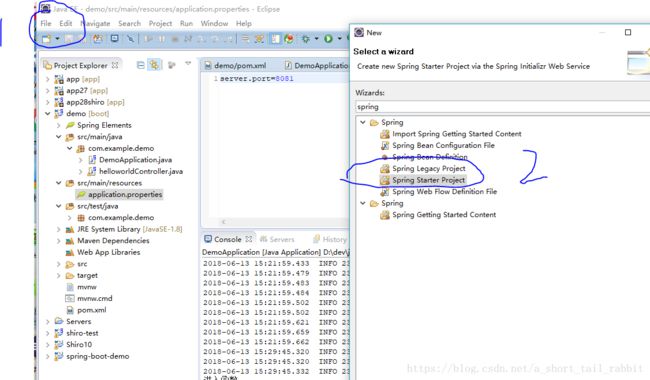
填写项目名称,其他默认的了解就可以,不用再修改
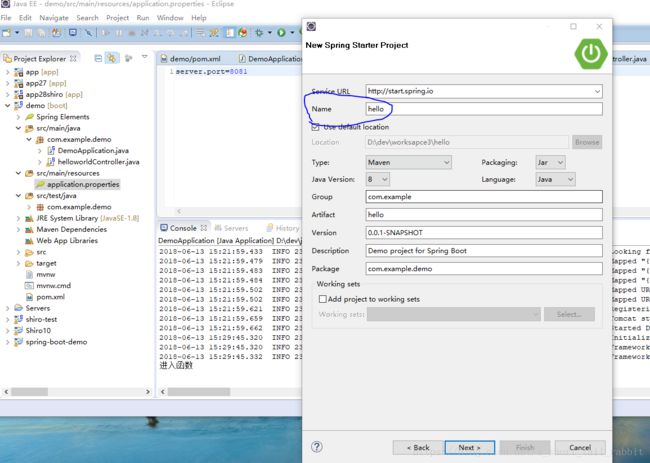
然后选择需要的模块,比如我选中了web
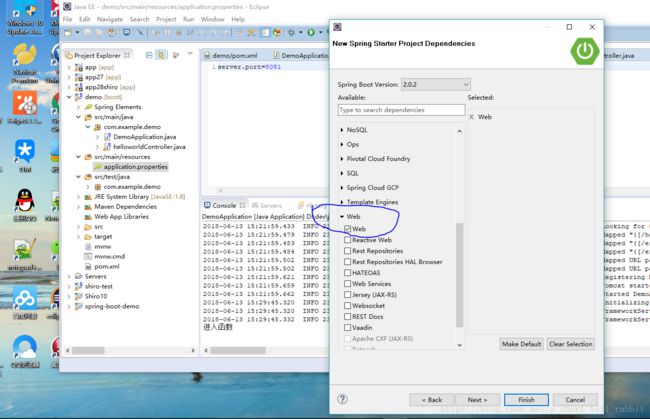
然后直接finished,就会联网创建项目

springboot的配置
1、springboot配置文件
- application.pproperties
- application.yml
这两个文件都是springboot的全局配置文件配置文件名是固定的。配置文件的作用就只用于修改spring的固定配置的默认值。由于springboot在底层配置好了,不需要我们配置,所以对于不满意的配置我们可以直接修改。
YAML是”YAML Ain’t a Markup Language”(YAML不是一种置标语言)的递归缩写。
之前的配置文件,大多都是用.xml文件,但是yaml主要以数据为中心。比起xml或者json更加优秀。
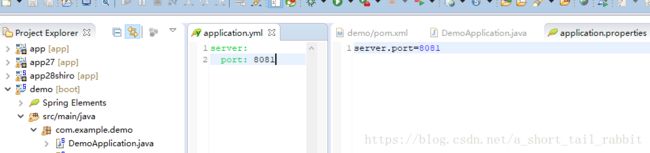
yaml文件
server:
  port: 8081
xml文件
<server>
<port>8081port>
server>properties文件 server.port=80812、yamld 基本语法
- k: v k与v之间有冒号,空格。以空格的缩进来控制层级,语法是左对齐。只要左对齐的一列数据,都是同一层级。属性与值大小写敏感。
server:
     port: 8081
     path:/hello
值得写法
字面量:普通的值(数字,布尔,字符串)
字符串不需要加上引号或者双引号
“”;双引号不会转义字符串的特殊字符串,特殊字符会作为本身表示的意思
name:"张三\n list";输出张三换行 list
‘’;会转义特殊字符,特殊字符变成一个普通的字符串输出
name:‘张三\n list‘;输出张三 /n list- 对象 map(属性和值)
k: v
对象还是键值对方式,主要注意缩进就可以
student:
      age:20
      sex: 男
行内写法
student:{age:20,sex: 男}
- 数组
用-表示数组的一个元素
pets:
    -cat     -dog     -bird
数组的行内写法
pets: [cat,dog,bird]3、获取配置文件值注入
首先在主程序所在的包下面建立新的包bean,在bean包里面新建person.class与dog.class两个类,并将设置一些属性,并且用get,set方法与tostring 的方法。
package com.example.demo.bean;
import java.util.Date;
import java.util.List;
import java.util.Map;
import org.springframework.boot.context.properties.ConfigurationProperties;
import org.springframework.stereotype.Component;
/* * 将配置文件配置的值映射到这个组件中 * @ConfigurationProperties告诉springboot将本类中的所有属性和配置文件相关的配置进行绑定 * prefix="person";配置文件中哪个下面的所有的属性一一映射 * 只有这个组件是容器中的组件,才能容器提供的@ConfigurationPropertiesd 功能 * */
@Component
@ConfigurationProperties(prefix="person")
public class Person {
private String lastName;
private Integer age;
private boolean boss;
private Date birth;
private Map maps;
private List 然后在resources文件夹下的application文件夹下新建的application.yml文件里面将类描述出来
server:
  port: 8081
person:
  lastName: jj
  age: 18
  boss: false
  birth: 2018/02/01
  maps: {k1: v1,k2: v2}
  lists:
    - lit     - sa     - gg   dog:
    name: 咪咪
    age: 2
写完之后在person里面用注解@ConfigurationProperties将.yml文件中与person所有属性和配置文件相关的配置进行绑定
@component (把普通pojo实例化到spring容器中,相当于配置文件中的
)
泛指各种组件,就是说当我们的类不属于各种归类的时候(不属于@Controller、@Services等的时候),我们就可以使用@Component来标注这个类。
最后进行测试
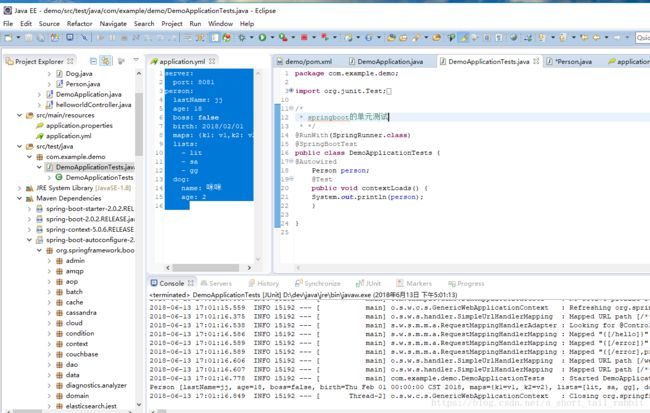
看控制台最底下,注入成功
在编辑.yml
文件的时候,要导入配置文件处理器,用来读取.yml配置文件
<dependency>
            <groupId>org.springframework.bootgroupId>
            <artifactId>spring-boot-configuration-processorartifactId>
            <optional>trueoptional>
        dependency>
    dependencies>
在使用.properties配置文件的时候,需要先导入properties editor插件防止中文乱码,具体方法如下
help->eclipes marketplace->搜索框填入properties,找到properties editor,点击install。
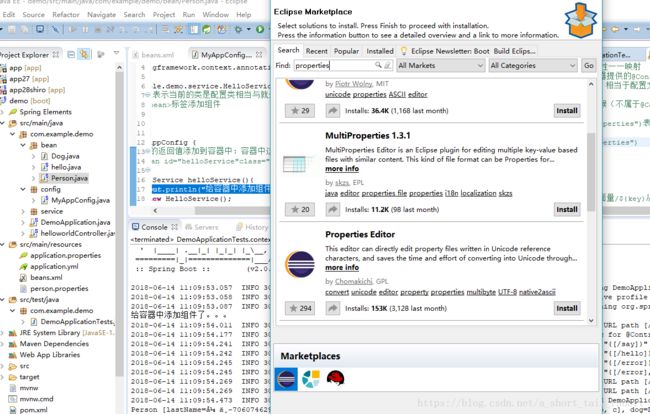
然后如图所示打开.properties,重新编辑中文的值,然后运行,就不会乱码了。
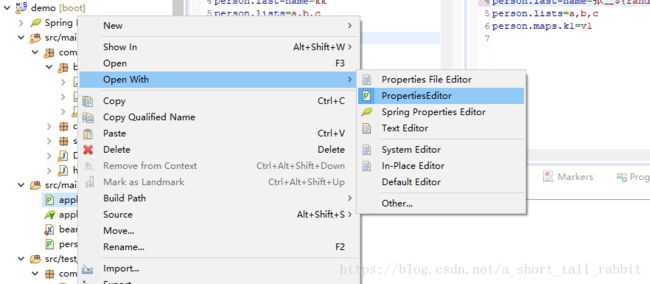
properties文件,里面的内容与上面的.yml文件表示的一样,都是表示一个person的属性的值,作用也是一样的,具体的使用方法都是使用@configurationProperties(prefix=”person”)注解。绑定参数。
| tables | @configurationproperties | @value |
|---|---|---|
| 功能 | 批量注入文件中的属性 | 一个一个指定注入 |
| 松散绑定 | 支持 | 不支持 |
| spEL | 不支持 | 支持 |
| JSR303数据校验 | 支持 | 不支持 |
| 复杂类型分装(maps) | 支持 | 不支持 |
如何使用这两个注释,如果说,我们只需要在业务逻辑中获取配置文件中的某一个值,就是用@value注解,@value可以限定数据格式,比如与@email注解结合使用,表示绑定的数据格式就是邮箱,如果说我们专门编写了一个javabean与配置文件用于映射,就直接使用@configurationproperties。它可以与@bean结合为属性赋值,与@propertysource结合读取.properties文件。
- @propertySource与@importResource
@propertySource加载指定配置文件
@importResource导入spring的配置文件,让配置文件的内容生效
springboot里面没有spring的配置文件,我们自己编写的配置文件,也不能自动识别,想让spring的配置文件生效,加载进来,就需要@importResource标注在一个配置类上面。
主程序
package com.example.demo;

import org.springframework.boot.SpringApplication;
import org.springframework.boot.autoconfigure.SpringBootApplication;
import org.springframework.context.annotation.ImportResource;

/* *@SpringBootApplication来标注一个主程序类,说明这是一个springboot应用 **@ImportResource(locations={"classpath:beans.xml"})用于加载spring的配置文件* */
@ImportResource(locations={"classpath:beans.xml"})
@SpringBootApplication
public class DemoApplication {

    public static void main(String[] args) {
        //启动springboot应用
        SpringApplication.run(DemoApplication.class, args);
    }
}
自己写的xml文件
<beans xmlns="http://www.springframework.org/schema/beans" xmlns:xsi="http://www.w3.org/2001/XMLSchema-instance" xmlns:p="http://www.springframework.org/schema/p" xmlns:context="http://www.springframework.org/schema/context" xmlns:mvc="http://www.springframework.org/schema/mvc" xsi:schemaLocation="http://www.springframework.org/schema/beans http://www.springframework.org/schema/beans/spring-beans.xsd http://www.springframework.org/schema/context http://www.springframework.org/schema/context/spring-context.xsd http://www.springframework.org/schema/mvc http://www.springframework.org/schema/mvc/spring-mvc.xsd">
<bean id="helloService" class="com.example.demo.service.HelloService">

bean>
beans>
测试
package com.example.demo;

import org.junit.Test;
import org.junit.runner.RunWith;
import org.springframework.beans.factory.annotation.Autowired;
import org.springframework.boot.test.context.SpringBootTest;
import org.springframework.context.ApplicationContext;
import org.springframework.test.context.junit4.SpringRunner;

import com.example.demo.bean.Person;

/* * springboot的单元测试 * */
@RunWith(SpringRunner.class)
@SpringBootTest
public class DemoApplicationTests {
@Autowired
    Person person;
*//该方法就是看看spring容器里面有没有我们刚刚建立的HelloService
@Autowired
ApplicationContext ioc;
@Test
public void testHelloService(){


    System.out.println(ioc.containsBean("helloService"));
}
    @Test
    public void contextLoads() {
    System.out.println(person);
    }

}
至于HelloService类就不展示了,自己创建就好
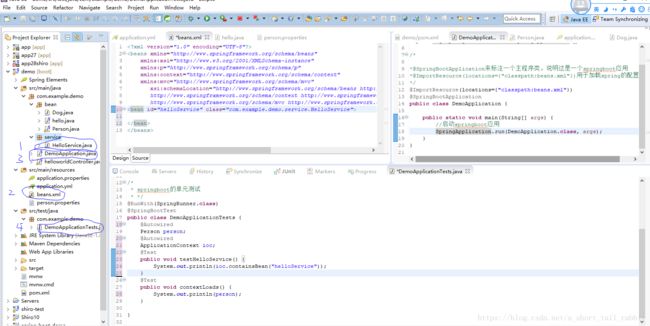
- 但是上面的方式有点麻烦,现在介绍一种springboot推荐使用方式给容器添加组件。推荐使用全注解的方式
- 配置类=====spring配置文件
import org.springframework.context.annotation.Configuration;
import com.example.demo.service.HelloService;
/*@Configuration表示当前的类是配置类相当与就是配置文件 * 配置文件中用标签添加组件 * * */
@Configuration
public class MyAppConfig {
/*表示将方法的返回值添加到容器中:容器中这个组件,默认的id就是方法名, * 相当于在主程序注释注解@ImportResource(locations={“classpath:beans.xml”})之后,添加MyAppConfig类,单元测试testHelloService 打印ture,说明helloService实例在容器中存在。这种加载组件的方式就是springboot推荐的方式。
* 配置文件的占位符
RandomValuePropertySource:配置文件中可以使用的随机数
${random.value} 、${random.int}、${random.long}
${random.int(10)、${random.int[123,46]}}
*属性配置占位符
app.name=ll;
app.description=${app.name} is a spring boot application
可以在配置文件中引用前面配置过的属性,其中${app.name:默认值}来指定找不到属性的默认值。
person.age=${random.int}
person.boss=true
person.dog.name=${person.last-name}mimi
person.last-name=张三${random.long}
person.lists=a,b,c
person.maps.k1=v1
profile
profile 是spring对于不同环境提供的不同配置功能,支持可以通过激活指定参数等方式快速切换环境。
- 多profile文件形式
我们在写配置文件的时候,文件名可以是 - 格式:application-(profile).properties/yml: application-dev.properties/yml、application-prod.properties/yml。但是默认使用的配置文件,就是主程序启动的时候不做特殊说明,一般启动application.properties。
server.port=8081
#激活开发环境的配置文件
spring.profiles.active=dev

person.age=${random.int}
person.boss=true
person.dog.name=${person.last-name}mimi
person.last-name=\u5f20\u4e09${random.long}
person.lists=a,b,c
person.maps.k1=v1

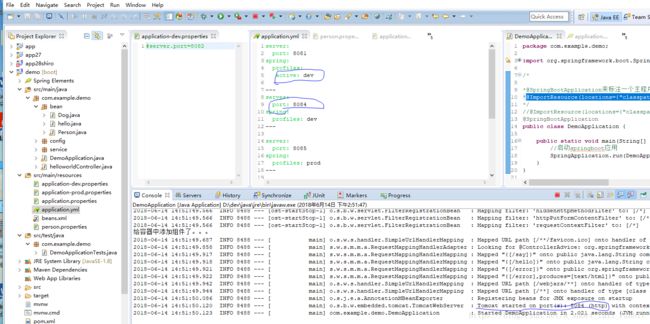
首先新建两个Properties的配置文件,文件名称分别是application-dev.properties/yml: application-prod.properties/yml。然后在配置文件里面修改端口号,具体内容如图所示。
- yml支持多文档块模式
这里使用yml配置文件的时候,yml语法支持代码块,不用按照Properties那样新建很多文档,直接写代码块就可以,代码块之间使用三个短杠分隔开来。通过修改active达到改变环境的目的。
server:
 port: 8081
spring:
 profiles:
 active: dev ---
server:
 port: 8084
spring:
 profiles: dev ---
server:
 port: 8085
spring:
 profiles: prod ---
具体实现如下
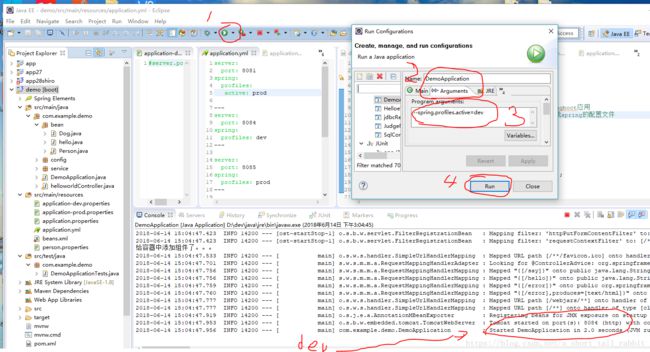
- 激活profile
1. 在配置文件中激活的两种方式如上所表述,但是还有一种方式就是可以通过命令行激活。这个方式可以在程序运行的时候去激活。具体如图
点击运行按钮的下三角,选择run configuration,选择arguments,在program arguments 的编辑框编辑,注意短杠两个不能省略,点击run,尽管在yml文件配置的端口是8085,使用的代码块是prod的,但是我们在program arguments中修改成运行dev的配置都代码块,结果是以我们在命令行输入的配置为主。
--spring.profiles.active=dev具体实现如图
3. 还能在打包后,在cmd窗口上使用该命令直接执行jar包
java -jar 打包后的包名(XXX.jar) --spring.profile.active=dev- 还有一种方式与2类似,是通过vm虚拟机执行命令改变执行的配置代码块
-Dspring.profiles.active=dev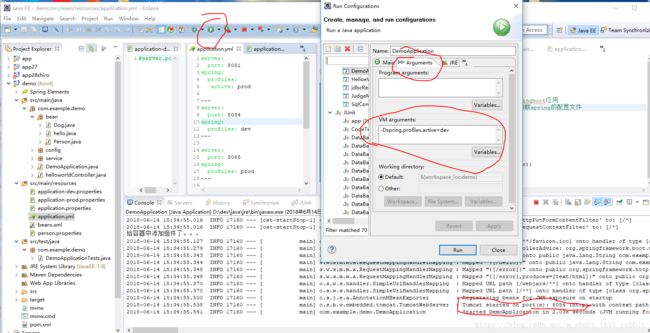
## 配置文件位置 ##
springboot会启动扫描以下位置的application.Properties或者application.yml文件作为springboot的默认配置文件。
文件放在-file:/config/文件夹,或者file:/文件夹,或者-classpath:/config/或者-classpath:/文件夹下面(类路径文件夹根目录下)。以上是按照优先级顺序从高到低,所有的配置文件都会被加载,优先级高的会覆盖优先级低的配置文件内容。springboot通过四个配置文件实现互补配置
我们可以通过spring.config.location来改变默认配置地址,打包以后可以以命令行的方式改变配置文件的。在运维的时候好用。
server.context-path=/boot ##用于修改url如果之前是http://localhost:8080/hello,那么修改后访问http://localhost:8080/boot/hello
spring.config.location=G:/application.properties
外部配置加载顺序
springboot可以从以下位置加载配置文件,优先级高到低。
1、命令行参数
2、来自java:comp/env的ndi属性
3、java系统属性(system.getproperties)
4、操作系统环境变量
5、RandomValuePropertySource配置的randon.*的属性
优先级是有jar包外向jar内加载,优先加载带profile的文件
6、jar包外部的application-(profile).Propertie或者application.yml(带spring.profile)文件
7、jar包内部的application-(profile).Propertie或者application.yml(带spring.profile)文件
8、jar包外部的application-(profile).Propertie或者application.yml(不带spring.profile)文件
9、jar包内部的application-(profile).Propertie或者application.yml(不带spring.profile)文件
10、@configuration注解类上@propertySource
11、通过springApplication.setDefaultProperties指定默认属性
springboot的自动配置原理
1.springboot启动的时候,加载主配置类,开启自动配置功能@EnableAutoConfiguration
2.@EnableAutoConfiguration的作用是利用选择器,即EnableAutoConfigurationImportSelector给容器中导入一些组件,
详细可以查看selectImport()方法的内容:
List<String> configurations=getCandidateConfiguration(Metadata,attributes);获取候选配置
springfactoriesloader.loadfactoryName(),扫描所有jar包类路径下的文件 META-INF/spring-factories
把扫描到的文件的内容整理成包装成Properties的对象,
从Properties中获取到EnableAutoCongfigurations.class类(类名)对应的值加载到容器中
将类路径下META-INF/spring.properties里面配置所有EnableAutoConfiguration的值加载到容器中。
# Auto Configure
org.springframework.boot.autoconfigure.EnableAutoConfiguration=\
org.springframework.boot.autoconfigure.admin.SpringApplicationAdminJmxAutoConfiguration,\
org.springframework.boot.autoconfigure.aop.AopAutoConfiguration,\
org.springframework.boot.autoconfigure.amqp.RabbitAutoConfiguration,\
org.springframework.boot.autoconfigure.batch.BatchAutoConfiguration,\
org.springframework.boot.autoconfigure.cache.CacheAutoConfiguration,\
org.springframework.boot.autoconfigure.cassandra.CassandraAutoConfiguration,\
org.springframework.boot.autoconfigure.cloud.CloudAutoConfiguration,\
org.springframework.boot.autoconfigure.context.ConfigurationPropertiesAutoConfiguration,\
org.springframework.boot.autoconfigure.context.MessageSourceAutoConfiguration,\
org.springframework.boot.autoconfigure.context.PropertyPlaceholderAutoConfiguration,\
org.springframework.boot.autoconfigure.couchbase.CouchbaseAutoConfiguration,\
org.springframework.boot.autoconfigure.dao.PersistenceExceptionTranslationAutoConfiguration,\
org.springframework.boot.autoconfigure.data.cassandra.CassandraDataAutoConfiguration,\
org.springframework.boot.autoconfigure.data.cassandra.CassandraReactiveDataAutoConfiguration,\
org.springframework.boot.autoconfigure.data.cassandra.CassandraReactiveRepositoriesAutoConfiguration,\
org.springframework.boot.autoconfigure.data.cassandra.CassandraRepositoriesAutoConfiguration,\
org.springframework.boot.autoconfigure.data.couchbase.CouchbaseDataAutoConfiguration,\
org.springframework.boot.autoconfigure.data.couchbase.CouchbaseReactiveDataAutoConfiguration,\
org.springframework.boot.autoconfigure.data.couchbase.CouchbaseReactiveRepositoriesAutoConfiguration,\
org.springframework.boot.autoconfigure.data.couchbase.CouchbaseRepositoriesAutoConfiguration,\
org.springframework.boot.autoconfigure.data.elasticsearch.ElasticsearchAutoConfiguration,\
org.springframework.boot.autoconfigure.data.elasticsearch.ElasticsearchDataAutoConfiguration,\
org.springframework.boot.autoconfigure.data.elasticsearch.ElasticsearchRepositoriesAutoConfiguration,\
org.springframework.boot.autoconfigure.data.jpa.JpaRepositoriesAutoConfiguration,\
org.springframework.boot.autoconfigure.data.ldap.LdapDataAutoConfiguration,\
org.springframework.boot.autoconfigure.data.ldap.LdapRepositoriesAutoConfiguration,\
org.springframework.boot.autoconfigure.data.mongo.MongoDataAutoConfiguration,\
org.springframework.boot.autoconfigure.data.mongo.MongoReactiveDataAutoConfiguration,\
org.springframework.boot.autoconfigure.data.mongo.MongoReactiveRepositoriesAutoConfiguration,\
org.springframework.boot.autoconfigure.data.mongo.MongoRepositoriesAutoConfiguration,\
org.springframework.boot.autoconfigure.data.neo4j.Neo4jDataAutoConfiguration,\
org.springframework.boot.autoconfigure.data.neo4j.Neo4jRepositoriesAutoConfiguration,\
org.springframework.boot.autoconfigure.data.solr.SolrRepositoriesAutoConfiguration,\
org.springframework.boot.autoconfigure.data.redis.RedisAutoConfiguration,\
org.springframework.boot.autoconfigure.data.redis.RedisReactiveAutoConfiguration,\
org.springframework.boot.autoconfigure.data.redis.RedisRepositoriesAutoConfiguration,\
org.springframework.boot.autoconfigure.data.rest.RepositoryRestMvcAutoConfiguration,\
org.springframework.boot.autoconfigure.data.web.SpringDataWebAutoConfiguration,\
org.springframework.boot.autoconfigure.elasticsearch.jest.JestAutoConfiguration,\
org.springframework.boot.autoconfigure.flyway.FlywayAutoConfiguration,\
org.springframework.boot.autoconfigure.freemarker.FreeMarkerAutoConfiguration,\
org.springframework.boot.autoconfigure.gson.GsonAutoConfiguration,\
org.springframework.boot.autoconfigure.h2.H2ConsoleAutoConfiguration,\
org.springframework.boot.autoconfigure.hateoas.HypermediaAutoConfiguration,\
org.springframework.boot.autoconfigure.hazelcast.HazelcastAutoConfiguration,\
org.springframework.boot.autoconfigure.hazelcast.HazelcastJpaDependencyAutoConfiguration,\
org.springframework.boot.autoconfigure.http.HttpMessageConvertersAutoConfiguration,\
org.springframework.boot.autoconfigure.http.codec.CodecsAutoConfiguration,\
org.springframework.boot.autoconfigure.influx.InfluxDbAutoConfiguration,\
org.springframework.boot.autoconfigure.info.ProjectInfoAutoConfiguration,\
org.springframework.boot.autoconfigure.integration.IntegrationAutoConfiguration,\
org.springframework.boot.autoconfigure.jackson.JacksonAutoConfiguration,\
org.springframework.boot.autoconfigure.jdbc.DataSourceAutoConfiguration,\
org.springframework.boot.autoconfigure.jdbc.JdbcTemplateAutoConfiguration,\
org.springframework.boot.autoconfigure.jdbc.JndiDataSourceAutoConfiguration,\
org.springframework.boot.autoconfigure.jdbc.XADataSourceAutoConfiguration,\
org.springframework.boot.autoconfigure.jdbc.DataSourceTransactionManagerAutoConfiguration,\
org.springframework.boot.autoconfigure.jms.JmsAutoConfiguration,\
org.springframework.boot.autoconfigure.jmx.JmxAutoConfiguration,\
org.springframework.boot.autoconfigure.jms.JndiConnectionFactoryAutoConfiguration,\
org.springframework.boot.autoconfigure.jms.activemq.ActiveMQAutoConfiguration,\
org.springframework.boot.autoconfigure.jms.artemis.ArtemisAutoConfiguration,\
org.springframework.boot.autoconfigure.groovy.template.GroovyTemplateAutoConfiguration,\
org.springframework.boot.autoconfigure.jersey.JerseyAutoConfiguration,\
org.springframework.boot.autoconfigure.jooq.JooqAutoConfiguration,\
org.springframework.boot.autoconfigure.jsonb.JsonbAutoConfiguration,\
org.springframework.boot.autoconfigure.kafka.KafkaAutoConfiguration,\
org.springframework.boot.autoconfigure.ldap.embedded.EmbeddedLdapAutoConfiguration,\
org.springframework.boot.autoconfigure.ldap.LdapAutoConfiguration,\
org.springframework.boot.autoconfigure.liquibase.LiquibaseAutoConfiguration,\
org.springframework.boot.autoconfigure.mail.MailSenderAutoConfiguration,\
org.springframework.boot.autoconfigure.mail.MailSenderValidatorAutoConfiguration,\
org.springframework.boot.autoconfigure.mongo.embedded.EmbeddedMongoAutoConfiguration,\
org.springframework.boot.autoconfigure.mongo.MongoAutoConfiguration,\
org.springframework.boot.autoconfigure.mongo.MongoReactiveAutoConfiguration,\
org.springframework.boot.autoconfigure.mustache.MustacheAutoConfiguration,\
org.springframework.boot.autoconfigure.orm.jpa.HibernateJpaAutoConfiguration,\
org.springframework.boot.autoconfigure.quartz.QuartzAutoConfiguration,\
org.springframework.boot.autoconfigure.reactor.core.ReactorCoreAutoConfiguration,\
org.springframework.boot.autoconfigure.security.servlet.SecurityAutoConfiguration,\
org.springframework.boot.autoconfigure.security.servlet.UserDetailsServiceAutoConfiguration,\
org.springframework.boot.autoconfigure.security.servlet.SecurityFilterAutoConfiguration,\
org.springframework.boot.autoconfigure.security.reactive.ReactiveSecurityAutoConfiguration,\
org.springframework.boot.autoconfigure.security.reactive.ReactiveUserDetailsServiceAutoConfiguration,\
org.springframework.boot.autoconfigure.sendgrid.SendGridAutoConfiguration,\
org.springframework.boot.autoconfigure.session.SessionAutoConfiguration,\
org.springframework.boot.autoconfigure.security.oauth2.client.OAuth2ClientAutoConfiguration,\
org.springframework.boot.autoconfigure.solr.SolrAutoConfiguration,\
org.springframework.boot.autoconfigure.thymeleaf.ThymeleafAutoConfiguration,\
org.springframework.boot.autoconfigure.transaction.TransactionAutoConfiguration,\
org.springframework.boot.autoconfigure.transaction.jta.JtaAutoConfiguration,\
org.springframework.boot.autoconfigure.validation.ValidationAutoConfiguration,\
org.springframework.boot.autoconfigure.web.client.RestTemplateAutoConfiguration,\
org.springframework.boot.autoconfigure.web.embedded.EmbeddedWebServerFactoryCustomizerAutoConfiguration,\
org.springframework.boot.autoconfigure.web.reactive.HttpHandlerAutoConfiguration,\
org.springframework.boot.autoconfigure.web.reactive.ReactiveWebServerFactoryAutoConfiguration,\
org.springframework.boot.autoconfigure.web.reactive.WebFluxAutoConfiguration,\
org.springframework.boot.autoconfigure.web.reactive.error.ErrorWebFluxAutoConfiguration,\
org.springframework.boot.autoconfigure.web.reactive.function.client.WebClientAutoConfiguration,\
org.springframework.boot.autoconfigure.web.servlet.DispatcherServletAutoConfiguration,\
org.springframework.boot.autoconfigure.web.servlet.ServletWebServerFactoryAutoConfiguration,\
org.springframework.boot.autoconfigure.web.servlet.error.ErrorMvcAutoConfiguration,\
org.springframework.boot.autoconfigure.web.servlet.HttpEncodingAutoConfiguration,\
org.springframework.boot.autoconfigure.web.servlet.MultipartAutoConfiguration,\
org.springframework.boot.autoconfigure.web.servlet.WebMvcAutoConfiguration,\
org.springframework.boot.autoconfigure.websocket.reactive.WebSocketReactiveAutoConfiguration,\
org.springframework.boot.autoconfigure.websocket.servlet.WebSocketServletAutoConfiguration,\
org.springframework.boot.autoconfigure.websocket.servlet.WebSocketMessagingAutoConfiguration,\
org.springframework.boot.autoconfigure.webservices.WebServicesAutoConfiguration
这些是自动配置的源头。每一个这样的XXXAutoConfiguration类都是容器中的一个组件都加入到容器中,用他们来做自动配置。
每个自动配置类进行自动配置
以HttpEcondingAutoConfiguration(http编码自动配置)为例
 */
@Configuration //表示这是一个配置类,与之前编写的配置文件作用一样,也可以给容器添加组件
@EnableConfigurationProperties(HttpEncodingProperties.class)//启用configurationProperties功能,参数的意思是启用指定类的configurationProperties功能。将配置文件对应的值与httpEnableProperties绑定起来,并把HttpEncodingProperties加入到ioc容器中
@ConditionalOnWebApplication(type = ConditionalOnWebApplication.Type.SERVLET)//spring底层@conditional注解,作用是根据不同条件,如果满足指定的条件,整个配置类里面的配置就会生效。判断当前应用是不是web应用,如果是,当前配置类生效
@ConditionalOnClass(CharacterEncodingFilter.class)//判断当前项目有没有这个类,CharacterEncodingFilter,该类是解决springmvc中乱码问题的过滤器。
@ConditionalOnProperty(prefix = "spring.http.encoding", value = "enabled", matchIfMissing = true)//判断配置文件中是否存在某个配置,spring.http.encoding,如果不存在,也是默认ture。
//即使我们配置文件中不配置spring.http.encoding这个类,也是默认自动生效的。
public class HttpEncodingAutoConfiguration {
//已经和springboot的配置文件映射
    private final HttpEncodingProperties properties;
//只有一个有参构造器,参数的值就会从容器中拿
    public HttpEncodingAutoConfiguration(HttpEncodingProperties properties) {
        this.properties = properties;
    }

    @Bean //给容器中添加组件,这个组件的某些值需要从Properties文件获取。
    @ConditionalOnMissingBean
    public CharacterEncodingFilter characterEncodingFilter() {
        CharacterEncodingFilter filter = new OrderedCharacterEncodingFilter();
        filter.setEncoding(this.properties.getCharset().name());
        filter.setForceRequestEncoding(this.properties.shouldForce(Type.REQUEST));
        filter.setForceResponseEncoding(this.properties.shouldForce(Type.RESPONSE));
        return filter;
    }
自动配置类就是根据当前不同的条件判断,决定这个配置是不是生效
所有在配置文件中可以配置的属性都封装在XXXproperties类中,配置文件要配置什么就参考某个功能对应的这个属性类。
 */
@ConfigurationProperties(prefix = "spring.http.encoding")//从配置文件中获取指定的值与bean的属性的值进行绑定
public class HttpEncodingProperties {

    public static final Charset DEFAULT_CHARSET = StandardCharsets.UTF_8;
自动配置类要一定的条件才能生效,具体判断有注解@conditional判断。如何判断哪些配置类生效。但是可以再配置文件中写debug=ture,来让控制台打印哪些配置报告生效了。
server.port=8081 debug=ture运行以后,控制台会打印配置类的使用情况。
springboot日志 框架
1、日志框架作用:
用于记录一些运行时的信息,利用jdbc-数据库驱动的编程思想,写一个统一的接口层:日志门面,(日志的一个抽象层):logging-abstract.jar
给项目中岛日日志的实现就可以。我们之前的日志框架都是抽象层
市面常见的日志框架
JUL、JCL、jboss-logging 、logback、log4j、log4j2、slf4j
| table | Are | cool |
|---|---|---|
| 日志门面(日志的抽象层) | 日志实现 | |
| JCL(jakarata commons logging) SLF4J(simple logging facade for java)jboss-logging | log4j jul(java.util.logging) log4j2 lagback |
左边选择一个门面,右边选择一个实现。常用slf4j做门面,日志实现用log4j或者logback
springboot:底层使用的是spring框架,spring框架默认的是jcl;
springboot选用slf4j和logback。
2、slf4j使用
1)如何在系统使用slf4j
以后在开发的时候,日志记录方法的调用,不该直接调用日志的实现类,而是调用日志抽象层的里面的方法;
给系统导入slf4j的jar和logback的实现jar
import org.slf4j.Logger;
import org.slf4j.LoggerFactory;

public class HelloWorld {
  public static void main(String[] args) {
    Logger logger = LoggerFactory.getLogger(HelloWorld.class);
    logger.info("Hello World");
  }
}
每个日志的实现框架都有自己的配置文件。使用slf4j以后,配置文件还是使用日志实现框架本身的配置文件。
2、遗留问题
a(slf4j+logback)、spring(commons-logging ) hibernate(jboss-loging).我们自己的系统a使用自己定义的框架,但是我们系统使用的框架自己又使用了其他日志框架,
这时候就需要统一日志输出,即使使用别的框架,但是也和系统日志输出
如何将系统中所有的日志都统一到slf4j:
首先将系统中其他日志包排除,接下来用中间包替换原有的日志框架,接下来导入slf4j的实现。
springboot的日志使用
<dependency>
            <groupId>org.springframework.bootgroupId>
            <artifactId>spring-boot-starterartifactId>
        dependency>```
使用该配置做日志
<dependency>
            <groupId>org.springframework.bootgroupId>
            <artifactId>spring-boot-starter-loggingartifactId>
        dependency>
springboot底层使用slf4j+logback,也通过导入其他替换包把其他日志都替换成slf4j。如果我们引入了其他框架,一定要把这个框架默认的日志框架的包移除。标签表示排除
springboot能自动适配所有日志框架,底层使用slf4j+logback的方式记录日志,引入其他框架的时候,只需要把该框架的依赖的日志框架排除就可以。
package com.example.demo;

import org.junit.Test;
import org.junit.runner.RunWith;
import org.slf4j.Logger;
import org.slf4j.LoggerFactory;
import org.springframework.beans.factory.annotation.Autowired;
import org.springframework.boot.test.context.SpringBootTest;
import org.springframework.context.ApplicationContext;
import org.springframework.test.context.junit4.SpringRunner;

import com.example.demo.bean.Person;


/* * springboot的单元测试 * */
@RunWith(SpringRunner.class)
@SpringBootTest
public class DemoApplicationTests {
    //记录器
    Logger log= LoggerFactory.getLogger(getClass());
    @Autowired
    Person person;
    @Autowired
    ApplicationContext ioc;
    @Test
    public void testHelloService() {
        System.out.println(ioc.containsBean("helloService"));
    }
    @Test
    public void contextLoads() {
        //System.out.println(person);
        //日志的级别由低到高
        //可以调整输出日志的级别,日志只会在这个级别以后的高级别生效
        log.trace("这是跟踪轨迹");
        log.debug("运行时调试信息");

        //springboot默认输出的级别是Info以后的,没有指定级别的就用springboot默认规定的级别。就是root级别
        log.info("自己想要输入的内容");
        log.warn("警告");
        log.error("try的时候出错,打印错误");
    }

}
配置文件
server.port=8081
#debug=ture
#表示该包下的日志打印级别是trace
logging.level.com.example.demo=trace
server.port=8081
debug=ture
logging.level.com.example.demo=trace
在项目新建文件springboot.log文件,用于输出日志。当前项目下生成日志
logging.file=springboot.log
在d盘生成日志
logging.file=D:/springboot.log
可以指定完整路径。一般如果使用了logging.file,那么logging.path不起作用
当前磁盘路径下创建spring文件夹存放输出日志,使用spring.log作为默认文件名
logging.path=/spring/log
控制台输入的日志格式
日志输出格式
%d表示日期,
%thread 表示线程名称
%-5level 表示从左显示5个字符宽度 %logger(50) 表示logger名字最长50个字符,否则按照句点分割 %msg日志消息 %n是换行符 logging.pattern.console=%d{yyyy-MM-dd}[%thread] %-5level %logger(50) -%msg%n
日志文件格式
logging.pattern.file=%d{yyyy-MM-dd}[%thread] %-5level %logger(50) -%msg%n
#\u6fc0\u6d3b\u5f00\u53d1\u73af\u5883\u7684\u914d\u7f6e\u6587\u4ef6
#spring.profiles.active=dev

#person.age=${random.int}
#person.boss=true
#person.dog.name=${person.last-name}mimi
#person.last-name=\u5f20\u4e09${random.long}
#person.lists=a,b,c
#person.maps.k1=v1
如何使用自己的日志配置文件
给类路径下放每个日志框架自己的配置文件即可;springboot就不会使用其他默认配置了。
如果使用logback,就在项目中添加文件名称为logback.xml文件或者使用logback-spring.xml文件。如果使用log4j2 就放log4j2-spring.xml或者log4j.xml.推荐使用有spring的扩展名的,这样可以有一些其他功能
| logging system | customization |
|---|---|
| logback | logback.xml\logback-spring.xml |
| log4j2 | log4j2-spring.xml\log4j.xml. |
logback.xml:直接被日志框架识别
logback-spring.xml:日志框架不能直接识别,加载日志配置项由springboot加载。可以使用springboot的某些功能
<springProfile name="staging">
可以指定配置环境生效
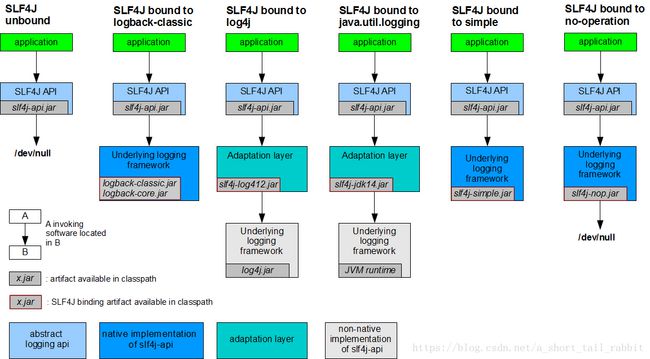
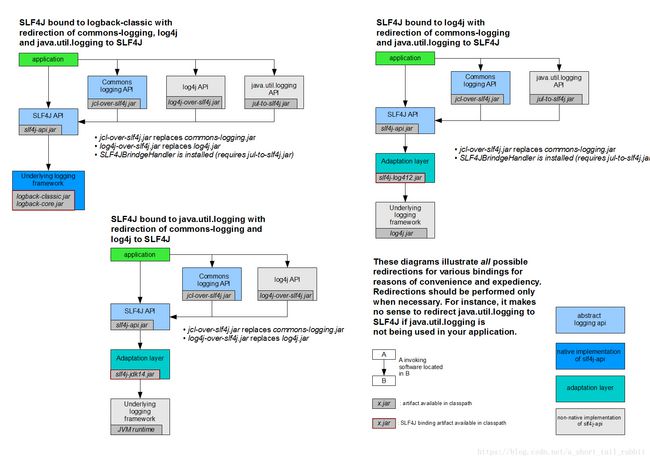
springProfile>切换日志框架
可以按照slf4j 的日志适配图进行相关的切换
        <dependency>
  <groupId>org.springframework.bootgroupId>
  <artifactId>spring-boot-starter-log4j2artifactId>
  <version>2.0.3.RELEASEversion>
  <classifier>sourcesclassifier>
dependency>