Shiro & CAS 实现单点登录
概览
单点登录主要用于多系统集成,即在多个系统中,用户只需要到一个中央服务器登录一次即可访问这些系统中的任何一个,无须多次登录。
本文使用开源框架 Jasig CAS 来完成单点登录。下载地址:https://www.apereo.org/cas/download
部署服务器
本文服务器使用Tomcat7,下载了 cas-server-4.0.0-release.zip ,将其解压,找到modules目录下面的cas-server-webapp-4.0.0.war直接复制到webapps文件夹下即可。启动Tomcat,访问 http://localhost:8080/cas-server-webapp-4.0.0,使用casuser/Mellon登录,即可登录成功。
Tomcat默认没有开启HTTPS协议,所以这里直接用了HTTP协议访问。为了能使客户端在HTTP协议下单点登录成功,需要修改一下配置:
-
WEB-INF\spring-configuration\ticketGrantingTicketCookieGenerator.xml将
p:cookieSecure="true"改为p:cookieSecure="false" -
WEB-INF\spring-configuration\warnCookieGenerator.xml:将
p:cookieSecure="true"改为p:cookieSecure="false" -
WEB-INF\deployerConfigContext.xml:
p:requireSecure="false"
至此,一个简单的单点登录服务器就基本部署好了。
部署客户端
客户端需要添加对 shiro-cas 和cas-client-core这两个包的依赖。这里主要讲跟CAS相关的配置。
之后配置web.xml
< listener >
< listener-class > org.jasig.cas.client.session.SingleSignOutHttpSessionListener
< filter >
< filter-name > CAS Single Sign Out Filter
< filter-class > org.jasig.cas.client.session.SingleSignOutFilter
< filter-mapping >
< filter-name > CAS Single Sign Out Filter
< url-pattern > /*
自定义Realm:
public class MyCasRealm extends CasRealm {
private UserService userService;
public void setUserService (UserService userService) {
this .userService = userService;
}
@Override
protected AuthorizationInfo doGetAuthorizationInfo (PrincipalCollection principals) {
String username = (String)principals.getPrimaryPrincipal();
SimpleAuthorizationInfo authorizationInfo = new SimpleAuthorizationInfo();
authorizationInfo.setRoles(userService.findRoles(username));
authorizationInfo.setStringPermissions(userService.findPermissions(username));
return authorizationInfo;
}
}
配置
< bean id = "casRealm" class = "package.for.your.MyCasRealm" >
< property name = "userService" ref = "userService" />
< property name = "cachingEnabled" value = "true" />
< property name = "authenticationCachingEnabled" value = "true" />
< property name = "authenticationCacheName" value = "authenticationCache" />
< property name = "authorizationCachingEnabled" value = "true" />
< property name = "authorizationCacheName" value = "authorizationCache" />
< property name = "casServerUrlPrefix" value = "${shiro.casServer.url}" />
< property name = "casService" value = "${shiro.client.cas}" />
配置CAS过滤器
/casFailure.jsp = anon
/cas = cas
/logout = logout
/** = user
上面登录url我的配置的是 http://localhost:8080/cas-server/login?service=http://localhost:8080/cas-client/cas ,service参数是之后服务将会跳转的地址。
/cas=cas :即/cas 地址是服务器端回调地址,使用 CasFilter 获取 Ticket 进行登录。
之后通过eclipse部署,访问 http://localhost:8080/cas-client 即可测试。为了看到单点登录的效果,可以直接复制一份webapps中的client为client2,只需要修改上述配置中的地址即可。如果用户已经登录,那么访问 http://localhost:8080/cas-client2发现不会再跳转到登录页面了,用户已经是登录状态了。
还需要注意一个问题,就是cas server默认是开启单点登出的但是这里却没有这样的效果,APP1登出了,但是APP2仍能访问,如果查看浏览器的cookie的话,会发现有两个sessionid,一个是JSESSIONID,容器原生的,另一个是shiro中配置的:
< bean id = "sessionIdCookie" class = "org.apache.shiro.web.servlet.SimpleCookie">
SingleSignOutFilter发现是logoutRequest请求后,原来SingleSignOutHandler中创建的原生的session已经被销毁了,因为从a登出的,a的shiro session也会销毁,
但是b的shiro的session还没有被销毁,于是再访问b还是能访问,单点登出就有问题了-->
< constructor-arg value = "JSESSIONID" />
< property name = "httpOnly" value = "true" />
< property name = "maxAge" value = "-1" />
如果我们把sid改为JSESSIONID会怎么样,答案是如果改为JSESSIONID会导致重定向循环,原因是当登录时,shiro发现浏览器发出的请求中的JSESSIONID没有或已经过期,于是生成一个JSESSIONID给浏览器,同时链接被重定向到服务器进行认证,认证成功后返回到客户端服务器的cas service url,并且带有一个ticket参数。因为有SingleSignOutFilter,当发现这是一个tocken请求时,SingleSignOutHandler会调用request.getSession()获取的是原生Session,如果没有原生session的话,又会创建并将JSESSIONID保存到浏览器cookie中,当客户端服务器向cas服务器验证ticket之后,客户端服务器重定向到之前的页面,这时shiro发现JSESSIONID是SingleSignOutHandler中生成的,在自己维护的session中查不到,又会重新生成新的session,然后login,然后又会重定向到cas服务器认证,然后再重定向到客户端服务器的cas service url,不同的是SingleSignOutHandler中这次调用session.getSession(true)不会新创建一个了,之后就如此循环。如果使用sid又会导致当单点登出时候,如果有a、b两个客户端服务器,从a登出,会跳转到cas服务器登出,cas服务器会对所有通过它认证的service调用销毁session的方法,但是b的shiro的session还没有被销毁,于是再访问b还是能访问,单点登出就有问题了
之所以这样是因为我设置shiro的session管理器为DefaultWebSessionManager,这个管理器直接抛弃了容器的session管理器,自己来维护session,所以就会出现上述描述的问题了。如果我们不做设置,那么shiro将使用默认的session管理器ServletContainerSessionManager:Web 环境,其直接使用 Servlet 容器的会话。这样单点登出就可以正常使用了。
此外如果我们非要使用DefaultWebSessionManager的话,我们就要重写一个SingleSignOutFilter、SingleSignOutHandler和SessionMappingStorage了。
如果没有使用Spring框架,则可以参考如下配置web.xml
< web-app xmlns:xsi = "http://www.w3.org/2001/XMLSchema-instance"
xmlns = "http://java.sun.com/xml/ns/javaee" xmlns:web ="http://java.sun.com/xml/ns/javaee/web-app_2_5.xsd"
xsi:schemaLocation = "http://java.sun.com/xml/ns/javaee http://java.sun.com/xml/ns/javaee/web-app_2_5.xsd"
id = "WebApp_ID" version = "2.5" >
< display-name > YPshop Authority Manage
< context-param >
< param-name > webAppRootKey
< param-value > authority.root
< listener >
< listener-class > org.jasig.cas.client.session.SingleSignOutHttpSessionListener
< filter >
< filter-name > CAS Single Sign Out Filter
< filter-class > org.jasig.cas.client.session.SingleSignOutFilter
< filter-mapping >
< filter-name > CAS Single Sign Out Filter
< url-pattern > /*
< filter >
< filter-name > CAS Authentication Filter
< filter-class > org.jasig.cas.client.authentication.AuthenticationFilter
< init-param >
< param-name > casServerLoginUrl
< param-value > https://localhost:8443/cas-server/login
< init-param >
< param-name > serverName
< param-value > https://localhost:8443
< filter-mapping >
< filter-name > CAS Authentication Filter
< url-pattern > /*
< filter >
< filter-name > CAS Validation Filter
< filter-class >org.jasig.cas.client.validation.Cas20ProxyReceivingTicketValidationFilter
< init-param >
< param-name > casServerUrlPrefix
< param-value > https://localhost:8443/cas-server
< init-param >
< param-name > serverName
< param-value > https://localhost:8443
< filter-mapping >
< filter-name > CAS Validation Filter
< url-pattern > /*
< filter >
< filter-name > CAS Assertion Thread Local Filter
< filter-class > org.jasig.cas.client.util.AssertionThreadLocalFilter
< filter-mapping >
< filter-name > CAS Assertion Thread Local Filter
< url-pattern > /*
< welcome-file-list >
< welcome-file > index.html
< welcome-file > index.jsp
< distributable />
进阶
使用HTTPS协议
首先我们需要生成数字证书
keytool -genkey -keystore "D:\localhost.keystore" -alias localhost -keyalg RSA
输入密钥库口令:
再次输入新口令:
您的名字与姓氏是什么?
[ Unknown ]: localhost
您的组织单位名称是什么?
[Unknown]: xa
您的组织名称是什么?
[Unknown]: xa
您所在的城市或区域名称是什么?
[Unknown]: xi'an
您所在的省/市/自治区名称是什么?
[Unknown]: xi'an
该单位的双字母国家/地区代码是什么?
[Unknown]: cn
CN=localhost, OU=sishuok.com, O=sishuok.com, L=beijing, ST=beijing, C=cn 是否正确
[否]: y
输入
(如果和密钥库口令相同, 按回车):
需要注意的是 “您的名字与姓氏是什么?”这个地方不能随便填的,如果运行过程中提示“Caused by: java.security.cert.CertificateException: No name matching localhost found”那么就是因为这里设置错了,当然除了localhost也可以写其他的,如helloworld.com,但是需要能解析出来,可以直接在hosts中加 127.0.0.1 helloworld.com
然后,由于Tomcat默认没有开HTTPS,所以我们需要在server.xml文件中找到8443出现的地方。然后修改如下
maxThreads= "150" scheme= "https" secure= "true" clientAuth= "false" sslProtocol= "TLS" keystoreFile= "D:\localhost.keystore" keystorePass= "123456" />
keystorePass 就是生成 keystore 时设置的密码。
如果出现下面的问题,修改server.xml中的protocol为org.apache.coyote.http11.Http11Protocol
Failed to initialize end point associated with ProtocolHandler [“http-apr-8443”]java.lang.Exception: Connector attribute SSLCertificateFile must be defined when using SSL with APR
因为 CAS client 需要使用该证书进行验证,所以我们要使用 localhost.keystore 导出数字证书(公钥)到 D:\localhost.cer。再将将证书导入到 JDK 中。
keytool -export -alias localhost -file D: \localhost .cer -keystore D: \localhost .keystore
cd D: \jdk 1.7.0_21 \jre \lib \security
keytool -import -alias localhost -file D: \localhost .cer -noprompt -trustcacerts -storetype jks -keystore cacerts -storepass 123456
如果导入失败,可以先把 security 目录下的 cacerts 删掉
搞定证书之后,我们需要将之前client中配置的地址修改一下。然后还可以添加ssl过滤器。
如果遇到以下异常,一般是证书导入错误造成的,请尝试重新导入,如果还是不行,有可能是运行应用的 JDK 和安装数字证书的 JDK 不是同一个造成的:
Caused by: sun.security.validator.ValidatorException: PKIX path building failed: sun.security.provider.certpath.SunCertPathBuilderException: unable to find valid certification path to requested target
自定义登录页面
- 在cas.properties 修改 cas.viewResolver.basename 值为 custom_view ,那样系统就会自动会查找 custom_view.properties 这个配置文件
- 直接复制原来的 default_views.properties 就行了,重命名为custom_view.properties
- 把 custom_view.properties 中的WEB-INF\view\jsp\default全部替换把这地址替换成 WEB-INF\view\jsp\custom
- 接下来把 cas\WEB-INF\view\jsp\default 下面的所有文件复制,然后重命名为我们需要的名称,cas\WEB-INF\view\jsp\custom
主要修改casLoginView.jsp和cas.css即可
布局时遇到一个问题,就是将页脚固定在页面底部。可以参看 如何将页脚固定在页面底部
其它
【SSO单点系列】(4):CAS4.0 SERVER登录后用户信息的返回
在多点环境下使用cas实现单点登陆及登出
关于单点登录中的用户信息存储问题的探讨原理
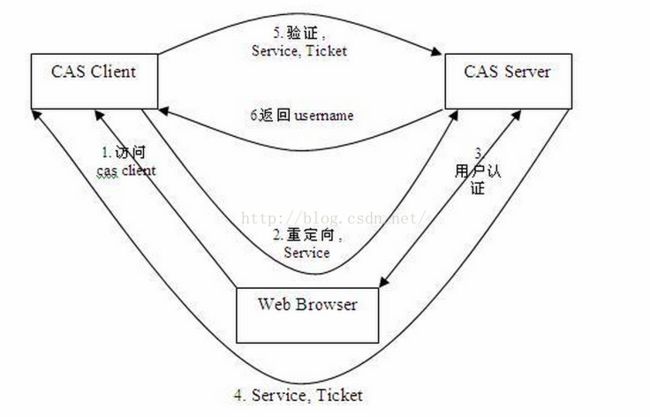
从结构来看,CAS主要分为Server和Client。Server主要负责对用户的认证工作;Client负责处理客户端受保护资源的访问请求,登录时,重定向到Server进行认证。
基础模式的SSO访问流程步骤:
- 访问服务:客户端发送请求访问应用系统提供的服务资源。
- 定向认证:客户端重定向用户请求到中心认证服务器。
- 用户认证:用户进行身份认证
- 发放票据:服务器会产生一个随机的 Service Ticket 。
- 验证票据: SSO 服务器验证票据 Service Ticket 的合法性,验证通过后,允许客户端访问服务。
- 传输用户信息: SSO 服务器验证票据通过后,传输用户认证结果信息给客户端。
CAS最基本的协议过程:
如上图: CAS Client 与受保护的客户端应用部署在一起,以 Filter 方式保护 Web 应用的受保护资源,过滤从客户端过来的每一个 Web 请求,同时, CAS Client 会分析 HTTP 请求中是否包含请求 Service Ticket( ST 上图中的 Ticket) ,如果没有,则说明该用户是没有经过认证的;于是 CAS Client 会重定向用户请求到 CAS Server ( Step 2 ),并传递 Service (要访问的目的资源地址)。 Step 3 是用户认证过程,如果用户提供了正确的 Credentials , CAS Server 随机产生一个相当长度、唯一、不可伪造的 Service Ticket ,并缓存以待将来验证,并且重定向用户到 Service 所在地址(附带刚才产生的 Service Ticket ) , 并为客户端浏览器设置一个 Ticket Granted Cookie ( TGC ) ; CAS Client 在拿到 Service 和新产生的 Ticket 过后,在 Step 5 和 Step6 中与 CAS Server 进行身份核实,以确保 Service Ticket 的合法性。
在该协议中,所有与 CAS Server 的交互均采用 SSL 协议,以确保 ST 和 TGC 的安全性。协议工作过程中会有 2 次重定向 的过程。但是 CAS Client 与 CAS Server 之间进行 Ticket 验证的过程对于用户是透明的(使用 HttpsURLConnection )。
原文出自:http://www.tuicool.com/articles/vieU7nY
