Photo Editing Extension 详解 (附带应用滤镜Demo)
extension是iOS8新开放的一种对几个固定系统区域的扩展机制,它可以在一定程度上弥补iOS的沙盒机制对应用间通信的限制。允许应用帮助系统扩展自定义功能,去实现一个特定作用域的任务,如照片编辑、自定义键盘、通知中心、Action动作、Share分享等。 这对于一向封闭的iOS来说, 无疑是一大福音。
虽然iOS8离现在比较远了, 分享 “Extension “ 相关的文章也很多了, 不过对于“Photo Editing”, 我觉得还是有必要来讲一讲的, 一来多数教程介绍Extension 的时候都是拿Widgets举例, 再有Photo Editing是可自定义内容最丰富的一个, 你完全可以把它当作App里额外的一个界面来完成。
正好前一阵在实习的时候, 实现过相关功能, 总结一番也是极好。
1. 相关概念
1.1 Extension Point
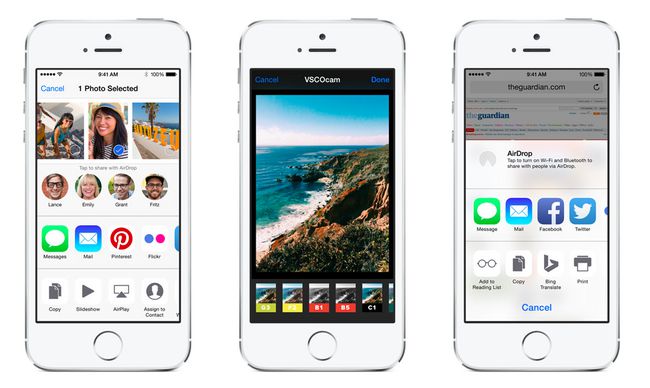
系统中支持Extension 的区域,Extension 的类别也是据此区分的,iOS上共有Today、Share、Action、Photo Editing、Storage Provider、Custom keyboard几种,其中Today中的extension又被称为Widget。
- 今日(Today,又称为Widget):可以快速获取更新或者在通知中心的今日视图中执行一项快速任务。
- 共享(Share):发布到一个共享网站或者与其它应用程序共享内容。
- 动作(Action):在另一个应用程序的上下文中操作或查看内容。
- 照片编辑(Photo Editing)(仅限于iOS):在照片应用程序中编辑照片或视频。
- 查找器(仅限于iOS):在查找器中直接显示文件同步的状态信息。
- 文档提供程序(Storage Provider)(仅限于iOS):提供对文件库的访问和管理。
- 自定义键盘(Custom keyboard)(仅限于iOS):用自定义键盘替代iOS系统键盘,并用于所有的应用程序中。
由于每个扩展点都有与之相关的使用策略和专门的API,开发人员必须为他们想要提供的那种功能选择恰当的扩展点, 每种Extension Point的使用方式和适合干的活都不一样,因此不存在通用的Extension 。
例如,在默认情况下,键盘Extension“不能访问网络,而且不能与其包含应用程序共享同一容器”。通过对Extension进行恰当的配置,这样的限制可以移除,但开发人员仍然需要遵守苹果应用商店审查指南和iOS开发者计划许可协议中的具体的网络键盘指南。
1.2 App Extension
即为本文所说的Extension。Extension并不是一个独立的app,它有一个包含在App Bundle中的独立Bundle,Extension的Bundle后缀名是.appex。其生命周期也和普通App不同,这些后文将会详述。
Extension不能单独存在,必须有一个包含它的Containing App。
另外,Extension需要用户手动激活,不同的Extension激活方式也不同。
比如:
- Today中的widget需要在Today中激活和关闭;
- Custom keyboard需要在设置中进行相关设置;
- Photo Editing需要在使用照片时在照片管理器中激活或关闭;
- Storage Provider可以在选择文件时出现;
- Share和Action可以在任何应用里被激活,但前提是开发者需要设置Activation Rules,以确定extension需要在合适出现。
1.3 Containing App
尽管苹果开放了Extension,但是在iOS中Extension并不能单独存在,要想提交到AppStore,必须将Extension包含在一个app中提交,并且App的实现部分不能为空, 这个包含Extension的App就叫Containing App。
Extension会随着Containing App的安装而安装,同时随着Containing App的卸载而卸载。
1.4 Host App
能够调起Extension的App被称为Host App。
比如:
- widget的Host App就是Today。
- Photo Editing 的 Host App 就是 Photos
2. Extension和Containing App、Host App通信
2.1 Extension和Host App
Extension和Host App之间可以通过extensionContext属性直接通信,该属性是新增加的UIViewController类别:
@interface UIViewController(NSExtensionAdditions) <NSExtensionRequestHandling>

// Returns the extension context. Also acts as a convenience method for a view controller to check if it participating in an extension request.
@property (nonatomic,readonly,retain) NSExtensionContext *extensionContext NS_AVAILABLE_IOS(8_0);

@end
实际上extension和Host App之间是通过IPC(interprocess communication)实现的,只是苹果把调用接口高度抽象了,我们并不需要关注那么底层的东西。
2.2 Containing App和Host App
他们之间没有任何直接关系,也从来不需要通信。
2.3 Extension和Containing App
这二者之间的关系最复杂,纠纠缠缠扯不清关系。
众所周知,每个iOS应用程序都有自己的沙箱。通过Mac苹果应用商店分发的OS X应用程序也有类似的要求,不过许多OS X应用程序是在Mac苹果应用商店之外分发的,并不需要遵守这一沙箱要求。
沙箱是苹果iOS安全策略的基石之一。沙箱是为了限制应用程序对文件、首选项、网络资源、硬件等的访问,具体来讲,其目的是为了限制受损的应用程序可能对系统造成的损害。
考虑到并不是所有可以用在应用程序中的API都可以用在Extension中,所以与通常的应用程序相比,App Extension运行在有更多限制的沙箱中。不能在Extension中使用的API标记为不可用宏,如NS_EXTENSIONS_UNAVAILABLE,它会在链接时导致失败。
此外,对于Extension与其它应用程序之间的通信,苹果有几项强制规定:
- 调用Extension的应用程序即主应用程序不能启动Extension;只有系统可以启动Extension。
- 当Extension启动后,主应用程序就和它直接通信。
- 主应用程序永远不和包含应用程序直接通信。
- Extension不是一个应用程序,但它由系统生成,并有它自己单独的进程。
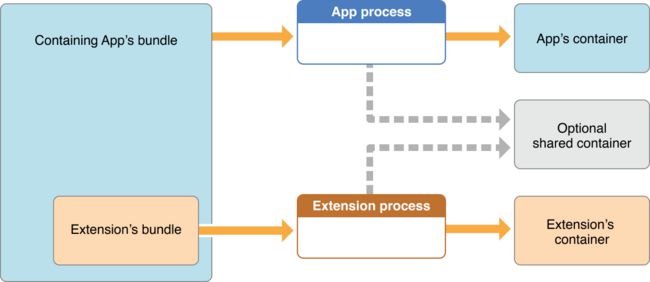
- 为了在包含应用程序和它的Extension之间共享数据,包含应用程序及其Extension都必须是应用程序组的一部分。对于应用程序组的其中两个成员,部分数据可以在两者沙箱之外的第三个容器中共享。
正如Ars Technica的Andrew Cunningham总结的那样,这些规则的最终结果主要是一个应用程序不能进入另一个应用程序的沙箱。这与Android相反,在Android上,内容提供程序和解析程序仍然可以一起工作来为应用程序提供对其它应用程序中数据的访问。
不能直接通信:
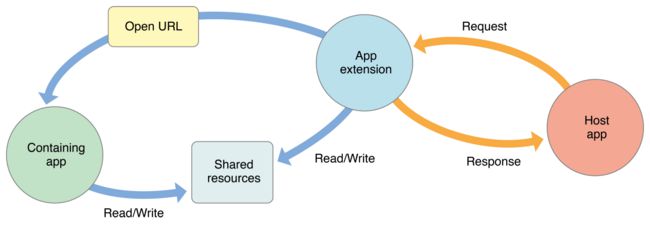
首先,尽管Extension的bundle是放在Containing App的bundle中,但是他们是两个完全独立的进程,之间不能直接通信。不过Extension可以通过openURL的方式启动Containing App(当然也能启动其它App),不过必须通过extensionContext借助host app来实现:
//通过openURL的方式启动Containing APP
- (void)openURLContainingAPP
{
    [self.extensionContext openURL:[NSURL URLWithString:@"appextension://123"]
                 completionHandler:^(BOOL success) {
                     NSLog(@"open url result:%d",success);
                 }];
}
Extension中是无法直接使用openURL的。
可以共享Shared Resources:
Extension和Containing App可以共同读写一个被称为Shared Resources的存储区域,这是通过App Groups实现的,后文将会详述。
三者间的关系可以通过官网给的两张图片形象地说明:
3. 数据共享
App Groups这是iOS8新开放的功能,在OS X上早就可用了。它主要用于同一Group下的App共享同一份读写空间,以实现数据共享。
3.1 功能开启
为了便于后续操作,请先确保你的开发者账号在Xcode上处于登录状态。
3.1.1 在App中开启
App Groups位于:
TARGETS–>AppExtensionDemo–>Capabilities–>App Groups`
找到以后,将App Groups右上角的开关打开,然后选择添加Groups,正规的命名规则应该是:group.com.company.app。
添加成功以后如下图所示:
3.1.2 在Extension中开启
开启方式和App中一样,需要注意的是必须保证这里地App Groups名称和App中的相同。
3.2 extension和containing app数据共享
App Groups给我们提供了同一Group内App可以共同读写的区域,可以通过以下方式实现数据共享:
3.2.1 通过NSUserDefaults共享数据
存数据
通过以下方式向NSUserDefaults中保存数据:
- (void)saveTextByNSUserDefaults
{
    NSUserDefaults *shared = [[NSUserDefaults alloc] initWithSuiteName:@"group.com.xx.test"];
    [shared setObject:_textField.text forKey:@"test"];
    [shared synchronize];
}
需要注意的是:
- 保存数据的时候必须指明group id;
- 而且要注意NSUserDefaults能够处理的数据只能是可plist化的对象,详情见Property List Programming Guide。
- 为了防止出现数据同步问题,不要忘记调用
[shared synchronize];
读数据
对应的读取数据方式:
- (NSString *)readDataFromNSUserDefaults
{
    NSUserDefaults *shared = [[NSUserDefaults alloc] initWithSuiteName:@"group.com.xx.test"];
    NSString *value = [shared valueForKey:@"test"];

    return value;
}
3.2.1 通过NSFileManager共享数据
NSFileManager在iOS7提供了containerURLForSecurityApplicationGroupIdentifier方法,可以用来实现app group共享数据。
存数据
- (BOOL)saveTextByNSFileManager
{
    NSError *err = nil;
    NSURL *containerURL = [[NSFileManager defaultManager] containerURLForSecurityApplicationGroupIdentifier:@"group.com.xx.test"];
    containerURL = [containerURL URLByAppendingPathComponent:@"Library/Caches/good"];

    NSString *value = _textField.text;
    BOOL result = [value writeToURL:containerURL atomically:YES encoding:NSUTF8StringEncoding error:&err];
    if (!result) {
        NSLog(@"%@",err);
    } else {
        NSLog(@"save value:%@ success.",value);
    }

    return result;
}
读数据
- (NSString *)readTextByNSFileManager
{
    NSError *err = nil;
    NSURL *containerURL = [[NSFileManager defaultManager] containerURLForSecurityApplicationGroupIdentifier:@"group.com.xx.test"];
    containerURL = [containerURL URLByAppendingPathComponent:@"Library/Caches/good"];
    NSString *value = [NSString stringWithContentsOfURL:containerURL encoding:NSUTF8StringEncoding error:&err];

    return value;
}
PS:
两个应用共同读取同一份数据,就会引发数据同步问题。WWDC2014的视频中建议使用NSFileCoordination实现普通文件的读写同步,而数据库可以使用CoreData,Sqlite也支持同步。
3.3 动态加载, 资源共享
这个感兴趣的可以看下, 无关紧要~
和数据共享类似,Extension和Containing App很自然地会有一些业务逻辑上可以共用的代码,这时可以通过iOS8中刚开放使用的framework实现。苹果在App Extension Programming Guide中是这样描述的:
In iOS 8.0 and later, you can use an embedded framework to share code between your extension and its containing app. For example, if you develop image-processing code that you want both your Photo Editing extension and its containing app to share, you can put the code into a framework and embed it in both targets.
即将framework分别嵌入到extension和containing app的target中实现代码共享。但这样岂不是需要分别要将framework分别copy到extension和containing app的main bundle中?
参考extension和containing app数据共享,我试想能不能将framework只保存一份放在App Groups区域?
3.3.1 copy framework到App Groups
在app首次启动的时候将framework放到App Groups区域:
- (BOOL)copyFrameworkFromMainBundleToAppGroup
{
    NSFileManager *manager = [NSFileManager defaultManager];
    NSError *err = nil;
    NSURL *containerURL = [[NSFileManager defaultManager] containerURLForSecurityApplicationGroupIdentifier:@"group.com.xx.test"];
    NSString *sorPath = [NSString stringWithFormat:@"%@/Dylib.framework",[[NSBundle mainBundle] bundlePath]];
    NSString *desPath = [NSString stringWithFormat:@"%@/Library/Caches/Dylib.framework",containerURL.path];

    BOOL removeResult = [manager removeItemAtPath:desPath error:&err];
    if (!removeResult) {
        NSLog(@"%@",err);
    } else {
        NSLog(@"remove success.");
    }

    BOOL copyResult = [[NSFileManager defaultManager] copyItemAtPath:sorPath toPath:desPath error:&err];
    if (!copyResult) {
        NSLog(@"%@",err);
    } else {
        NSLog(@"copy success.");
    }

    return copyResult;
}
3.3.2 使用framework
- (BOOL)loadFrameworkInAppGroup
{
    NSError *err = nil;
    NSURL *containerURL = [[NSFileManager defaultManager] containerURLForSecurityApplicationGroupIdentifier:@"group.com.xx.test"];
    NSString *desPath = [NSString stringWithFormat:@"%@/Library/Caches/Dylib.framework",containerURL.path];
    NSBundle *bundle = [NSBundle bundleWithPath:desPath];
    BOOL result = [bundle loadAndReturnError:&err];
    if (result) {
        Class root = NSClassFromString(@"Person");
        if (root) {
            Person *person = [[root alloc] init];
            if (person) {
                [person run];
            }
        }
    } else {
        NSLog(@"%@",err);
    }

    return result;
}
经过测试,竟然能够加载成功。
对比一下, 有如下总结:
主要验证了两种方式:
- 导入公用framework到项目中, 只有containing app 的 Link Binary With Libraries添加对应framework, extension运行时动态加载framework。
- containing app 和 extension的Link Binary With Libraries分别链接公用framework, (Compile Sources 只包含在framework这个target中)
以上两种方式都可以做到公用资源。 区别如下:
方式一需要App Groups, 共享资源。 方式二不需要。
方式一需要containing app先启动把, 把数据copy到App Groups中, entension才能加载到。 方式二不需要。
方式一不能直接初始化类, 比如:
#importFilterImage *filter = [[FilterImage alloc] init]; 将会报错: Undefined symbols for architecture x86_64: "_OBJC_CLASS_$_FilterImage", referenced from: objc-class-ref in PhotoEditingViewController.o ld: symbol(s) not found for architecture x86_64 clang: error: linker command failed with exit code 1 (use -v to see invocation) 需要用这样的方式:
   Class root = NSClassFromString(@"FilterImage");
   if (root) {
       FilterImage *filter = [[root alloc] init];
       NSString *nameLUT = [NSString stringWithFormat:@"%@/TestFrameWork.bundle/images/filter_lut_%d", desPath, 2];

       self.imageView.image = [filter filterImage:self.input.displaySizeImage imageName:nameLUT];
   }
方式二可以直接使用。 (#import “FilterImage.h”)
对比了一下导出包的大小。
写了3个Demo,
- 方式一, 动态加载 12.1M
- 方式二,静态链接 23.7M
- 方式三,只包含framework,没有extension 11.2M
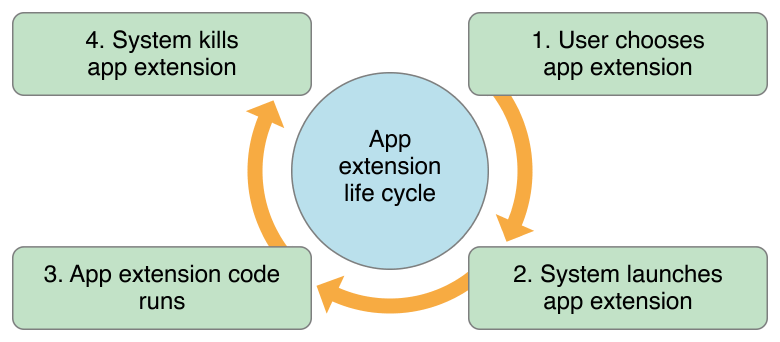
4. 生命周期
下图来自官方文档,它详细描述了Extension App的生命周期 
开始
在用户通过host app点击extension时,系统就会实例化extension应用,这是生命周期的开始。
执行任务
在extension启动以后,开始执行它的使命。
终止
在用户取消任务,或者任务执行结束,或者开启了一个长时后台任务时,系统会将其杀掉。
由此可见,extension就是为了任务而生!
5. Photo Editing使用滤镜实战
这里因为时间关系, 就直接采用 Apple 官方例子, 不再重新写了。如果实践过程中, 有遇到任何问题, 欢迎留言或者其他方式与我交流~
Demo下载地址: Photo Editing Extension Demo
这里有几点需要注意的。
因为Host App是Photos, 所以我们的Extension必须适配横竖屏, 因为它的状态是跟着Host App变的, 而不是Containing App。 至于横竖屏的适配, 建议采用Size Class, 然后监听缩放模式, 来适配屏幕
#pragma mark - UIContentContainer - (void)willTransitionToTraitCollection:(UITraitCollection *)newCollection withTransitionCoordinator:(id)coordinator { [super willTransitionToTraitCollection:newCollection withTransitionCoordinator:coordinator]; [coordinator animateAlongsideTransition:^(id context) { // 横屏处理 } else { // 竖屏处理 } [self.view setNeedsLayout]; } completion:nil]; } 同样, 需要获取初始状态来处理。
   if (self.traitCollection.verticalSizeClass == UIUserInterfaceSizeClassCompact) {
       //To Do: modify something for compact vertical size
   }
   else {
       //To Do: modify something for other vertical size
   }
如果第三方库用Pod来管理的话, 需要修改pod的target, 以及添加链接。
Build Settings — > Other Linker Flags **-l"Pods-MBProgressHUD"**
6. 相关资料
App Extension Programming Guide
App Extensions for iOS 8 in Depth
WWDC2014之App Extensions学习笔记
Sample Photo Editing Extension


