Spring Cloud进阶——实战教程(一)
实战教程
也专研了有一段时间的微服务架构了,试着写了个调用商品服务的实战类项目,不足之处还请多多指教。项目为了直观方便,同时体现出使用了Spring Cloud Config,所以数据访问层通过从git获取值的方式展示,并没有连接到数据库。
本项目的SpringCloud基于如下版本:
Finchley.RELEASE
SpringBoot版本如下:
2.0.3.RELEASE
其中使用了:
SpringCloud的五大神兽:Eureka,Ribbon,Hystrix,Zuul,Spring Cloud Config;
API开发框架:Swagger;
链路追踪工具:Zipkin
构建Eureka-Server服务
和之前所写的项目一样,我们需要导入eureka-server的依赖,但是只导入此依赖,我们在访问浏览器时,无论谁都可以访问到eureka-server的UI,这和我们期待的安全性有很大的差异,所以我们出于安全性考虑,引入security、oauth2作为安全验证。完整依赖如下:
    <dependencies>
        <dependency>
            <groupId>org.springframework.cloudgroupId>
            <artifactId>spring-cloud-starter-netflix-eureka-serverartifactId>
        dependency>
        <dependency>
            <groupId>org.springframework.bootgroupId>
            <artifactId>spring-boot-starter-webartifactId>
        dependency>
        <dependency>
            <groupId>org.springframework.bootgroupId>
            <artifactId>spring-boot-starter-testartifactId>
            <scope>testscope>
        dependency>

        <dependency>
            <groupId>org.springframework.bootgroupId>
            <artifactId>spring-boot-starter-securityartifactId>
        dependency>
        <dependency>
            <groupId>org.springframework.security.oauthgroupId>
            <artifactId>spring-security-oauth2artifactId>
            <version>2.3.3.RELEASEversion>
        dependency>
    dependencies>

    <dependencyManagement>
        <dependencies>
            <dependency>
                <groupId>org.springframework.cloudgroupId>
                <artifactId>spring-cloud-dependenciesartifactId>
                <version>${spring-cloud.version}version>
                <type>pomtype>
                <scope>importscope>
            dependency>
        dependencies>
    dependencyManagement>

    <build>
        <plugins>
            <plugin>
                <groupId>org.springframework.bootgroupId>
                <artifactId>spring-boot-maven-pluginartifactId>
            plugin>
            <plugin>
                <groupId>com.spotifygroupId>
                <artifactId>docker-maven-pluginartifactId>
                <version>0.4.13version>
                <configuration>
                    <imageName>${docker.image.prefix}/${project.artifactId}imageName>
                    <dockerDirectory>src/main/resourcesdockerDirectory>
                    <resources>
                        <resource>
                            <targetPath>/targetPath>
                            <directory>${project.build.directory}directory>
                            <include>${project.build.finalName}.jarinclude>
                        resource>
                    resources>
                configuration>
            plugin>
        plugins>
    build>
project>
在项目的启动类,我们添加上@EnableEurekaServer注解。而后,新建一个类,去定义系统访问时的用户名密码。没有这个类也可以,项目在运行时会在控制台输出随机密码,用户名为user,输入随机密码即可访问。
@EnableWebSecurity
public class WebSecurityConfig extends WebSecurityConfigurerAdapter {
    @Override
    protected void configure(HttpSecurity http) throws Exception {
        http.csrf().disable().authorizeRequests().anyRequest().authenticated().and().httpBasic();
    }
    @Autowired
    public void configureGlobal(AuthenticationManagerBuilder auth) throws Exception {
        auth.inMemoryAuthentication().passwordEncoder(new PasswordEncoder() {
            @Override
            public String encode(CharSequence charSequence) {
                return charSequence.toString();
            }
            @Override
            public boolean matches(CharSequence charSequence, String s) {
                return s.equals(charSequence.toString());
            }
        }).withUser("用户名").password("密码").roles("USER");
    }
}
而后,配置application.properties文件,为了项目的高可用,我们将eureka-server本身进行注册,而后启动两个端口,在service-url处指定另一个服务的访问路径,项目运行,修改port和service-url.defaultZone的端口,就可以实现注册中心的高可用了,完整配置文件如下:
server.port=8889
spring.application.name=eureka-server
eureka.instance.hostname=eureka-server
eureka.client.register-with-eureka=true
eureka.client.fetch-registry=true
eureka.instance.prefer-ip-address=true
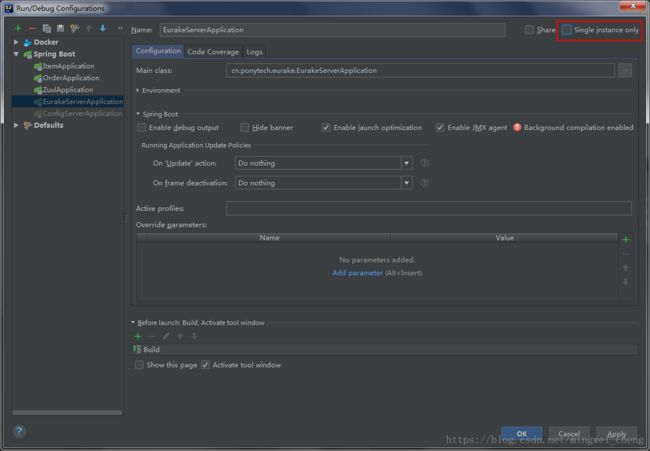
eureka.client.service-url.defaultZone=http://用户名:密码@localhost:8888/eureka/idea中想要同时运行一个项目,我们只需要进行如下的修改,将Single instance only前面的勾勾,取消掉就好了。
我们运行两个eureka-server项目,指定两个的端口号分别为8888和8889。运行后,我们在浏览器访问localhost:8888
。
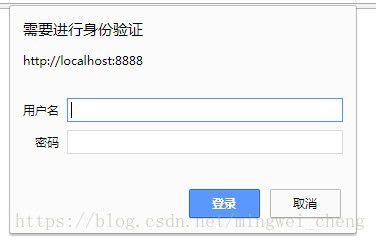
会弹出认证页面,我们只需要输入刚才设定好的用户名密码,就会登录到UI中,在我圈红的地方可以看到,有两个端口的服务注册到了相同的名称下,在访问localhost:8889,出现与访问8888时一样的页面,证明我们的两个服务都相互注册成功了,在后面,我们搭建完service服务,就可以证明eureka-server实现高可用了:

搭建Item-Service服务
作为商品服务的接口,该服务本应该从数据库中读取数据,但是由于本次实战的重点不在于对数据库的链接访问,所以数据的获取我们使用SpringCloud Config框架,从GitHub中获取可刷新的数据。但是真实使用过程中,不推荐这样使用。
我们需要先搭建一个Config-Server项目,来实现我们的分布式配置中心的服务访问,使整个项目与GitHub连接起来。
搭建Config-Server项目
在Pom文件中,我们只需要导入如下依赖即可:
<dependency>
   <groupId>org.springframework.cloudgroupId>
   <artifactId>spring-cloud-config-serverartifactId>
dependency>
<dependency>
   <groupId>org.springframework.cloudgroupId>
   <artifactId>spring-cloud-starter-netflix-eureka-clientartifactId>
dependency>
而后,我们修改properties配置文件,指定好服务的端口号,GitHub的路径地址,在GitHub中查找的路径,再将我们的服务注册到Eureka-Server上。具体配置文件如下:
server.port=9006
spring.application.name=config-server
spring.cloud.config.server.git.uri=https://github.com/mingwei-cheng/SpringCloud.git
spring.cloud.config.server.git.searchPaths=SpringCloud
spring.cloud.config.label=master

eureka.client.service-url.defaultZone=http://用户名:密码@localhost:8888/eureka,http://用户名:密码@localhost:8889/eureka
最后,我们在项目的启动类中,增加两个注解,前者为声明这是个配置中心的服务端、后者为声明这是个注册到注册中心的服务。
@EnableConfigServer
@EnableEurekaClient
这样,我们的分布式配置中心的服务就搭建完成了,接着我们返回到Item-Service中,首先还是添加依赖,我们需要添加Eureka、Hystrix、Zipkin、Config、Swagger2等依赖,具体依赖如下:
<dependencies>
        <dependency>
            <groupId>org.springframework.bootgroupId>
            <artifactId>spring-boot-starter-webartifactId>
        dependency>
        <dependency>
            <groupId>org.springframework.cloudgroupId>
            <artifactId>spring-cloud-starter-netflix-eureka-serverartifactId>
        dependency>
        <dependency>
            <groupId>org.springframework.bootgroupId>
            <artifactId>spring-boot-starter-testartifactId>
            <scope>testscope>
        dependency>
        <dependency>
            <groupId>org.springframework.cloudgroupId>
            <artifactId>spring-cloud-starter-zipkinartifactId>
        dependency>
        <dependency>
            <groupId>org.springframework.cloudgroupId>
            <artifactId>spring-cloud-starter-netflix-hystrixartifactId>
        dependency>
        <dependency>
            <groupId>org.springframework.cloudgroupId>
            <artifactId>spring-cloud-starter-netflix-hystrix-dashboardartifactId>
        dependency>
        <dependency>
            <groupId>org.springframework.cloudgroupId>
            <artifactId>spring-cloud-starter-configartifactId>
        dependency>
        <dependency>
            <groupId>org.springframework.bootgroupId>
            <artifactId>spring-boot-starter-actuatorartifactId>
        dependency>
        <dependency>
            <groupId>org.springframework.bootgroupId>
            <artifactId>spring-boot-starter-aopartifactId>
        dependency>
        <dependency>
            <groupId>io.springfoxgroupId>
            <artifactId>springfox-swagger2artifactId>
            <version>2.7.0version>
        dependency>
        <dependency>
            <groupId>io.springfoxgroupId>
            <artifactId>springfox-swagger-uiartifactId>
            <version>2.7.0version>
        dependency>
        <dependency>
            <groupId>com.alibabagroupId>
            <artifactId>fastjsonartifactId>
            <version>1.2.31version>
        dependency>
    dependencies>
而后,我们将application.properties更名为bootstrap.properties,这是因为消息总线中,对RabbitMQ的配置,写在application中的不识别,需要写到bootstrap中,具体配置如下:
server.port=9001
spring.application.name=item-service

spring.cloud.config.label=master
#此处的item是GitHub中,文件application后的名称
spring.cloud.config.profile=item
spring.cloud.config.discovery.enabled=true
spring.cloud.config.discovery.serviceId=config-server

eureka.client.service-url.defaultZone=http://用户名:密码@localhost:8888/eureka,http://用户名:密码@localhost:8889/eureka
eureka.client.register-with-eureka=true
eureka.client.fetch-registry=true
eureka.instance.ip-address=true

spring.rabbitmq.host=你的rabbitmq IP
spring.rabbitmq.port=5672
spring.rabbitmq.virtual-host=你的rabbitmq虚拟目录路径
spring.rabbitmq.username=你的rabbitmq用户名
spring.rabbitmq.password=你的rabbitmq密码
management.endpoints.web.exposure.include=*

spring.zipkin.base-url=http://localhost:9411
致此,配置基本完成,开始编写代码,首先我们新建三个包,controller、service、pojo,在Controller中提供对外接口地址,并将service层的类自动注入进来,这里我们使用@RestController,@RestController相当于@ResponseBody+@Controller一起使用,在声明对外接口时,我们也没有使用@RequestMapping,而是使用@GetMapping,这个注解,相当于@RequestMapping指定method为get,所以,可以联想与@GetMapping类似的有很多,如@PostMapping、@PutMapping等等,完整Controller类如下:
@RestController
public class ItemController {
    @Autowired
    ItemService itemService;
    @GetMapping("/item/{id}")
    public Item getItemById(@PathVariable("id") Long id){
            return itemService.getItemById(id);
    }
}
实体类中,除了get、set方法以外,再加上带参和不带参的构造方法和toString 的方法。
    Long id;
    String title;
    String pic;
    String desc;
    Long price;
    String port;

    public Item() {

    }

    public Item(Long id, String title, String pic, String desc, Long price) {
        this.id = id;
        this.title = title;
        this.pic = pic;
        this.desc = desc;
        this.price = price;
    @Override
    public String toString() {
        return "Item{" +
                "id=" + id +
                ", title='" + title + '\'' +
                ", pic='" + pic + '\'' +
                ", desc='" + desc + '\'' +
                ", price=" + price +
                ", from port}" + port;
    }
    .
    .
    .
    Get、Set方法省略
接下来,就是从配置中心读取数据了,由于没有dao层,所以我们将数据的获取写在了service中。我们需要先对Spring声明这个类是个Service,然后为了更改GitHub后,能够及时更新,需要使用@RefreshScope注解。我们将数据获取到后,写到Map中,并附上当前服务的端口号,这个端口号的展示,是为了我们后面体现负载均衡等有作用,从GitHub中读取的数据格式为Json格式,然后我们使用阿里巴巴提供的工具类fastjson,将JSON转为POJO。
@Service
@RefreshScope
public class ItemService {
    private static final Map MAP = new HashMap();

    @Value("${server.port}")
    String port;
    @Value("${item1}")
    String item1;
    @Value("${item2}")
    String item2;
    @Value("${item3}")
    String item3;
    @Value("${item4}")
    String item4;

    public Item getItemById(Long id){
        try {
            MAP.put(1L,JSON.toJavaObject(JSON.parseObject(item1),Item.class));
            MAP.put(2L,JSON.toJavaObject(JSON.parseObject(item2),Item.class));
            MAP.put(3L,JSON.toJavaObject(JSON.parseObject(item3),Item.class));
            MAP.put(4L,JSON.toJavaObject(JSON.parseObject(item4),Item.class));
        }catch (Exception ex){
            Logger.logMsg(1,ex.getMessage());
        }
        MAP.get(id).setPort(port);
        return  MAP.get(id);
    }
}
我们最后去GitHub上,新建之前定义好的文件,名称定义为application-item.properties,其中的内容,在读取到程序中时,会产生乱码的现象,这是因为,Spring 默认使用org.springframework.boot.env.PropertiesPropertySourceLoader 来加载配置,底层是通过调用 Properties 的 load 方法,而load方法输入流的编码是 ISO 8859-1,若要使用中文,需要将字符编码改成UTF-8,可以选择实现org.springframework.boot.env.PropertySourceLoader 接口,重写 load 方法,或者,在写入GitHub时,直接将中文转成unicode再写入,我就懒得烦,直接将GitHub文件中的中文,写成了unicode 的格式了。具体如下:
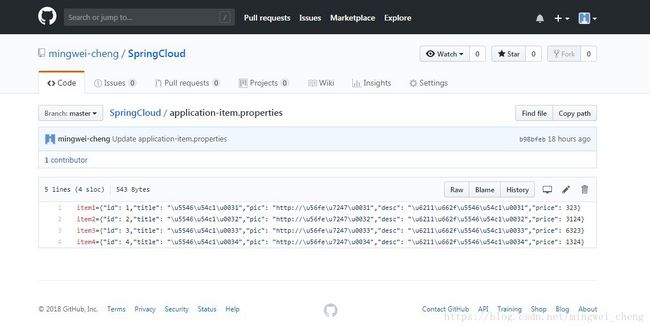
item1={"id": 1,"title": "\u5546\u54c1\u0031","pic": "http://\u56fe\u7247\u0031","desc": "\u6211\u662f\u5546\u54c1\u0031","price": 323}
item2={"id": 2,"title": "\u5546\u54c1\u0032","pic": "http://\u56fe\u7247\u0032","desc": "\u6211\u662f\u5546\u54c1\u0032","price": 3124}
item3={"id": 3,"title": "\u5546\u54c1\u0033","pic": "http://\u56fe\u7247\u0033","desc": "\u6211\u662f\u5546\u54c1\u0033","price": 6323}
item4={"id": 4,"title": "\u5546\u54c1\u0034","pic": "http://\u56fe\u7247\u0034","desc": "\u6211\u662f\u5546\u54c1\u0034","price": 1324}
我们还需要启动Zipkin,使链路追踪功能启用起来。ZipKin的下载,我有传到百度云中,密码: y6nm再使用 java -jar zipkin.jar命令启动它,就可以了。
再启动两个Eureka-Server服务,实现高可用,启动Config-Server服务、Item-Service项目,使他们依次启动。
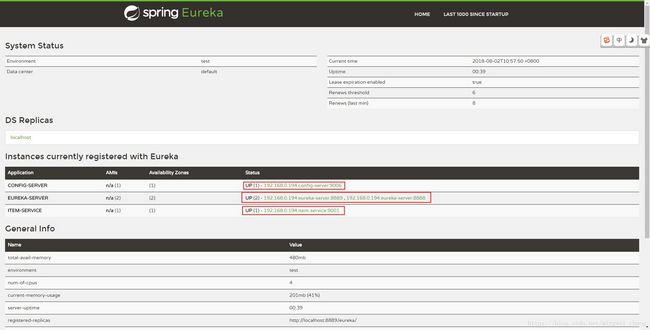
启动成功后,访问http://localhost:8888/,我们可以看到,四个服务都注册到注册中心了。
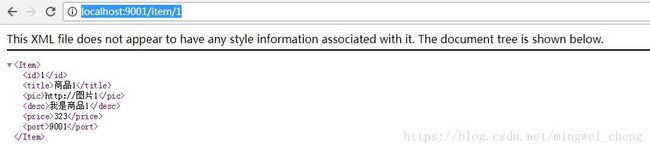
而后,我们访问http://localhost:9001/item/1,查看商品id为1的商品。出现下面的页面,就证明我们从GitHub实现了配置中心文件的读取。
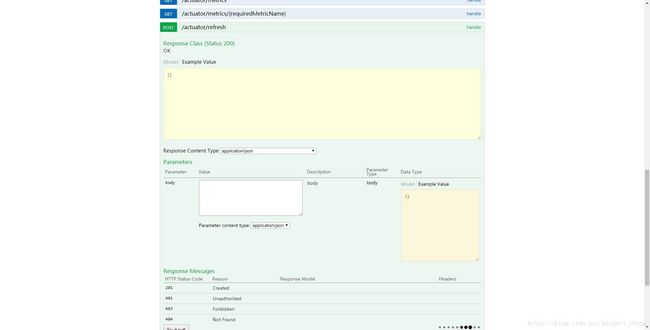
而后,我们访问http://localhost:9001/swagger-ui.html#/ 这个ui界面,显示了本程序提供的所有对外接口,如下图所示,我们项目中指定了Item的请求方法为GET,所以,这里就只显示GET的对外接口,若未指定方法,则会将RESTFul风格的所有方法都会显示出来,在黄色框框中,会显示返回的字段的名称,类型等信息,在我圈红的部位,输入要传的参数,再点击Try it Out,就会执行一次请求,将值返回显示出来。

若要测试GitHub中,修改后,项目中是否修改,只需要执行http://localhost:9001/actuator/refresh,但是此请求要求的方法为POST,所以,需要使用POSTMan等工具,进行POST请求,当然,你也可以在你的Controller中,增加一个方法,去使用post方法请求这个url,或者,再使用swagger工具,找到我下图的请求链接,点击Try it out!,也同样可以实现。
断路器监控的ui界面,只需访问http://localhost:9001/hystrix,具体的填写,在我之前的博客–传送门–中有写,具体可以去那篇文章中查看。
ZipKin的链路追踪,http://localhost:9411/zipkin访问这里可以看到,但是本次访问,并没有什么需要链路追踪的,所以,有兴趣的可以看之前的博客–传送门–。
致此,我们完成Eureka-Server服务、Config-Server服务、Item-Service服务的搭建。
在下一节中,将讲述Order-Service服务及Zuul网关服务的搭建过程,证明服务的高可用、服务的负载均衡等微服务的好处。