Apache
1、Apache的安装
[root@localhost Desktop]# yum install httpd
[root@localhost Desktop]# systemctl start httpd
[root@localhost Desktop]# systemctl enable httpd
ln -s ‘/usr/lib/systemd/system/httpd.service’ ‘/etc/systemd/system/multi-user.target.wants/httpd.service’
[root@localhost Desktop]# firewall-cmd --add-service=http
success
[root@localhost Desktop]# firewall-cmd --reload
success
此时我们可以在浏览器上访问我们的IP看到测试页,说明Apache服务正常开启

[root@localhost Desktop]# yum install httpd-manual -y ##安装服务手册
[root@localhost Desktop]# systemctl restart httpd

2、修改默认发布目录、默认发布文件、端口
Apache的默认发布目录为/var/www/html/,默认发布文件为index.html
[root@localhost Desktop]# cd /var/www/html/
[root@localhost html]# ls
[root@localhost html]# vim index.html


可以看到浏览器访问时显示的就是/var/www/html/index.html内的内容
接下来我们先修改默认发布文件
[root@localhost html]# vim test.html
![]()
[root@localhost html]# vim /etc/httpd/conf/httpd.conf

[root@localhost html]# systemctl restart httpd
测试

修改默认发布目录
[root@localhost html]# mkdir -p /westos/html
[root@localhost html]# cd /westos/html/
[root@localhost html]# vim index.html
![]()
再返回之前的目录/var/www/html/
[root@localhost html]# vim /etc/httpd/conf/httpd.conf

[root@localhost html]# ls -Zd /var/www/html/
drwxr-xr-x. root root system_u:object_r:httpd_sys_content_t:s0 /var/www/html/
[root@localhost html]# ls -Zd /westos/
drwxr-xr-x. root root unconfined_u:object_r:default_t:s0 /westos/
[root@localhost html]# getenforce
Enforcing
[root@localhost html]# semanage fcontext -a -t httpd_sys_content_t '/westos(/.)?’
[root@localhost html]# restorecon -FvvR /westos/
restorecon reset /westos context unconfined_u:object_r:default_t:s0->system_u:object_r:httpd_sys_content_t:s0
restorecon reset /westos/html context unconfined_u:object_r:default_t:s0->system_u:object_r:httpd_sys_content_t:s0
注意权限,还有selinux上下文标签的影响
[root@localhost html]# systemctl restart httpd

修改默认端口
[root@localhost html]# vim /etc/httpd/conf/httpd.conf
![]()
[root@localhost html]# firewall-cmd --permanent --add-port=8080/tcp 设置火墙开启端口
success
[root@localhost html]# firewall-cmd --reload
success
[root@localhost html]# systemctl restart httpd
[root@localhost html]#
[root@localhost html]#
[root@localhost html]# netstat -antlupe | grep httpd
tcp6 0 0 :::8080 ::: LISTEN 0 443414 6420/httpd
[root@localhost html]# firewall-cmd --list-all
public (default, active)
interfaces: eth0
sources:
services: dhcpv6-client ssh
ports: 8080/tcp ###可以看到端口改变
masquerade: no
forward-ports:
icmp-blocks:
rich rules:
3、Apache的虚拟主机
[root@localhost html]# vim /etc/hosts ##设置本地域名解析

[root@localhost html]# vim /etc/httpd/conf/httpd.conf 把默认发布目录、文件和端口都改回来


[root@localhost html]# systemctl restart httpd
这时就能通过域名访问到我们的发布文件,可以看到是一开始的/var/www/html/index.html文件的内容

但我们发现截至到现在现在每个域名内容都是一样的,比如www.westos.com和news.westos.com访问到的内容应该都是hello world,但现实生活中不同的域名应该访问到不同的东西才对,接下来我们就来处理这个问题
先开始配置默认发布文件
[root@localhost html]# cd /etc/httpd/conf.d/
[root@localhost conf.d]# ls
autoindex.conf manual.conf README userdir.conf welcome.conf
[root@localhost conf.d]# vim adefault.conf
[root@localhost conf.d]# cat adefault.conf
DocumentRoot /var/www/html
CustomLog logs/default.log combined

[root@localhost conf.d]# systemctl restart httpd
配置标签页
[root@localhost conf.d]# mkdir -p /var/www/virtual/westos.com/music/html ###建立标签页对应的发布目录
[root@localhost conf.d]# mkdir -p /var/www/virtual/westos.com/news/html
[root@localhost conf.d]# vim /var/www/virtual/westos.com/music/html/index.html ###建立标签页对应的发布文件
![]()
[root@localhost conf.d]# vim /var/www/virtual/westos.com/news/html/index.html
![]()
[root@localhost conf.d]# ls
adefault.conf autoindex.conf manual.conf README userdir.conf welcome.conf
[root@localhost conf.d]# vim music.conf ##子配置文件

[root@localhost conf.d]# systemctl restart httpd
[root@localhost conf.d]# cp music.conf news.conf
[root@localhost conf.d]# vim news.conf

[root@localhost conf.d]# systemctl restart httpd


4、访问黑白名单和访问加密
vim music.conf
Order Allow,Deny 先识别允许的,再识别禁止的
Allow from all 允许所有用户
Deny from 172.25.254.135 禁止172.25.254.235访问
systemctl restart httpd


###172.25.254.135访问被禁止
vim music.conf
Order Deny,Allow 先识别禁止的,再识别允许的 后面覆盖前面
Allow from 172.25.254.30 允许30
Deny from All 禁止所有
systemctl restart httpd

访问加密
cd /var/www/virtual/westos.com/music/html/
mkdir admin
cd admin/
vim index.html ##建立发布文件

cd /etc/httpd/
[root@localhost httpd]# htpasswd -cm userpass admin
[root@localhost httpd]# cat userpass
[root@localhost httpd]# htpasswd -m userpass admin1
[root@localhost httpd]# cat userpass

[root@localhost httpd]# cd conf.d
[root@localhost conf.d]# ls
adefault.conf manual.conf news.conf userdir.conf
autoindex.conf music.conf README welcome.conf
[root@localhost conf.d]# vim music.conf
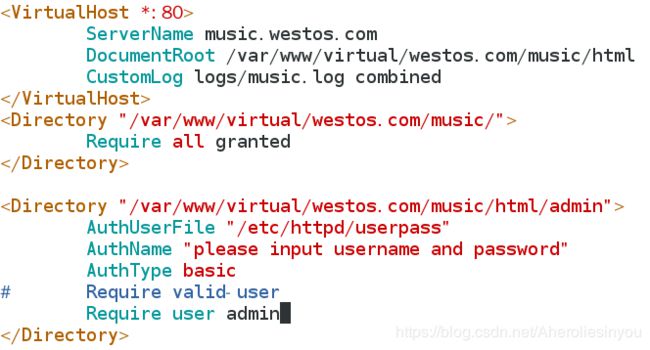
这个时候去访问music.westos.com/admin就需要密码

如果没有提示输入密码,记得清除一下浏览器缓存就好了,进去后就会看到设置的发布页内容

5、Apache识别php、cgi
php:
[root@localhost music]# cd /var/www/html/
[root@localhost html]# ls
index.html
[root@localhost html]# vim index.php
[root@localhost html]# cat index.php

[root@localhost html]# rpm -qa | grep php
可以看到没有安装php服务
[root@localhost html]# cd /etc/httpd/conf.d/
[root@localhost conf.d]# ls
adefault.conf manual.conf news.conf userdir.conf
autoindex.conf music.conf README welcome.conf
[root@localhost conf.d]# yum install php -y

[root@localhost conf.d]# ls
adefault.conf manual.conf news.conf README welcome.conf
autoindex.conf music.conf php.conf userdir.conf
[root@localhost conf.d]# systemctl restart httpd

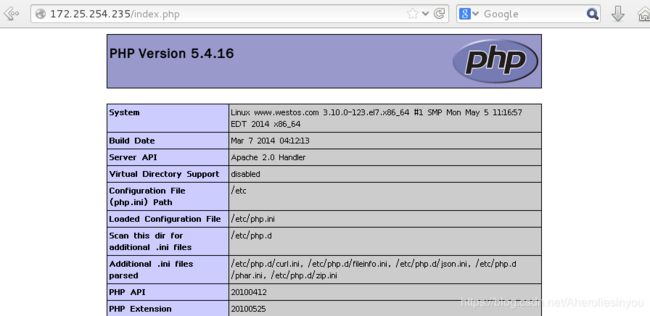
这时就能通过浏览器识别172.25.254.235/index.php
cgi:
[root@localhost conf.d]# cd -
/var/www/html
[root@localhost html]# mkdir cgi
[root@localhost html]# cd cgi/
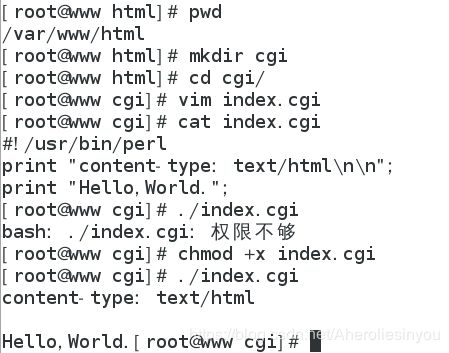
[root@localhost cgi]# vim index.cgi

别忘了加权限chmod +x index.cgi
[root@localhost cgi]# ./index.cgi
[root@localhost cgi]# vim index.cgi
重新编辑,让它执行命令

注意date两边为反向单引号
[root@localhost cgi]# ./index.cgi ##执行脚本

但此时在浏览器上访问该文件,它会把文件内容原封不动地显示出来,并没用识别出来要执行的命令,如下

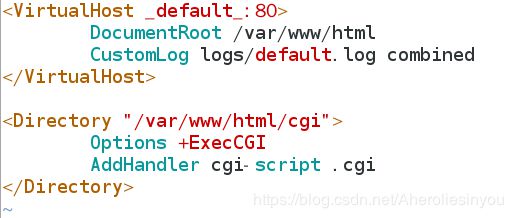
我们需要修改/etc/httpd/conf.d/adefault.conf 配置文件
[root@localhost cgi]# vim /etc/httpd/conf.d/adefault.conf
设置selinux上下文标签
[root@localhost cgi]# semanage fcontext -l | grep^C
[root@localhost cgi]# semanage fcontext -a -t httpd_sys_script_exec_t ‘/var/www/html/cgi(/.*)?’
[root@localhost cgi]# restorecon -RvvF /var/www/html/cgi/
restorecon reset /var/www/html/cgi context unconfined_u:object_r:httpd_sys_content_t:s0->system_u:object_r:httpd_sys_script_exec_t:s0
restorecon reset /var/www/html/cgi/index.cgi context unconfined_u:object_r:httpd_sys_content_t:s0->system_u:object_r:httpd_sys_script_exec_t:s0
[root@localhost cgi]# systemctl restart httpd ##记得重启服务
可以通过浏览器访问172.25.254.235/cgi/index.cgi

6、HTTPS:
[root@localhost cgi]# netstat -antlupe | grep httpd
[root@localhost cgi]# yum install mod_ssl.x86_64

发现只开了一个80端口
[root@localhost cgi]# cd /etc/httpd/conf.d/
[root@localhost conf.d]# ls
adefault.conf manual.conf news.conf README userdir.conf
autoindex.conf music.conf php.conf ssl.conf welcome.conf
[root@localhost conf.d]# systemctl restart httpd
[root@localhost conf.d]# netstat -antlupe | grep httpd
tcp6 0 0 :::443 :: LISTEN 0 1529708 14253/httpd
tcp6 0 0 :::80 :: LISTEN 0 1529694 14253/httpd

开启了80和443端口,原本不能访问https://172.25.254.235现在可以
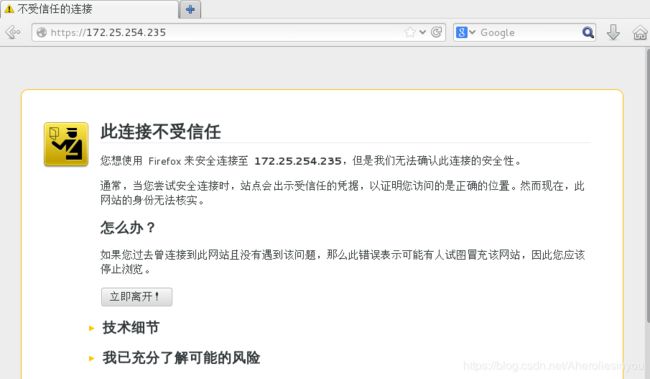
提示连接不受信任,是因为我们的172.25.254.235没有安全证书,接下来给它做一个安全证书
yum install crypto-utils.x86_64 -y
genkey www.westos.com ##生成www.westos.com的证书和密钥
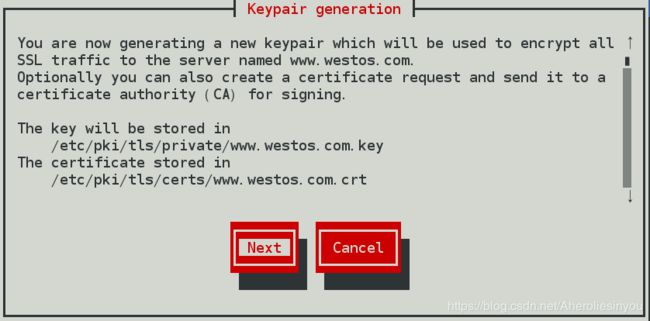
你正在生成一个新的密钥对,该密钥对将用于向名为www.westos.com的服务器加密所有SSL通信,你也可以选择创建证书请求并将其发送到一个证书颁发机构进行签名,钥匙被存储在/etc/~~/www.westos.com.key,证书存储在/etc/~~www.westos.com.dir
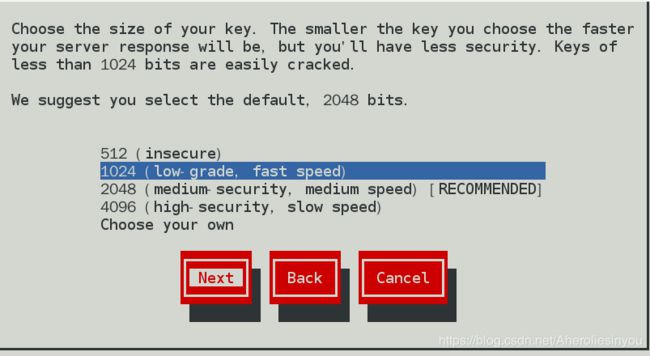
选择钥匙大小,密钥越小,服务器响应就越快,但安全性就降低,小于1024位的密钥很容易被破解
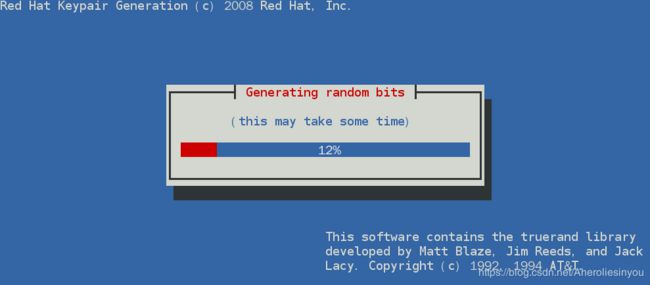

这一步需要你在键盘上随便敲一些按键,来生成2048个随机数

###除了这一步选No,其他都选Yes,这是要向认证机构申请认证,是要花钱的,本次只是实验不需要
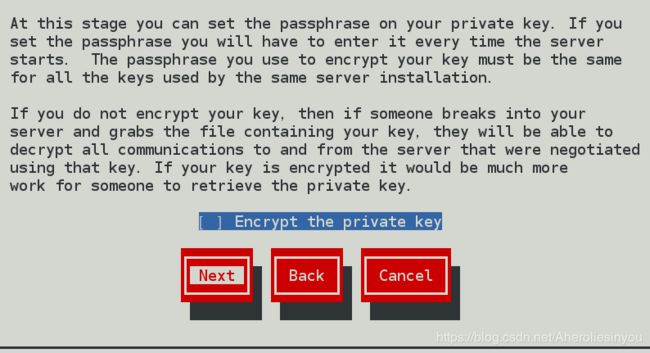

##填写证书信息
整个做完了以后原本的命令行会变成如下的样子
[root@localhost conf.d]# genkey www.westos.com
lfdskjfdlkjs/usr/bin/keyutil -c makecert -g 1024 -s “CN=www.westos.com, OU=linux, O=westos, L=XI’AN, ST=Shanxi, C=CN” -v 1 -a -z /etc/pki/tls/.rand.14885 -o /etc/pki/tls/certs/www.westos.com.crt -k /etc/pki/tls/private/www.westos.com.key
cmdstr: makecert
cmd_CreateNewCert
command: makecert
keysize = 1024 bits
subject = CN=www.westos.com, OU=linux, O=westos, L=XI’AN, ST=Shanxi, C=CN
valid for 1 months
random seed from /etc/pki/tls/.rand.14885
output will be written to /etc/pki/tls/certs/www.westos.com.crt ##证书存放地点
output key written to /etc/pki/tls/private/www.westos.com.key ##钥匙存放地点
Generating key. This may take a few moments…
Made a key
Opened tmprequest for writing
/usr/bin/keyutil Copying the cert pointer
Created a certificate
Wrote 882 bytes of encoded data to /etc/pki/tls/private/www.westos.com.key
Wrote the key to:
/etc/pki/tls/private/www.westos.com.key
[root@localhost conf.d]# vim /etc/httpd/conf.d/ssl.conf 将上面加粗的两个证书和钥匙替换到文件中
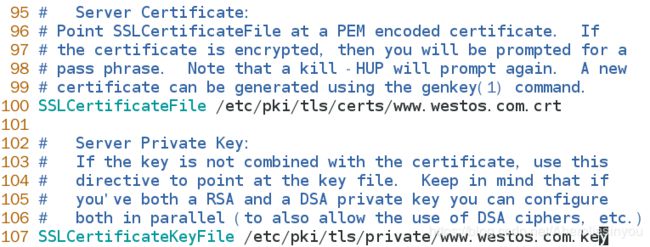
[root@localhost conf.d]# systemctl restart httpd
然后就可以看到证书

点击获取证书后可以直接看到证书,然后点击左下角确认安全例外,再次进入https://www.westos.com/就不会显示不受信任,直接进入
也可以通过以下方法查看证书
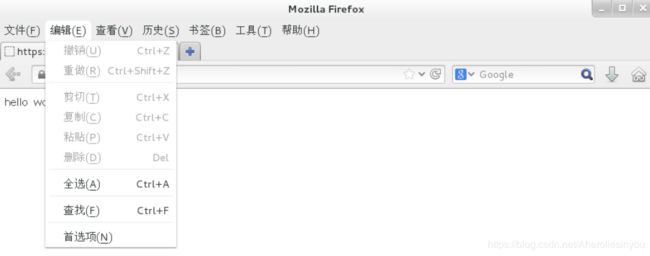
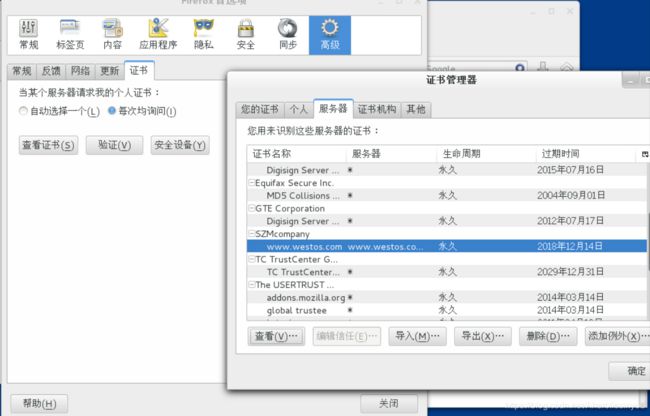
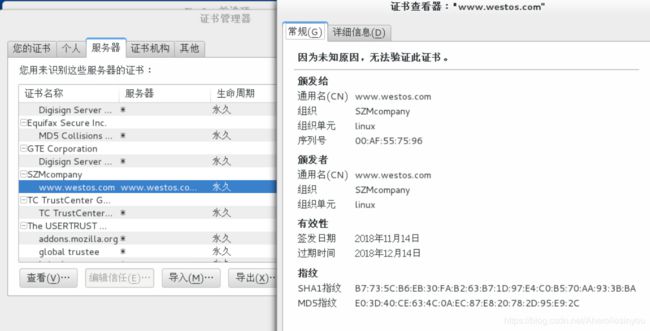
可以看到证书信息就是自己编辑的
7、设定https虚拟主机并设定网页重写
[root@localhost conf.d]# cd /etc/httpd/conf.d/
[root@localhost conf.d]# ls
adefault.conf manual.conf news.conf README tmprequest welcome.conf
autoindex.conf music.conf php.conf ssl.conf userdir.conf
[root@localhost conf.d]# cp news.conf login.conf
[root@localhost conf.d]# vim login.conf

[root@localhost conf.d]# vim /etc/hosts
[root@localhost conf.d]# mkdir -p /var/www/virtual/westos.com/login/html
[root@localhost conf.d]# vim /var/www/virtual/westos.com/login/html/index.html

[root@localhost conf.d]# systemctl restart httpd
现在测试

[root@localhost conf.d]# vim login.conf

[root@localhost conf.d]# systemctl restart httpd
这个时候我们就可以通过hhtps://login.westos.com来访问
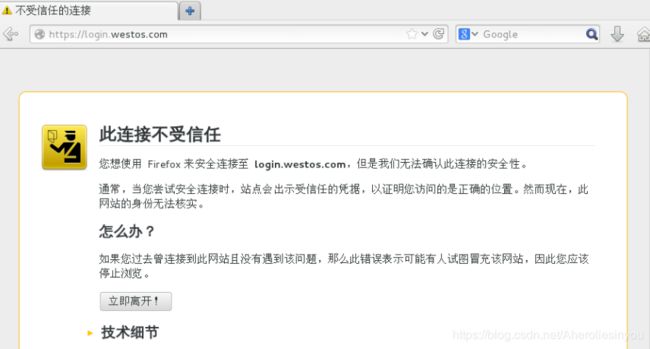
接下来设置自动跳转,也就是访问login.westos.com直接跳转到https://login.westos.com
[root@localhost conf.d]# vim login.conf
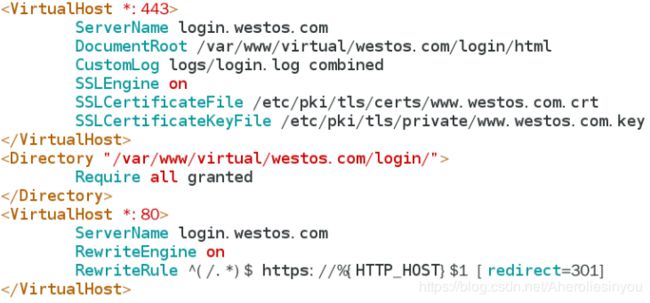
^(/.)$ ##客户在浏览器地址栏输入的所以字符
https:// ##强制客户加密访问
%{HTTP_HOST} ##客户请求主机
$ 1 ##表示^(/.)$ 的值
[redirect=301] ##临时重写 302永久转换
[root@localhost conf.d]# systemctl restart httpd
接下来通过login.westos.com就会直接跳转至https://login.westos.com
8、phpMyadmin
首先需要下载phpMyAdmin的安装包,将它移到/var/www/html/目录下
[root@localhost Desktop]# mv phpMyAdmin-2.11.3-all-languages.tar.bz2 /var/www/html/
[root@localhost Desktop]# cd /var/www/html/
[root@localhost html]# ls
cgi index.html index.php phpMyAdmin-2.11.3-all-languages.tar.bz2
[root@localhost html]# tar jxf phpMyAdmin-2.11.3-all-languages.tar.bz2 ##解压
[root@localhost html]# ls
cgi phpMyAdmin-2.11.3-all-languages
index.html phpMyAdmin-2.11.3-all-languages.tar.bz2
index.php
[root@localhost html]# mv phpMyAdmin-2.11.3-all-languages mysqladmin ##重命名
[root@localhost html]# ls
cgi index.php phpMyAdmin-2.11.3-all-languages.tar.bz2
index.html mysqladmin
[root@localhost html]# cd mysqladmin/
[root@localhost mysqladmin]# ls
browse_foreigners.php license.php server_status.php
calendar.php main.php server_variables.php
ChangeLog navigation.php show_config_errors.php
changelog.php pdf_pages.php sql.php
chk_rel.php pdf_schema.php tbl_addfield.php
config.sample.inc.php phpinfo.php tbl_alter.php
contrib phpmyadmin.css.php tbl_change.php
太多不列出了,重点是加粗显示的这个
[root@localhost mysqladmin]# vim README ###指导文档,告诉你该做什么
[root@localhost mysqladmin]# cp config.sample.inc.php config.inc.php
[root@localhost mysqladmin]# less Documentation.txt
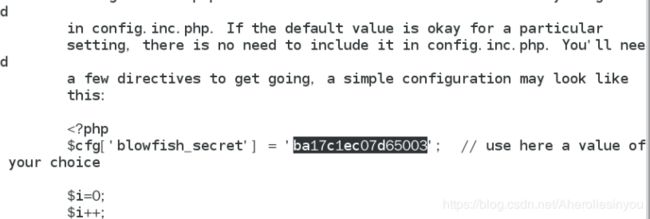
复制这串字符
[root@localhost mysqladmin]# vim config.inc.php

将字符沾贴上去
还要安装一个服务,不然http不支持php
[root@localhost mysqladmin]# yum install php-mysql.x86_64 -y
记得重启
[root@localhost mysqladmin]# systemctl restart httpd

如果在浏览器上仍然不能看到
看是不是SElinux开启之后上下文标签的原因
9、squid正向代理
首先确保真机能访问外网
然后在真机上安装squid服务,并修改配置文件
cd /var/spool/suid
vim /etc/squid/squid.conf
http_access allow all
http_port 3128
cache_dir ufs /var/spool/squid 100 16 256


systemctl restart squid 一定要记得重启服务,还有真机防火墙也要关闭
还需要在浏览器上设置代理,先进入首选项(浏览器左上角编辑–>首选项),选择高级–>网络–>设置配置FireFox如何连接至国际互联网
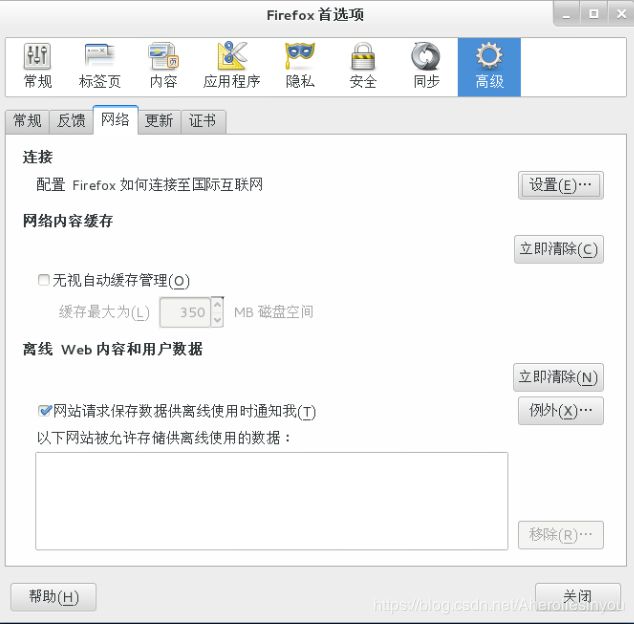
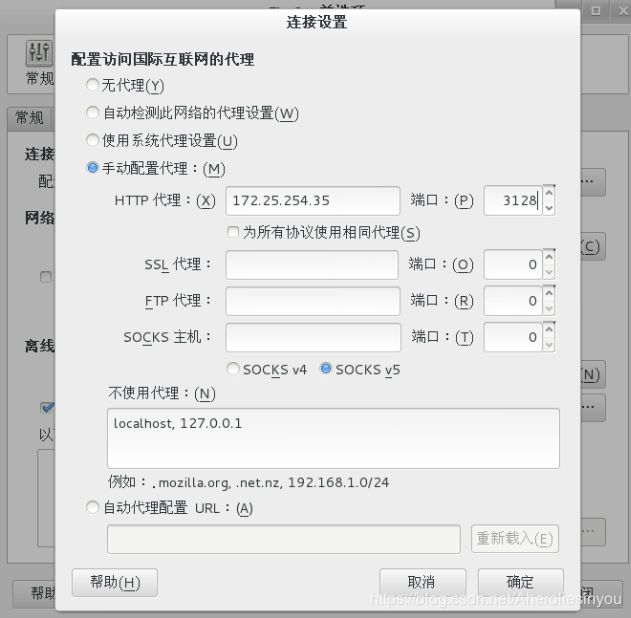
HTTP代理首先要能上网,接下来就可以在虚拟机上访问互联网了。
10、squid反向代理
反向代理方式是指以代理服务器来接受internet上的连接请求,然后将请求转发给内部网络上的服务器,并将从服务器上得到的结果返回给internet上请求连接的客户端,此时代理服务器对外就表现为一个反向代理服务器
vim /var/www/html/index.html
vim /etc/squid/squid.conf

systemctl restart squid
