Spring Cloud(三) :微服务网关(Zuul)
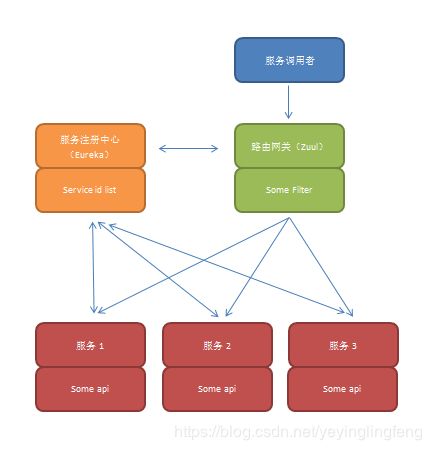
在一个实际业务当中通常都会调用多个服务接口,而每个服务接口的ip/端口or域名都不一样,这样在实际调用中会变得十分繁琐,而且当服务接口ip/端口or域名修改后,业务系统也需要进行相应的修改,大大增加了开发维护成本,所以一般的做法都是在多个服务接口上游再添加一层,我们通常称之为网关。网关能够实现多种功能,比如反向代理,负载均衡,拦截器。在拦截器中我们还可以实现身份验证,反网络爬虫等等功能。
在Spring Cloud中,可以使用Zuul来实现网关层。

服务调用者向Zuul服务发送调用请求,Zuul服务通过各种filter进行身份验证,反爬虫等等操作后,根据配置信息从Eureka服务注册中心获取到调用的服务的实际ip/端口等信息,然后将请求发向服务提供者。
PS:本片内容都基于Spring Boot 2.X
这里继续在上篇中的项目基础上进行扩展。
总体为1个服务注册中心,1个配置中心,3个服务(serviceI,serviceII,serviceIII),1个网关。其中I,II两个服务为不同的服务,剩下的III服务与I服务完全一样,注册用的service id一致,只有端口和提供的服务输出不同(来验证负载均衡)。
整体代码下载:Spring Cloud Zuul服务示例
一.服务注册中心
SpringCloudServiceCenter项目继续维持不变,启动。(端口8761)
二.配置中心
SpringCloudConfig项目也继续维持不变,启动。(端口8091)
同时新建myServiceII-dev.properties和myServiceII-prod.properties(内容和myServiceI对应的相同即可),并向远程git仓库推送。
三.服务I
SpringCloudServiceI项目维持不变
service id 为myServiceI,并添加了路径/myServiceI,端口为8762
四.服务II
新建SpringCloudServiceII项目,配置部分与SpringCloudServiceI大致一样。
service id 为myServiceII,并添加了路径/myServiceII,端口为8763
(1)pom.xml
	4.0.0

	com.my.serviceII
	SpringCloundServiceII
	0.0.1-SNAPSHOT
	jar

	SpringCloundServiceII
	com.my.serviceII


		org.springframework.boot
		spring-boot-starter-parent
		2.1.0.RELEASE


		UTF-8
		UTF-8
		1.8
		Greenwich.M1


			org.springframework.boot
			spring-boot-starter-web


			org.springframework.cloud
			spring-cloud-starter-netflix-eureka-client


			org.springframework.cloud
			spring-cloud-starter-config


        	org.springframework.retry
       		spring-retry


        	org.springframework.boot
        	spring-boot-starter-aop


    		org.springframework.boot
    		spring-boot-starter-actuator


			org.springframework.boot
			spring-boot-starter-test
			test


				org.springframework.cloud
				spring-cloud-dependencies
				${spring-cloud.version}
				pom
				import


				org.springframework.boot
				spring-boot-maven-plugin


			spring-milestones
			Spring Milestones
			https://repo.spring.io/milestone

				false
(2)application.properties配置
server.servlet.context-path=/myServiceII
server.port=8763
#spring.application.name=myServiceII
spring.application.name=myServiceII
eureka.client.service-url.defautZone=http://serviceCenter:8761/eureka/

#retry
#和重试机制相关的配置有如下四个:
# 配置重试次数,默认为6
spring.cloud.config.retry.max-attempts=6
# 间隔乘数,默认1.1
spring.cloud.config.retry.multiplier=1.1
# 初始重试间隔时间,默认1000ms
spring.cloud.config.retry.initial-interval=1000
# 最大间隔时间,默认2000ms
spring.cloud.config.retry.max-interval=2000

#spring 2.X actuator
#http://ip:port/actuator/refresh
management.endpoints.web.exposure.include=refresh,health,info
(3)bootstrap.properties配置
#config
#开启配置服务发现
spring.cloud.config.discovery.enabled=true
#配置服务实例名称
spring.cloud.config.discovery.service-id=myConfigServer
#配置文件所在分支
spring.cloud.config.label=master
spring.cloud.config.profile=dev
#配置服务中心
spring.cloud.config.uri=http://localhost:8091/

#启动失败时能够快速响应
spring.cloud.config.fail-fast=true
(4)添加ServiceApiController.java,其实和serviceI的一样,这里就是用来模拟另一个服务的接口。
package com.my.serviceII.controller;

import org.springframework.beans.factory.annotation.Value;
import org.springframework.stereotype.Controller;
import org.springframework.web.bind.annotation.RequestMapping;
import org.springframework.web.bind.annotation.ResponseBody;

@Controller
@RequestMapping(value="/Api")
public class ServiceApiController {
	@Value("${name}")
	private String name;

	@ResponseBody
	@RequestMapping(value="/getInfo")
	public String getInfo() {
		return "serviceII+"+name;
	}
}
(5)启动项SpringCloundServiceIiApplication.java
package com.my.serviceII;

import org.springframework.boot.SpringApplication;
import org.springframework.boot.autoconfigure.SpringBootApplication;
import org.springframework.cloud.netflix.eureka.EnableEurekaClient;

@SpringBootApplication
@EnableEurekaClient
public class SpringCloundServiceIiApplication {

	public static void main(String[] args) {
		SpringApplication.run(SpringCloundServiceIiApplication.class, args);
	}
}
五.服务III
实际作为服务I的副本,当然直接用服务I改个端口号启动也可以。我这里是又新建了一个服务III(SpringCloudServiceIII)
内容和服务器基本一致,不同的地方在配置中将端口号修改为8764
(1)修改application.properties
server.port=8764
(2)修改获取的配置,改为dev。
修改bootstrap.properties
spring.cloud.config.profile=dev
(3)修改接口内容
ServiceApiController
package com.my.serviceIII.controller;

import org.springframework.beans.factory.annotation.Value;
import org.springframework.cloud.context.config.annotation.RefreshScope;
import org.springframework.stereotype.Controller;
import org.springframework.web.bind.annotation.RequestMapping;
import org.springframework.web.bind.annotation.ResponseBody;

@Controller
@RefreshScope
@RequestMapping(value="/Api")
public class ServiceApiController {
	@Value("${name}")
	private String name;

	@ResponseBody
	@RequestMapping(value="/getInfo")
	public String getInfo() {
		return "serviceIII+"+name;
	}
}
六.路由网关(Zuul)
新建SpringCloudZuul项目。
(1)pom.xml
			org.springframework.cloud
			spring-cloud-starter-netflix-zuul


			org.springframework.cloud
			spring-cloud-starter-netflix-eureka-client


			org.springframework.boot
			spring-boot-starter-test
			test
(2)application.properties配置(重点)
spring.application.name=api-gateway
server.port=5555

#忽略所有请求,不包括zuul.routes指定的路径
#zuul.ignored-services=*
# routes to serviceId 这里边是通过serviceid来绑定地址,当在路径后添加/api-a/   则是访问service-A对应的服务。
# ** 表示多层级,*表示单层级
zuul.routes.api-a.path=/api-a/**
zuul.routes.api-a.serviceId=myServiceI

zuul.routes.api-b.path=/api-b/**
zuul.routes.api-b.serviceId=myServiceII

# routes to url  这里是绑定具体的ip地址
zuul.routes.api-a-url.path=/api-a-url/**
zuul.routes.api-a-url.url=http://localhost:8762/

eureka.client.service-url.defautZone=http://serviceCenter:8761/eureka/
这里配置当访问/api-a/**路径时将会把请求发送到service id为myServiceI的服务,而上面的服务I和服务III的service id都是myServiceI,所以当访问该路径时将会被负载均衡。同时也可以采用zuul.routes.api-a-url.url来配置实际url地址,这里访问/api-a-url/**时将会转发到服务I的接口。
(3)启动项SpringCloundZuulApplication.java
package com.my.zuul;

import org.springframework.boot.SpringApplication;
import org.springframework.boot.autoconfigure.SpringBootApplication;
import org.springframework.cloud.netflix.eureka.EnableEurekaClient;
import org.springframework.cloud.netflix.zuul.EnableZuulProxy;

@SpringBootApplication
@EnableZuulProxy
@EnableEurekaClient
public class SpringCloundZuulApplication {

	public static void main(String[] args) {
		SpringApplication.run(SpringCloundZuulApplication.class, args);
	}
}
七.验证
(1)现在启动3个服务和Zuul网关。
能在注册界面http://localhost:8761/看到如下情形,可以看到service id 为myServiceI的服务有2个,分别为8762(服务I)和8764(服务III)

(2)分别测试下3个服务接口是否能调通。正常情况为如下输出
服务I

服务II

服务III

下面开始使用路由网关访问服务接口,路由网关端口为5555
(3)负载均衡
多次访问http://localhost:5555/api-a/myServiceI/Api/getInfo能看到如下两种输出


证明负载均衡正常运行。
(5)上面是通过service id 映射,这里试试通过url映射的方式访问

OK,能访问到服务I。
八.熔断处理
当路由网关后的微服务宕机或者无响应时,服务调用者却还在不停的调用服务,每个调用的请求都会超时,久而久之Zuul路由网关就会累积大量的请求,这些又会消耗大量的系统资源,最后导致Zuul路由网关挂掉。所以Zuul提供了一套回退机制,能够使得出现这类大量请求堆积时,让系统进行熔断处理,快速返回给调用者一些信息,从而减轻Zuul路由网关负担。
这里有一个坑,大部分介绍Zuul熔断处理的文章都会提到使用的是 Zuulfallbackprovider接口实现的回退,但是由于版本更替,该接口已经过时,现在所以用的是FallbackProvider接口,二者主要区别如下:
http://www.itmuch.com/spring-cloud/edgware-new-zuul-fallback/
Dalston及更低版本通过实现ZuulFallbackProvider 接口,从而实现回退;
Edgware及更高版本通过实现FallbackProvider 接口,从而实现回退。 在Edgware中:
FallbackProvider是ZuulFallbackProvider的子接口。
ZuulFallbackProvider已经被标注Deprecated ,很可能在未来的版本中被删除。
FallbackProvider接口比ZuulFallbackProvider多了一个ClientHttpResponse
fallbackResponse(Throwable cause); 方法,使用该方法,可获得造成回退的原因。
这里在六中SpringCloudZuul基础上进行扩展
(1)添加ServiceFallback.java
在getRoute()方法中填写需要进行回退处理的服务的service id,例如我写的是服务I的service id :myServiceI。如果想要让所有服务都进行回退处理的话就 return "*"
package com.my.zuul.fallback;

import java.io.ByteArrayInputStream;
import java.io.IOException;
import java.io.InputStream;
import java.nio.charset.Charset;

import org.springframework.cloud.netflix.zuul.filters.route.FallbackProvider;
import org.springframework.http.HttpHeaders;
import org.springframework.http.HttpStatus;
import org.springframework.http.MediaType;
import org.springframework.http.client.ClientHttpResponse;
import org.springframework.stereotype.Component;

import com.netflix.hystrix.exception.HystrixTimeoutException;

/**
 *
 * zuulfallbackprovider 已过时
 *
 */
@Component
public class ServiceFallback implements FallbackProvider{

	@Override
	public String getRoute() {
		// TODO Auto-generated method stub
		return "myServiceI";//service id ,如果想要支持所有的就return "*" or return null;
	}

	@Override
	public ClientHttpResponse fallbackResponse(String route, Throwable cause) {
		if (cause instanceof HystrixTimeoutException) {
			return response(HttpStatus.GATEWAY_TIMEOUT);
	    } else {
	      return this.fallbackResponse();
	    }
	}

	public ClientHttpResponse fallbackResponse() {
		return this.response(HttpStatus.INTERNAL_SERVER_ERROR);
	}

	private ClientHttpResponse response(final HttpStatus status) {
		return new ClientHttpResponse() {

			@Override
			public HttpStatus getStatusCode() throws IOException {
				return status;
			}

			@Override
			public int getRawStatusCode() throws IOException {
				return status.value();
			}

			@Override
			public String getStatusText() throws IOException {
				return status.getReasonPhrase();
			}

			@Override
			public void close() {
			}

			@Override
			public InputStream getBody() throws IOException {
				String result = "服务不可用,请稍后再试。"+getStatusCode();
				return new ByteArrayInputStream(result.getBytes());
			}

			@Override
			public HttpHeaders getHeaders() {
				// headers设定
				HttpHeaders headers = new HttpHeaders();
				MediaType mt = new MediaType("application", "json", Charset.forName("UTF-8"));
				headers.setContentType(mt);
				return headers;
			}
	    };
	}
}
然后启动注册中心,配置中心,服务II,网关。
通过网关访问服务I和III http://localhost:5555/api-a/myServiceI/Api/getInfo
然后也可以通过调用getStatusCode()这些方法来返回具体出错的原因。而在ZuulFallbackProvider接口中是不提供具体错误信息返回的,这也是ZuulFallbackProvider过时的原因。然后访问服务II,应该是可以访问的。

九.ZuulFilter过滤器
通常可以使用过滤器来进行身份验证,反爬虫等操作。
身份验证一般来说在服务调用方都会发送一个token过来,然后就可以使用拦截器来效验该token了,比如jwt验证框架。
ZuulFilter使用方式
新建IdentityVerificationFilter.java
package com.my.zuul.filter;

import javax.servlet.http.HttpServletRequest;

import org.springframework.cloud.netflix.zuul.filters.support.FilterConstants;

import com.netflix.zuul.ZuulFilter;
import com.netflix.zuul.context.RequestContext;
import com.netflix.zuul.exception.ZuulException;

@Component
public class IdentityVerificationFilter extends ZuulFilter{

	@Override
	public boolean shouldFilter() {
		// TODO Auto-generated method stub
		return true;
	}

	@Override
	public Object run() throws ZuulException {
		// TODO Auto-generated method stub
		System.out.println("my filter");

		RequestContext ctx = RequestContext.getCurrentContext();
        HttpServletRequest request = ctx.getRequest();

        Object token = request.getParameter("token");

        //校验token
        if (token == null) {
            //"token为空,禁止访问!"
            ctx.setSendZuulResponse(false);
            ctx.setResponseStatusCode(401);
            return null;
        } else {
            //TODO 根据token获取相应的登录信息,进行校验(略)
        }

        return null;
	}

	@Override
	public String filterType() {
		// TODO Auto-generated method stub
		return FilterConstants.PRE_TYPE;
	}

	@Override
	public int filterOrder() {
		// TODO Auto-generated method stub
		return 0;
	}

}
然后启动注册中心,配置中心,服务I,网关。
访问http://localhost:5555/api-a/myServiceI/Api/getInfo
从控制台可以看到输出

网页上访问为401

然后我们使用http://localhost:5555/api-a/myServiceI/Api/getInfo?token=123访问

就能访问了。当然具体的token效验规则还要看你的选型。
还有一种就是后面的微服务使用了spring security中的basic Auth(即:不允许匿名访问,必须提供用户名、密码),也可以在Filter中处理。
可以这样使用,修改run() 方法
	public Object run() {
        RequestContext ctx = RequestContext.getCurrentContext();
         ......
        //添加Basic Auth认证信息
        ctx.addZuulRequestHeader("Authorization", "Basic " + getBase64Credentials("app01", "*****"));

        return null;
    }
整体代码下载:Spring Cloud Zuul服务示例
