python数据可视化seaborn(四)—— 分类数据可视化
之前的文章关注的是两个变量都是数值变量的情况,当有一个变量是分类变量的时候,我们就需要其他类型的图形来展示分析数据。在seaborn中有多种类型的图形且非常易于上手。
import numpy as np
import pandas as pd
import matplotlib.pyplot as plt
import seaborn as sns
%matplotlib inline

sns.set(style="whitegrid",font_scale=1.4,context="paper")
# 设置风格、尺度
import warnings
warnings.filterwarnings('ignore')
# 不发出警告
seaborn中,分类图主要分为三个部分:
- 分类散点图:
- stripplot(默认,kind = “strip”)
- swarmplot(kind = “swarm”)
- 分类分布图:
- boxplot(kind=“box”)
- violinplot(kind=“violin”)
- boxenplot(kind=“boxen”)
- 分类估计图:
- pointplot(kind=“point”)
- barplot(kind=“bar”)
- countplot(kind=“count”)
以上三种系列分别代表了不同粒度级别的数据。当然,在实际使用的过程中,其实没有必要记住这么多,因为seaborn中的分类系列有统一的图形界面catplot(),只需要这一个函数,就能访问所有分类图像类型。
分类散点图
seaborn.stripplot(x=None, y=None, hue=None, data=None, order=None, hue_order=None, jitter=True, dodge=False, orient=None, color=None, palette=None, size=5, edgecolor=‘gray’, linewidth=0, ax=None, **kwargs)
- jitter : 是否抖动,True,false or float
- dodge : 当有hue参数时,是否沿轴分离不同颜色
- orient : 图形方向,垂直(“v”)或者水平(“h”)
# 1、catplot()  默认情况下,kind='strip'
# 按照不同类别对样本数据进行分布散点图绘制

tips = sns.load_dataset("tips")
print(tips.head())
# 加载数据

sns.catplot(x="day",          # x → 设置分组统计字段
            y="total_bill",   # y → 数据分布统计字段
            # 这里xy数据对调,将会使得散点图横向分布
            data=tips,        # data → 对应数据
            jitter = True, height=6,
            #当点数据重合较多时,jitter可以控制点抖动,也可以设置间距如:jitter = 0.1
            s = 6, edgecolor = 'w',linewidth=1,marker = 'o' ,
            # 设置点的大小、描边颜色或宽度、点样式
            )
   total_bill   tip     sex smoker  day    time  size
0       16.99  1.01  Female     No  Sun  Dinner     2
1       10.34  1.66    Male     No  Sun  Dinner     3
2       21.01  3.50    Male     No  Sun  Dinner     3
3       23.68  3.31    Male     No  Sun  Dinner     2
4       24.59  3.61  Female     No  Sun  Dinner     4
# 1、stripplot()
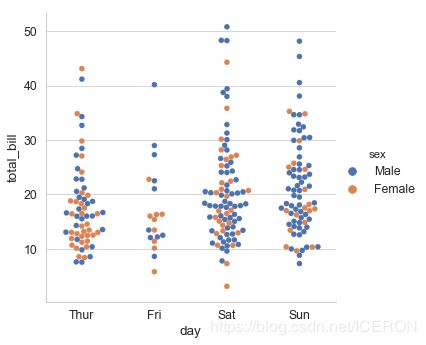
# 通过kind='swarm' 来调整点防止重合

sns.catplot(x="day", y="total_bill",kind='swarm',
              hue='sex',data=tips,height=5,s=5.5)
# 通过让点沿轴分布来防止重合,这只使用与较小数据集
# 1、stripplot()
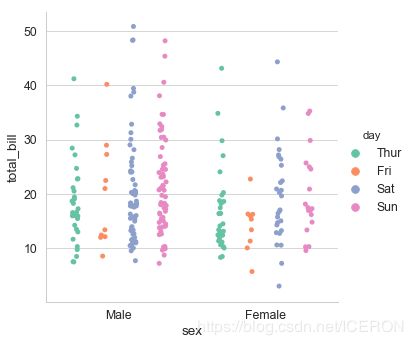
# 设置调色盘

sns.catplot(x="sex", y="total_bill", hue="day",
              data=tips, jitter=True,
              palette="Set2",  # 设置调色盘
              dodge=True,  # 是否拆分
             )
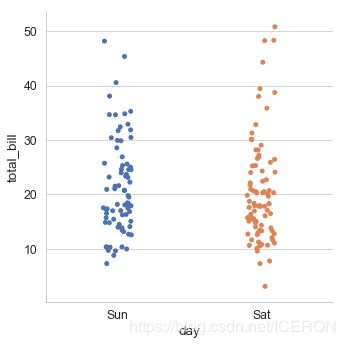
# 排序
print(tips['day'].value_counts())
# 查看day字段的唯一值

sns.catplot(x="day", y="total_bill", data=tips,
              order = ['Sun','Sat'])
# order → 筛选类别,控制排序
Sat     87
Sun     76
Thur    62
Fri     19
Name: day, dtype: int64
分类分布图
箱线图 boxplot()
seaborn.boxplot(x=None, y=None, hue=None, data=None, order=None, hue_order=None, orient=None, color=None, palette=None, saturation=0.75, width=0.8, dodge=True, fliersize=5, linewidth=None, whis=1.5, notch=False, ax=None, **kwargs)
- saturation : float,颜色饱和度
- fliersize : 异常值标记的大小
- whis : float,超出IQR多少比例被视为异常值,默认1.5
- notch : 是否用中位数设置凹槽
# 箱线图 catplot(kind='box')
sns.catplot(x='day', y='total_bill', data=tips,
            kind='box',linewidth=2,  # 线宽
            width=0.6,  # 箱之间的间隔比例
            fliersize=5,   # 异常点大小
            palette='hls',  # 调色板
            whis=1.5,  # 设置IQR
            notch=True,  # 设置是否用中位数做凹槽
            order=['Thur', 'Fri', 'Sat', 'Sun'], #筛选类别
           )
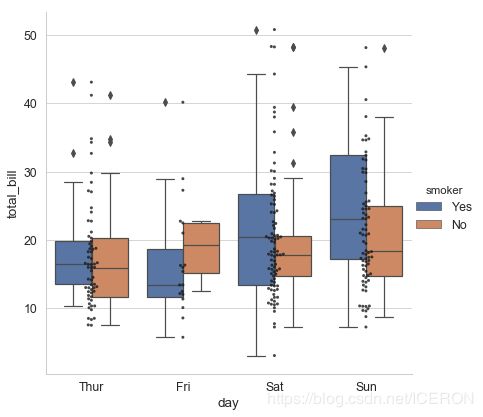
# 通过hue参数再分类
# 多种类型图混合

# 绘制箱型图
sns.catplot(x="day", y="total_bill", data=tips,
            kind='box',hue = 'smoker',height=6)

# 绘制散点图
sns.swarmplot(x="day", y="total_bill", data=tips,
              color ='k',s= 3,alpha = 0.8)
# 添加分类散点图,这里添加散点图要用各自的函数swarmplot()
# 不能再用高级端口catplot() 否则就是两个图了
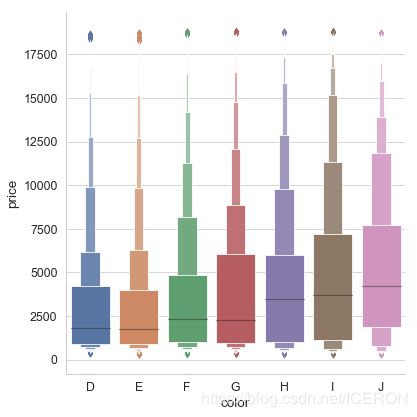
对于数据量较大的数据集,散点图会显的很拥挤,这时我们可以使用boxenplot(),这种图表类似箱线图,既能够展示数据的分布也可以如箱线图展示数据的统计信息
diamonds = sns.load_dataset("diamonds")
print(diamonds.head(3))
sns.catplot(x='color',y='price',kind='boxen',
           data=diamonds.sort_values("color"),
           height=6)
   carat      cut color clarity  depth  table  price     x     y     z
0   0.23    Ideal     E     SI2   61.5   55.0    326  3.95  3.98  2.43
1   0.21  Premium     E     SI1   59.8   61.0    326  3.89  3.84  2.31
2   0.23     Good     E     VS1   56.9   65.0    327  4.05  4.07  2.31
提琴图
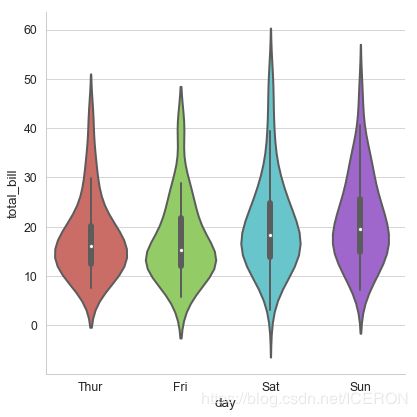
小提琴图将核密度估计和箱线图结合起来
seaborn.violinplot(x=None, y=None, hue=None, data=None, order=None, hue_order=None, bw=‘scott’, cut=2, scale=‘area’, scale_hue=True, gridsize=100, width=0.8, inner=‘box’, split=False, dodge=True, orient=None, linewidth=None, color=None, palette=None, saturation=0.75, ax=None, **kwargs)
- bw : (“scott”,“silverman”,float),核大小的比例因子,实际效果是越大越平滑。
- cut : float,用于将密度扩展到极端数据点之外的距离,设置为0以将小提琴范围限制在观测数据的范围内。
- scale : 小提琴图的宽度:area-面积相同,count-按照样本数量决定宽度,width-宽度一样
- scale_hue : bool,当有hue时,决定实在分组内还是图上所有小提琴计算缩放比例
- gridsize : 和必读估计离散网格中的点数,越高越平滑
- inner : (“box”, “quartile”, “point”, “stick”, None),内部显示样式
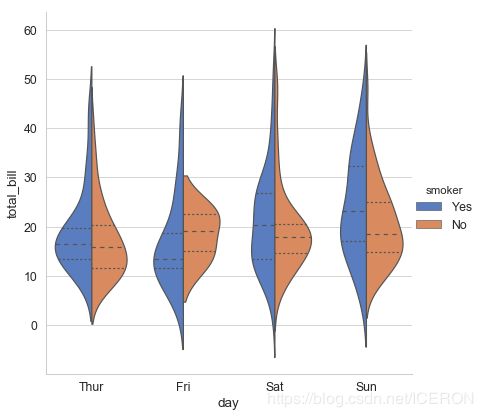
- split : 当有颜色嵌套是,是否分别绘制每侧的小提琴。
# 2、violinplot()
# 小提琴图

sns.catplot(x="day", y="total_bill", data=tips,
            kind='violin',linewidth = 2,   # 线宽
            width = 0.8,     # 箱之间的间隔比例
            height=6,palette = 'hls', # 设置调色板
            order = ['Thur','Fri','Sat','Sun'],  # 筛选类别
            scale = 'area',
            # 测度小提琴图的宽度:
            # area-面积相同,count-按照样本数量决定宽度,width-宽度一样
            gridsize = 30,   # 设置小提琴图边线的平滑度,越高越平滑
            inner = 'box',
            bw = .5    # 控制拟合程度,一般可以不设置
           )
# 2、violinplot()
# 通过hue参数再分类

sns.catplot(x="day", y="total_bill", data=tips,
            kind='violin',hue = 'smoker',
            palette="muted", split=True,  # 设置是否拆分小提琴图
            inner="quartile",height=6)
# 2、violinplot()
# 结合散点图

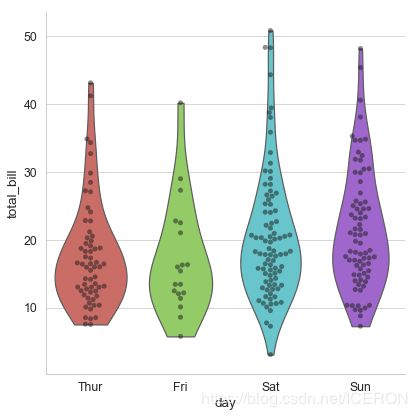
sns.catplot(x="day", y="total_bill", data=tips,
            kind='violin',palette = 'hls',
            inner = None,height=6,
            cut=0  # 设置为0,将图限制在观测数据范围内。
           )

# 插入散点图
sns.swarmplot(x="day", y="total_bill", data=tips,
              color="k", alpha=.5)
统计图
seaborn.barplot(x=None, y=None, hue=None, data=None, order=None, hue_order=None, estimator=
- estimator : 分类箱内使用的统计函数
- ci : (float,“sd”,None)
- units : 变量名称,对变量的每个采样单独绘制,可用于绘制重复数据
- errwidth : 误差线宽度
- capsize : 误差条帽的宽度
# 1、barplot()
# 置信区间:样本均值 + 抽样误差
titanic = sns.load_dataset("titanic")
# print(titanic.head())
# 加载数据

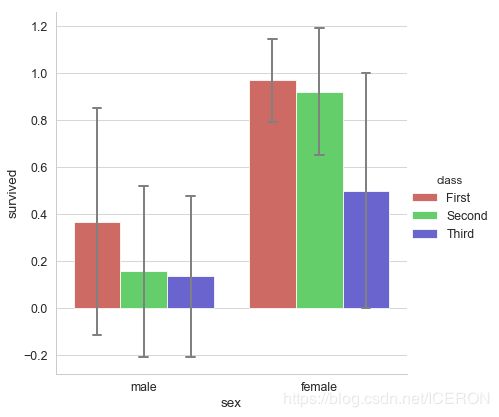
sns.catplot(x="sex", y="survived", data=titanic,
            kind='bar',palette = 'hls', hue="class",
            order = ['male','female'],  # 筛选类别
            capsize = 0.05,  # 误差线横向延伸宽度
            saturation=.8,   # 颜色饱和度
            errcolor = 'gray',errwidth = 2,  # 误差线颜色,宽度
            height=6,ci = 'sd'
            # 置信区间误差 → 0-100内值、'sd'、None
            )
print(titanic.groupby(['sex','class']).mean()['survived'])
print(titanic.groupby(['sex','class']).std()['survived'])
# 计算数据
sex     class
female  First     0.968085
        Second    0.921053
        Third     0.500000
male    First     0.368852
        Second    0.157407
        Third     0.135447
Name: survived, dtype: float64
sex     class
female  First     0.176716
        Second    0.271448
        Third     0.501745
male    First     0.484484
        Second    0.365882
        Third     0.342694
Name: survived, dtype: float64
# 1、barplot()
# 柱状图 - 置信区间估计
# 可以这样子改变风格

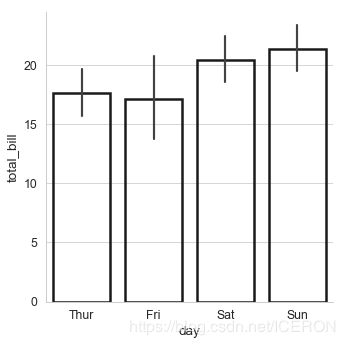
sns.catplot(x="day", y="total_bill", data=tips,
            linewidth=2.5,facecolor=(1,1,1,0),
            kind='bar',edgecolor = 'k',)
# 1、barplot()

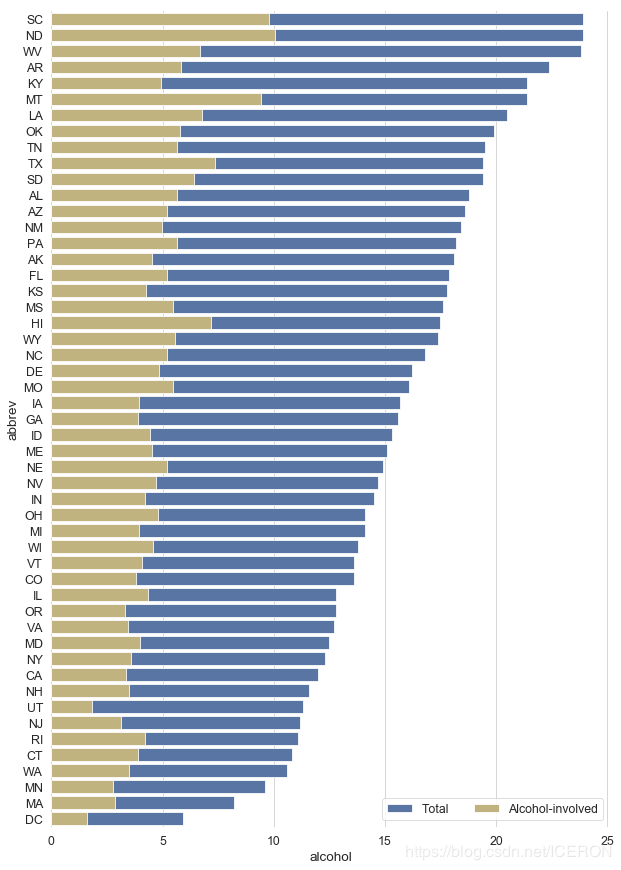
crashes = sns.load_dataset("car_crashes").sort_values("total", ascending=False)
print(crashes.head())
# 加载数据

f, ax = plt.subplots(figsize=(10, 15))
# 创建图表

# sns.set_color_codes("pastel")
sns.barplot(x="total", y="abbrev", data=crashes,
            label="Total", color="b",edgecolor = 'w')
# 设置第一个柱状图

# sns.set_color_codes("muted")
sns.barplot(x="alcohol", y="abbrev", data=crashes,
            label="Alcohol-involved", color="y",edgecolor = 'w')
# 设置第二个柱状图

ax.legend(ncol=2, loc="lower right")
sns.despine(left=True, bottom=True)
    total  speeding  alcohol  not_distracted  no_previous  ins_premium  \
40   23.9     9.082    9.799          22.944       19.359       858.97
34   23.9     5.497   10.038          23.661       20.554       688.75
48   23.8     8.092    6.664          23.086       20.706       992.61
3    22.4     4.032    5.824          21.056       21.280       827.34
17   21.4     4.066    4.922          16.692       16.264       872.51

    ins_losses abbrev
40      116.29     SC
34      109.72     ND
48      152.56     WV
3       142.39     AR
17      137.13     KY
# 2、countplot()
# 计数柱状图

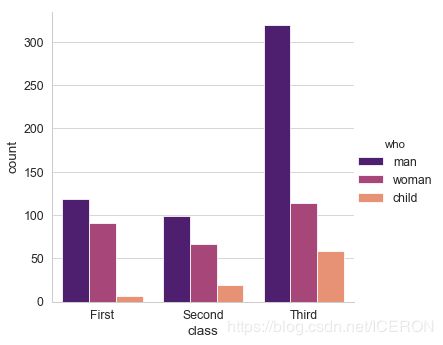
sns.catplot(x="class", hue="who", data=titanic,
              kind='count',palette = 'magma')

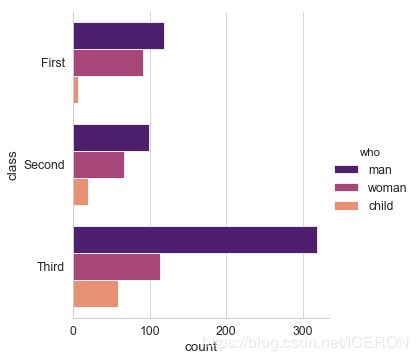
sns.catplot(y="class", hue="who", data=titanic,
            kind='count',palette = 'magma')
# x/y → 以x或者y轴绘图(横向,竖向)
# 用法和barplot相似
# 3、pointplot()

sns.catplot(x="time", y="total_bill", hue = 'smoker',data=tips,
              kind='point',palette = 'hls',height=7,
              dodge = True,   # 设置点是否分开
              join = True,    # 是否连线
              markers=["o", "x"], linestyles=["-", "--"],  # 设置点样式、线型
              )
# 计算数据
# # 用法和barplot相似

